Ethereum
 Hyperliquid
 Solana
 Arbitrum
 BNB Smart Chain
 Base
Base Polygon
 TRON
TRON Sui
Sui Robinhood


Web3 stack – a rookie Web3 developer’s guide
As a rookie developer making your first steps into BUIDLing on Web3, navigating the space can be quite a tough nut to crack. With decentralization being paramount across the landscape, there is a degree of fragmentation that also comes with it.
And it is exactly this fragmentation that turns your humble beginnings into an absolute nightmare, tossing you into the deeps with no map to guide you:
- What node do I need to deploy?
- Which blockchain protocol should I go for?
- How can I scale my blockchain operations?
- What is the best tool for Web3 developers?
These are just some of the tough questions you will be left answering on your own, or at best what you will be sifting through search engine results, Stack Exchange and Stack Overflow posts.
But we have good news for you—you can forget about all the endless digging for the resolution of your queries. Just tag along with us, as we take a closer look into the Web3 stack and do so with accessible language anyone can understand. That being said, let’s dig into the details:
Defining the Web3 stack
In its essence, the Web3 stack is composed of five main layers in the following order from bottom to top:
- Hardware and infrastructure, where nodes and virtual machines are;
- Data, which holds the keys, hashes, and transactions;
- Network, supporting the peer-to-peer (p2p) interaction;
- Consensus, determining how agreement between nodes is reached;
- Presentation and application, housing all BUIDLing tools and decentralized applications (DApps).
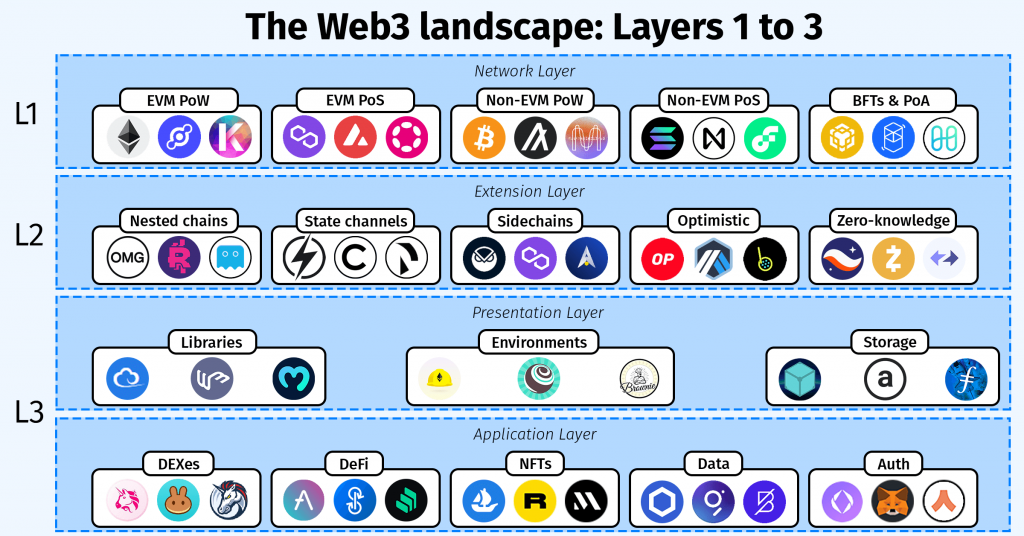
These refer to the architecture itself above anything else and what makes things tough for many is that the same Web3 stack can also be commonly seen arranged in a different set of layers–Layer 0 (L0), which makes blockchain a reality, Layer 1 (L1), also known as the foundation layer, Layer 2 (L2), or supporting technology, and Layer 3 (L3), where DApps live.
And even if we are just in the beginning, these tongue-twister lists of layers can already cause great confusion. That is why to keep things relatively simple and easy to digest, we will be referring to both sets of layers, so you don’t get lost along the way. That being said, let’s do a quick recap with the table below, and wait patiently for a more detailed review of the examples in the segments to come:

Layer 0: Hardware and infrastructure for Web3
This is the layer that makes everything Web3 possible. Here you will find all technical factors, responsible for having blockchain technology available in the first place. These include internet, network adapters, such as WAN, LAN, and Ethernet, nodes, and the various connection protocols like TCP/IP, RPC, WebSocket, and others.
While most other members of this layer are out of the scope of this guide, nodes are not. The nodes in a blockchain network serve the purpose of communicating messages between devices in order to share resources and achieve a common goal. These can be, for example, updating your wallet’s balance, validating the hash of new blocks, and other such operations.
In this category, Node-as-a-Service (NaaS) providers can also be found. They are responsible for running distributed node clients behind the scenes for you, so you don’t have to. These can be very handy, especially considering just how difficult running your own node(s) successfully can be. Want to learn more about nodes, and NaaS providers? Check out our detailed article on the topic here:
Overcoming infrastructure challenges
One of the biggest challenges for BUIDLing on Web3, especially for rookie developers is far from being down in the list. Rather it is at the start of the stack—on L0 and is related to infrastructure above anything else. If you have had the chance to take a closer look at the article mentioned above, you will already have the understanding that running a node, and specifically a set of them can be quite a cumbersome process that can drain the absolute life of you. Just in case, here’s the TL;DR:
- The synchronization process that is a must for every node deployment takes days or weeks.
- To have a healthy node, you will need to perform regular maintenance (also takes ages).
- Issues, such as node desync and timeout happen often and put a stop to everything.
- The more nodes you run, the harder it gets to keep them healthy.
- The more traffic your network serves, the more these issues compound.
That is why, as part of an effective BUIDLing process, it is imperative to shift this enormous responsibility and time-sink to someone whose sole purpose is doing it—NaaS providers. Unless you are ready and willing to invest in a large DevOps team that can administer your setup proactively and a set of powerful servers to support the nodes themselves, there is little point in doing it all yourself. Fortunately for you, starting out with a node provider is a piece of cake. Don’t know how? Check out our quick start guide for the Chainstack platform:
Layer 1: Blockchain data, network, and consensus
Layer 1 is typically what you’d imagine when you hear the word “blockchain.” Here you will find all technology and its application to make the foundational networks like Bitcoin and Ethereum. But there’s more to it than that, as L1 also holds the full range of factors that make these networks possible.
That is why it is not uncommon to see the various hashing algorithms, authentication methods, and Merkle tree implementations in this layer just as well. Examples of hashing algorithms include SHA-256, responsible for Bitcoin’s hashes, and Keccak-256 that is behind the algorithm of Ethereum.

Additionally, you can find consensus mechanisms here as well, such as PoW that powers Bitcoin and the current Ethereum network, PoS securing the upcoming Ethereum 2.0 after the Merge, Polygon, or Tezos, as well as Byzantine-Fault Tolerance variants (BFT), Proof-of-Authority (PoA) propagating the Fantom, Quorum, Multichain, and BNB Smart Chain among others.
EVM vs non-EVM chains
This is the time to ask yourself the big question—what blockchain protocol do I want to build upon? A popular choice among the large majority of developers out there is Ethereum. The reasons? It is one of the oldest protocols, supports smart contracts with no strings attached, and has a significant knowledge base, as well as community. What more could you ask for?
But say you want to go off the beaten path and try something else. What options are there? To put it simply, there are two—Ethereum Virtual Machine (EVM)-compatible chains and non-EVM ones. As the name suggests, Ethereum is an EVM-compatible chain, but so are plenty others, like BNB, Avalanche, Polygon, and Fantom. So even if you want to stick to EVM, you don’t necessarily have to BUIDL on top of Ethereum.
On the other hand, there are also non-EVM-compatible chains, such as Solana, and NEAR. Such protocols aim to break the constraints of EVM chains and do that by means of novel blockchain structures. The benefits here are that such chains are usually shipped with scalability in mind, which makes them perfect for BUIDLing products that tend to generate a high throughput of transaction volume, measured in Transactions Per Second (TPS). Only issue with this, however, is that you will be unable to use your non-EVM assets on an EVM chain. But why not have your cake and eat it too? Turn this into reality with our tutorial on creating a bridge between the two:
Layer 2: Chain extension & scalability
Now, this is where things get tricky. While L1 deals with foundational networks, L2 aims to build on top of that layer to introduce relevant improvements to the overall operation of the chain it is placed upon. This can be anything from offering scalability solutions to extending the basic functionalities of a particular blockchain network.
These L2 technologies can be, for example, nested chains, as is the case with Avalanche’s subnets, state channels, like that of the Bitcoin Lightning Network, sidechains, such as those with Klaytn, as well as rollups, which can be optimistic—those that assume transactions are legitimate by default (e.g., Optimism & Arbitrum) and zero-knowledge (zk) ones, performing computations off-chain, while maintaining absolute privacy (e.g. StarkNet).

As you can see already, the application of L2 solutions can be quite varied, but much of the debate on the topic is focused on scalability. That is so because L1 networks are in general quite inefficient and require a significant portion of resources, whether that be in the form of validation rewards (i.e., transaction fees), or hardware. And for blockchain technology to be able to reach centralized legacy finance systems, like Visa for example, in terms of TPS, much work needs to be done in this avenue.
The blockchain scalability trilemma
Also known as the consistency, availability, and partition tolerance (CAP), the scalability trilemma is a dire question across the Web3 landscape. In layman’s terms, it simply means that no network can be all three at the same time. But while it does claim itself to be an unquestionable truth, there are plenty of L2 solutions, whose primary goal is proving it wrong. That being said, let’s walk through two of the most popular applications of L2 that can make your dev life a real pleasure.
When it comes to expanding functionalities, few can rival a protocol, like Avalanche. This EVM-compatible protocol allows you to essentially deploy your own chain as part of a subnet. Subnets offer absolute flexibility and come at a fraction of the costs involved in creating your own protocol from the ground up. Curious to know more? Check out our tutorial series on Avalanche subnets and get started in no time:
And if you’re more inclined to seek solutions for scalability, look at StarkNet. StarkNet is also an EVM-compatible protocol and supports zk-rollups out-of-the-box. It offers a major improvement to transaction processing, both in terms of resources and speed, by bundling transactions together, as all rollups do. At the same time, however, it does so with complete anonymity, thanks to its zk implementation. Want to dig further into StarkNet? Try our introductory guide:

Layer 3: Web3 applications & presentation
The last layer on our list is where all the latest cool implementations can be found—smart contracts, dApps, and NFTs. And while application is pretty straightforward, the term presentation is not so much. However, in reality, it only refers to the supporting tools a Web3 developer can use to BUIDL, like libraries, environments, and means of storage. To put it simply, all projects that facilitate the interaction with a blockchain protocol in improving accessibility can be effectively deemed L3 solutions.

That is why, DEXs, such as Uniswap, PancakeSwap, and OpenSea are essentially part of the application L3. But so are creditors and yield aggregators, as is the case of Compound, Bancor, and Yearn. And let’s not forget about oracles, like Chainlink, that make interaction with real-world data possible, as well as the Ethereum Name Service (ENS), which is a decentralized version of the classic Domain Name Service (DNS).
Wallet providers, like everyone’s favourite—MetaMask are too part of the application layer. That is so because MetaMask facilitates the interaction between user and protocol with the help of its UI. And when you look deeper into it, it becomes apparent—your wallet balance is nothing more than a recorded state, while transactions are basically changes in that state. Curious to learn more about the subject? Explore further with our article on MetaMask transactions here:
But changes in state are far from being the only purpose of your MetaMask wallet. Would you be surprised to realize that it also serves as a means of authentication, allowing you to connect securely to various DApps, just as well? To do that, MetaMask takes the responsibility of a cryptographic account manager, while overseeing the creation and management of your account’s keys. So, don’t wait up and dive straight into the magic of MetaMask with an in-depth look under the hood:

And to top it all off, as part of L3, you can find priceless tools to support your blockchain development operations too. Such is the case of file storage protocols, like the Interplanetary File System (IPFS), and Arweave. More so, popular libraries, as are Ethers.js and Web3.js, make their way here just as well, in addition to development environments, like Hardhat, Truffle, Foundry, and Brownie to make the list complete.

Which Web3 library should I use?
And speaking about libraries and environments, here comes the burning question—which one should I use? Let’s start with the libraries, which serve as your go-to method for creating Web3 interactions. On one hand, there is Ethers.js—a lightweight and accessible implementation that also comes with extensive documentation. Ethers.js is the weapon of choice for plenty of rookie and seasoned BUIDLers alike and also serves as the default library for Hardhat projects. The only downside of Ethers.js is the handful of developers actively maintaining it.
On the other hand, Web3.js is the more actively developed and used option of the two. And while it is quite popular among those looking to spin their own version of it, it does lack in the completeness of its documentation. This makes it the more difficult alternative to pick up, as a starting developer. But even so, if you are not afraid to try it out, it might just be right for you.
What is the best Web3 dev environment?
With libraries, out of the way, let’s take a closer look at development environments. When it comes to such for Web3, your choice is basically one of four—Hardhat, Truffle, Brownie, and Foundry. Both Hardhat and Truffle are JavaScript-based, so if that is your programming language of choice, then you can skip on Brownie, as it is for Python developers. But what is the difference between the two?
Hardhat
Hardhat is a comprehensive development environment that sports the full set of functions you’d normally be looking for your Web3 needs. It allows you to compile, deploy, debug, and test all Ethereum-based codebases. The key benefit of Hardhat is that it offers flexibility when it comes to plugins and add-ons that can truly supercharge your entire development process. It also ships with an extensive knowledge base that will truly be a lifesaver while debugging and troubleshooting errors.
Foundry
Meet the new kid on the dev environment block—Foundry. It is an exceptionally fast, portable, and modular take on the subject that focuses on the Rust language instead. Much like Truffle, Foundry is also an entire suite of Web3 developer tools, rather than a single solution. Within it, Forge claims responsibility for the testing framework, Cast serves as the primary means of interacting with the EVM, while Anvil enables local node deployment. Want a more detailed comparison between Foundry and Hardhat? Explore further in our dedicated article below:
Truffle
As mentioned already, Truffle is not one tool, but rather a complementing set of three—Truffle, Ganache, and Drizzle. The suite allows you to perform compilations, deployment, and testing of EVM-compatible code. At the same time, it offers the means to build the frontend of dApps, just as well. When it comes to each individual module, Truffle serves as the primary environment, deployment pipeline, and framework for testing. Then there is Ganache, which helps you deploy a local chain swiftly, while Drizzle is the collection of libraries that enable the BUIDLing of frontend interfaces.
Brownie
Last on our list is Brownie—the perfect solution for Python-lovers that want to work with Web3. It comes with an extensive set of dev tools, mostly based on the Web3.py library, and can be used for the deployment, compilation, and testing of dApps. Brownie relies on pytest to provide a powerful debugging framework, which includes property-based, and stateful testing, as well as the classic tracebacks that all python developers know and love. Dig into the details behind Brownie with our tutorial on the subject:

How can I store files on a blockchain?
Blockchain technology is in its essence a resource-heavy and expensive database. This also makes storing files of pretty much any size on it extremely expensive and difficult. Simply put, you can forget about putting dank memes, GIFs, and high-res images on-chain. But what if your use case necessitates the storage of such files? Then decentralized storage protocols are the perfect fit for you!
One of the most popular such solutions is IPFS, and because of its monolithic name, paired with a handy first-comer advantage, has become the file protocol of choice for plenty of creators behind NFT assets, among many. An alternative to IPFS is the Arweave protocol, which offers an interesting take on the storage question at hand. Instead of requiring significant computational resources, Arweave miners offer hard drive space for users, and in return are rewarded with tokens accordingly.
How to use real-world data on-chain?
Interacting with real-world data is once again, one of the direst questions in Web3. The fact of the matter is that without any additions, a blockchain has absolutely no way of shaking hands with real-world data—from simple weather APIs to more complex interactions, like financial instruments. This is called the oracle problem.
And come to think of it, how did the entire DeFi boom come to be, if no chain has the capability to even interact with price feeds that are essential for its existence? The secret lies in a decentralized oracle implementation, called Chainlink that is to date responsible for powering the large majority of DeFi protocols currently in operation.
Oracle networks, like Chainlink and the Uniswap oracle, essentially serve as the bridge between blockchains and real-world data. To do that, they take the role of authenticating information received from relevant APIs in various ways and then parse what they determine to be the correct state to be written on-chain. So, should your use case rely on API data, look no further than an oracle network to solve this challenge for you.
Bringing all the layers together
That being said, we can put a definitive end to our overview of the Web3 stack. From L0 infrastructure, through the foundational networks on L1, and their L2 extensions, all the way to the libraries, environments, storage, and oracles of L3, there is always something interesting for you to start BUIDLing.
And what better way to do a curtain’s call than with another quick recap. This time, however, with one that offers a complete bird’s eye view of the Web3 stack and some of its most notable projects:
Power-boost your project on Chainstack
- Discover how you can save thousands in infra costs every month with our unbeatable pricing on the most complete Web3 development platform.
- Input your workload and see how affordable Chainstack is compared to other RPC providers.
- Connect to Ethereum, Solana, BNB Smart Chain, Polygon, Arbitrum, Base, Hyperliquid, Robinhood Chain, Tempo, MegaETH, Monad, Plasma, Avalanche, Optimism, Scroll, Aptos, Cronos, Gnosis Chain, Kaia, Moonbeam, Celo, Aurora, TON, Ronin, and Bitcoin mainnet or testnets through an interface designed to help you get the job done.
- Fast access to blockchain archive data and gRPC streaming on Solana.
- To learn more about Chainstack, visit our Developer Portal or join our Telegram group.
- Connect your AI agent to Chainstack in seconds using Chainstack MCP — give Claude, Cursor, Codex, Gemini, and Windsurf live access to blockchain data, node management, and docs.
- Are you in need of testnet tokens? Request some from our faucets. Sepolia faucet, Base Sepolia faucet, Solana devnet faucet, Hoodi faucet, BNB faucet, zkSync faucet, Scroll faucet, Hyperliquid faucet, Monad faucet, Amoy faucet, Plasma faucet, TON faucet.
Have you already explored what you can achieve with Chainstack? Get started for free today.