Ethereum
 Hyperliquid
 Solana
 Arbitrum
 BNB Smart Chain
 Base
Base Polygon
 TRON
TRON Sui
Sui Robinhood


Metamask transactions tutorial – a developer’s guide to transactions in Ethereum mempool
Blockchain transactions
This is the first article in a two-part series.
- Part I — The way of the mask. <– You are here.
- Part II — The way of the code.
These articles discuss some of the reasons behind transaction delays in blockchain networks. They explain how the mempool, transaction fees, and nonce values affect the duration of transaction confirmation.
To keep it beginner-friendly, the articles will focus on the Ethereum network, thus, most of the technical aspects discussed in these articles apply to Ethereum-based protocols.
What are transactions in blockchain?
Not to state the obvious, but a blockchain transaction doesn’t just show up in the ledger as soon as you send it. The transaction must wait a certain amount of time before it gets picked up by the nodes securing the network (miners or validators) and gets added to a block. Now, the whole “waiting” part of the transaction’s journey can last anywhere from a couple of seconds to a couple of minutes… hours…. days… you get the gist.
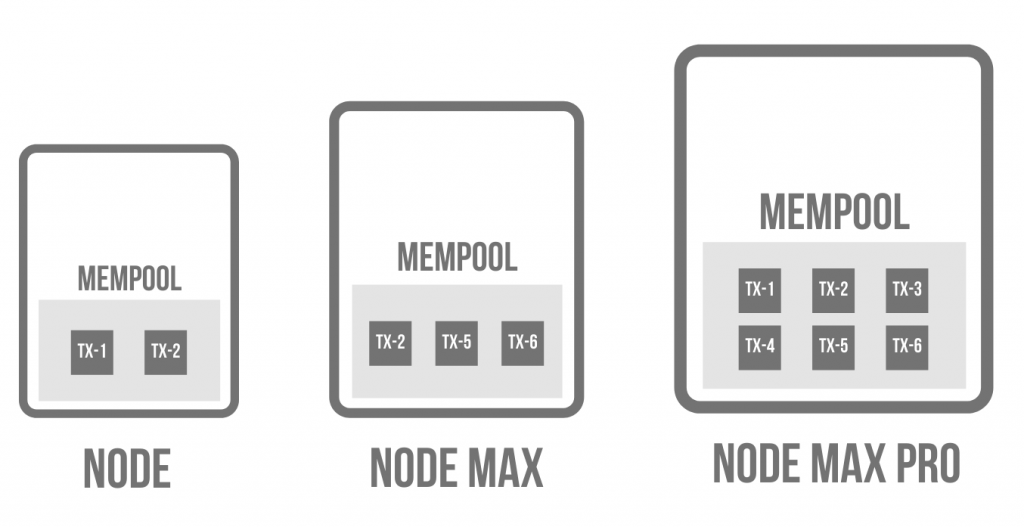
During this period, the transactions reside in an area of the blockchain node called the mempool (memory + pool). A mempool is a collection of all the “unconfirmed” transactions that are waiting to be a part of a block. Note that a mempool is not shared among multiple nodes in a network. In fact, each node has its own mempool. Each mempool is configured according to the capacity of the machine and the (Ethereum) client that they run. For example, a Geth node allows you to store 5120 “executable” transactions by default (we will discuss the “executable” part later) . In contrast, a Nethermind node sets a default value of 2048 transactions in the mempool..
This means that everything from the size of the mempool to the number of hosted transactions can vary from machine to machine.
How does blockchain verify transactions?
Technically, a transaction’s journey can be summed up as propagation through the memory pools of nodes, until a node adds it to a block.
Before entering the mempool, a transaction will be validated by the nodes themselves. The validation process filters out transactions with improper addressing, invalid signatures, data mismatch, etc. Only the valid transactions get to be a part of the mempool.
Most of the transactions usually do not spend more than a couple of minutes (at most) in the mempool, but there are times when they do, and when that happens, having a good understanding of the reasons behind this prolonged delay does make you look like a more knowledgeable blockchain developer.
This article shows you the various ways of getting your transaction stuck in the mempool ( for practical learning purposes of course !). The idea is to familiarize yourself with these situations so that you would know what to do when you face one while developing an application.
Metamask transactions

As developers, our way is the way of the code. But since this is an introductory article, I thought it would be really useful if we could understand the concepts from a high-level user perspective before jumping into code. To do that, we will use MetaMask.
Here is what I want you to do:
- Set up MetaMask in your browser.
- Create a couple of accounts in MetaMask.
Note: You can get test tokens for your account using various faucets available online.
Now, if you feel that this exercise is lacking a certain developer flair, you can always make it interesting by setting up “your own” blockchain node and using that node to conduct transactions.
To set up your own blockchain node:
- Head over to Chainstack and set up an account.
- Deploy a node in Chainstack.
Note: Since we are working on the Ethereum network, any Ethereum testnet node will be fine. This article, for instance, uses a Ropsten node.
Once you have the node up and running, get the node connection endpoints.
After getting the endpoints, you can open up MetaMask and add the new node as part of your network.
How to add a network to Metamask or connect your node?
- Open MetaMask and click on the network drop-down menu.
- Click on the Add Network button.
- In the new window, fill in all the details and click on Save.
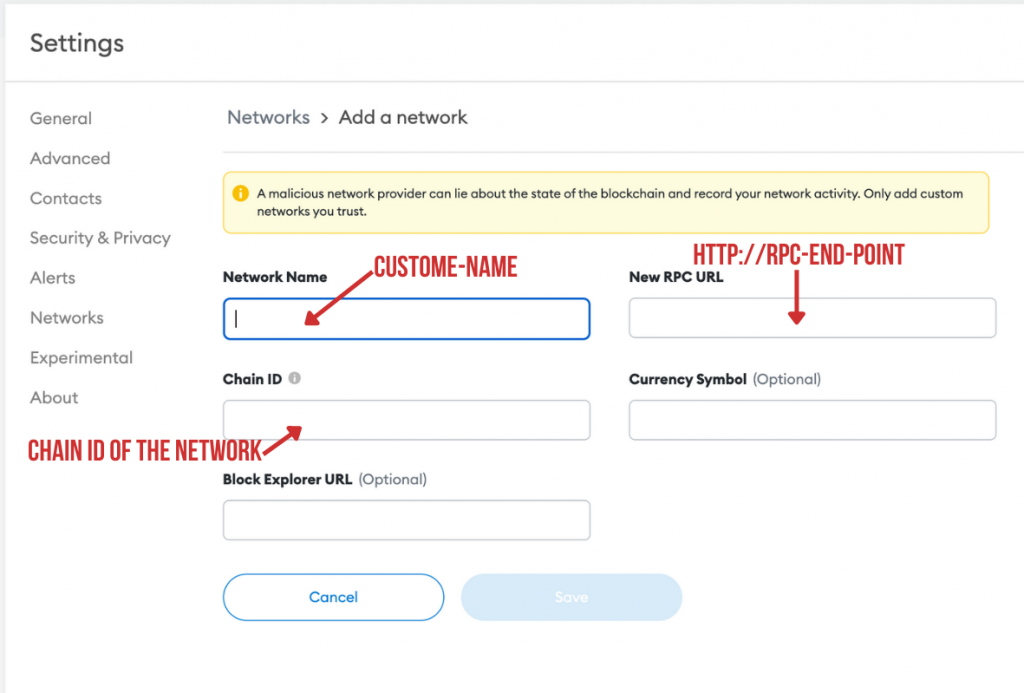
Note: Different blockchains can have different chain IDs. Based on your network, you can find the corresponding chain IDs online.
And that’s it. Just like that, you have your own node for conducting transactions. Great, so, let’s get cracking.
Blockchain transaction fees
A transaction fee, as the name suggests, is a fee that you pay the nodes responsible for the validation and verification of your transactions. The fee acts as an incentive for the people running these nodes. The fee along with the block rewards motivates them to keep the nodes running. Apart from acting as an incentive, the transaction fee (or gas fee, in Ethereum) also helps deter “sus” transactions (spams and such) by effectively making them expensive. (If you want to get really deep into the topic, check out the research: DETER: Denial of Ethereum Txpool sERvices.)
While making a blockchain transaction, the user must include a reasonable transaction fee. A “less-than” reasonable fee might get your transaction stuck in the mempool. You see, the transaction fee is a crucial detail that the nodes use in order to prioritize transactions. A higher transaction fee means a better incentive for the node, so, transactions carrying a higher fee get picked up fairly quickly by the nodes for confirmation.
The fee, however, is not stable. It depends on the network usage, meaning that a highly congested network (one with high transaction volume) demands a higher transaction fee.
During a period of high network activity, users are free to offer higher transaction fees in order to “out-prioritize” other transactions in the network. This prompts the miners/validators to increase the minimum accepted transaction fee. They do it in order to maximize their incentive. The changing nature of the fee makes it hard for us to pinpoint a definitive value that can be regarded as high/low (in terms of transaction fees).
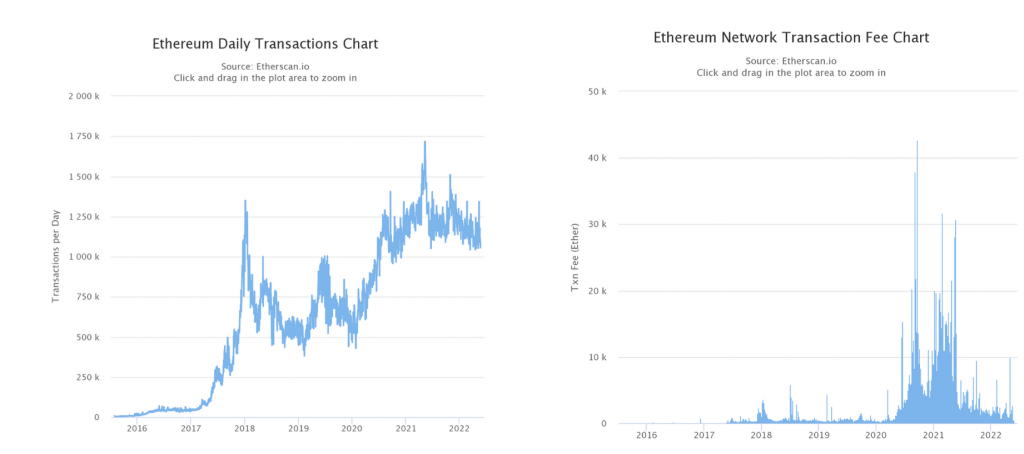
Source: Etherscan.io
Hence, the chances of getting stuck due to “low fee” is ever-present in a blockchain network.
To get a taste of transaction prioritization due to its fee, you can simply switch between the high, medium, and low options available while conducting a transaction in MetaMask. Do you notice the time difference?

MetaMask uses the latest block’s gas information in order to set the initial prices, but the user is free to edit these amounts.
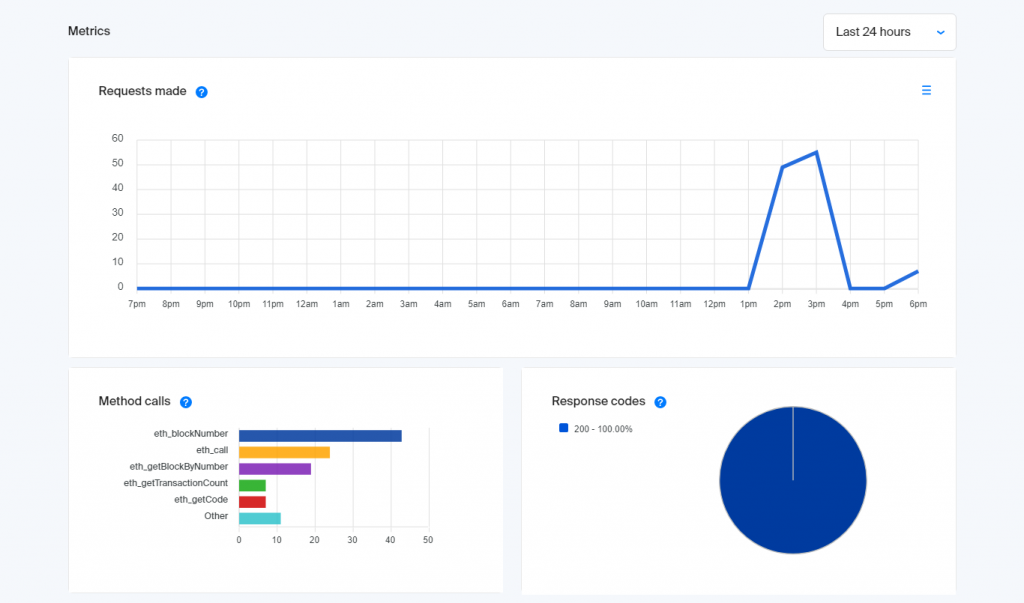
Note: If you are using your own Chainstack node with MetaMask, you can see the function calls that MetaMask makes in order to get the latest block information. The function details will be given under the Method calls metric on the node details page.
To truly make your transaction wait, you can try and set the transaction fee way too low and send a transaction.
Note: While doing this, MetaMask will flash some friendly warnings regarding the low fee, but since we are here to prove a point, we can ignore those warnings.
OK, you successfully got your transaction stuck in the mempool, so, how do we rescue it? Well, in MetaMask, you can either cancel this transaction or you can speed it up.
Now, both these options work by recreating and resubmitting the transaction.
But wait, how come we get to recreate our transaction? What happened to our old transaction? Well, to understand all that, you need to know a bit of nonce wizardry.
Transaction nonce wizardry
By definition, a nonce is a number you can only use once. In account-based protocols like Ethereum, they use a concept called account-nonce. An account-nonce acts like a transaction counter associated with an Ethereum address. They help maintain the order of transactions by keeping track of the number of confirmed transactions from a particular address (and by extension, the account). Each new transaction from an account will be attached to the current account-nonce, and once the transaction is confirmed, the account-nonce gets incremented by 1.

Note: Account-nonce is not stored on the blockchain as part of the account’s state. It is determined dynamically based on the number of confirmed transactions from the account. The above illustration is merely an abstract depiction of its functionality.
You cannot submit a transaction with a previous nonce value. But, while a transaction is still waiting to be confirmed, it is possible to submit another transaction with the same nonce, in hopes of replacing the older, pending transaction. For this to happen, the new transaction will need to have a higher transaction fee in order to give it a higher priority and a higher chance of getting picked up first for confirmation. Once the new transaction gets confirmed, the older, pending transaction will become invalid (due to duplicate nonce) and it will be dropped from the mempool. This is essentially what happens when you “speed up” or “cancel” a transaction in MetaMask.
While speeding up a transaction, you are sending an identical transaction with a higher transaction fee, same nonce, and the same ETH value. Cancelling a transaction involves sending a similar transaction with a higher fee, the same nonce, but 0 ETH value. In both cases, however, you must pay a higher transaction fee.
Now, it is possible to define the “how high of a price” parameter in your node. Let’s say you are running a Geth node. There is a parameter in Geth called txpool.pricebump that lets you define the percentage of extra fees that you would have to pay in order to replace a transaction. The default value is 10% in Geth, meaning, if the initial fee was $100, you would need $110 to replace it. If you try and send a replacement transaction with a fee below the pricebump rate, the node will reject it with the message “transaction underpriced.”
How to fix a stuck pending transaction in Metamask?
You can do the whole replacing thing manually by enabling the custom nonce option in MetaMask.
To do this:
- Go to MetaMask settings > advanced, and
- Turn on the Customize transaction nonce option.
- This will enable you to set a custom nonce value for your transaction.
Now, while using a custom nonce, remember that you cannot use any previous nonce values, and if you are planning to use a random nonce value that is much higher than the current account-nonce, know that it comes with its own set of problems (which we will discuss later).
So, to replace a pending transaction, set up a similar transaction with the same ETH value, give the same nonce for the transaction, add a higher transaction fee, and voila! Thanks to the higher transaction fee, your new and improved transaction will most likely get confirmed first and the pending transaction will be dropped.
Minding the gap
Since we are on the topic of nonce values, there is another possible way in which a transaction can get stuck in the mempool and this involves a gap in the nonce value. A nonce gap occurs when a transaction having a higher nonce value reaches a mempool before the preceding transactions. In such a situation, the transactions with the highest nonce value would have to wait for all the previous transactions to be confirmed.
The nonce gap usually occurs due to some fault in application logic or when too many wallets are trying to deal with the same account and in this situation, speeding up the transaction might not do you much good.
To understand the situation better, we can simulate a nonce gap using our MetaMask wallet.
For simulating a nonce gap:
- Make sure you have the enabled the Customize transaction nonce option.
- Send a transaction with a higher nonce value (+1 would be sufficient).
You can see that the transaction with the higher nonce will remain pending. To get it out of the mempool, you need to fill the nonce gap by sending the transactions carrying all the previous nonce values.
During this process, you might see that the transactions carrying higher nonce values appear to be in the queued state rather than the pending state. This is because the pending state is for transactions that are “executable.” A transaction with a higher nonce value cannot be executed until all the previous transactions have been confirmed and because of that, these “higher nonce value” transactions will remain in the queued state until all the “lower nonce value” transactions get confirmed.
Note: In a Geth node, you can store 1024 queued (non-executable) transactions by default.
Closing notes
So far, we have discussed a couple of methods for getting your transactions stuck in the mempool. There are more intricate situations (like node issues, protocol changes, etc) that cause delays in transactions, but the ones discussed here are the most common and are somewhat within the control of the developer.
In the next article, we will see how we can recreate all the above-mentioned situations using the way of the code.
- Discover how you can save thousands in infra costs every month with our unbeatable pricing on the most complete Web3 development platform.
- Input your workload and see how affordable Chainstack is compared to other RPC providers.
- Connect to Ethereum, Solana, BNB Smart Chain, Polygon, Arbitrum, Base, Hyperliquid, Robinhood Chain, Tempo, MegaETH, Monad, Plasma, Avalanche, Optimism, Scroll, Aptos, Cronos, Gnosis Chain, Kaia, Moonbeam, Celo, Aurora, TON, Ronin, and Bitcoin mainnet or testnets through an interface designed to help you get the job done.
- Fast access to blockchain archive data and gRPC streaming on Solana.
- To learn more about Chainstack, visit our Developer Portal or join our Telegram group.
- Connect your AI agent to Chainstack in seconds using Chainstack MCP — give Claude, Cursor, Codex, Gemini, and Windsurf live access to blockchain data, node management, and docs.
- Are you in need of testnet tokens? Request some from our faucets. Sepolia faucet, Base Sepolia faucet, Solana devnet faucet, Hoodi faucet, BNB faucet, zkSync faucet, Scroll faucet, Hyperliquid faucet, Monad faucet, Amoy faucet, Plasma faucet, TON faucet.
Have you already explored what you can achieve with Chainstack? Get started for free today.