Ethereum
 Hyperliquid
 Solana
 Arbitrum
 BNB Smart Chain
 Base
Base Polygon
 TRON
TRON Sui
Sui Robinhood


Blockchain node providers: What, how, and why
Starting out in the Web3 space can be a cumbersome task, especially if you are a rookie developer or someone without the savviness of Web3 native. But fortunately, you don’t have to be either to have a go at building on top of your favorite blockchain protocol. Quite the contrary, which is why we have devised this article just for you.
So, without further ado, let’s explore blockchain nodes, providers, and their intricacies.
What is a node in a blockchain?
Before you can understand what a node is, you have to get a better idea of how a blockchain network works. A blockchain network is essentially a distributed system. This means that the software components involved in its operation and the data that passes between them depend on multiple sources. These sources are network participants, or simply put, nodes.
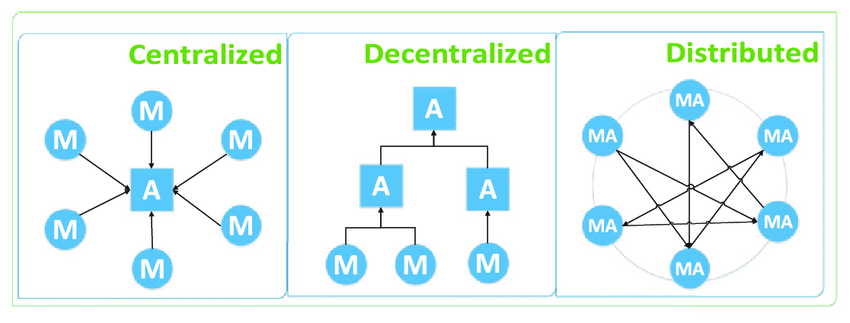
The purpose of the nodes is to communicate complex messages with the aim of sharing resources to accomplish a single goal. In the case of a blockchain network, for example, those goals can be changes in state, like an update to your wallet’s balance via transactions, block propagation, such as validating the hash of new blocks, or other complex and not so operations.
To keep things simple, let’s do a quick recap. A blockchain network is composed of nodes. Each of these nodes participates by broadcasting relevant information to the network. Other nodes in the network confirm the validity of that information in various ways (the consensus mechanism), and once everything checks out, changes are processed live.

Different types of nodes in a blockchain
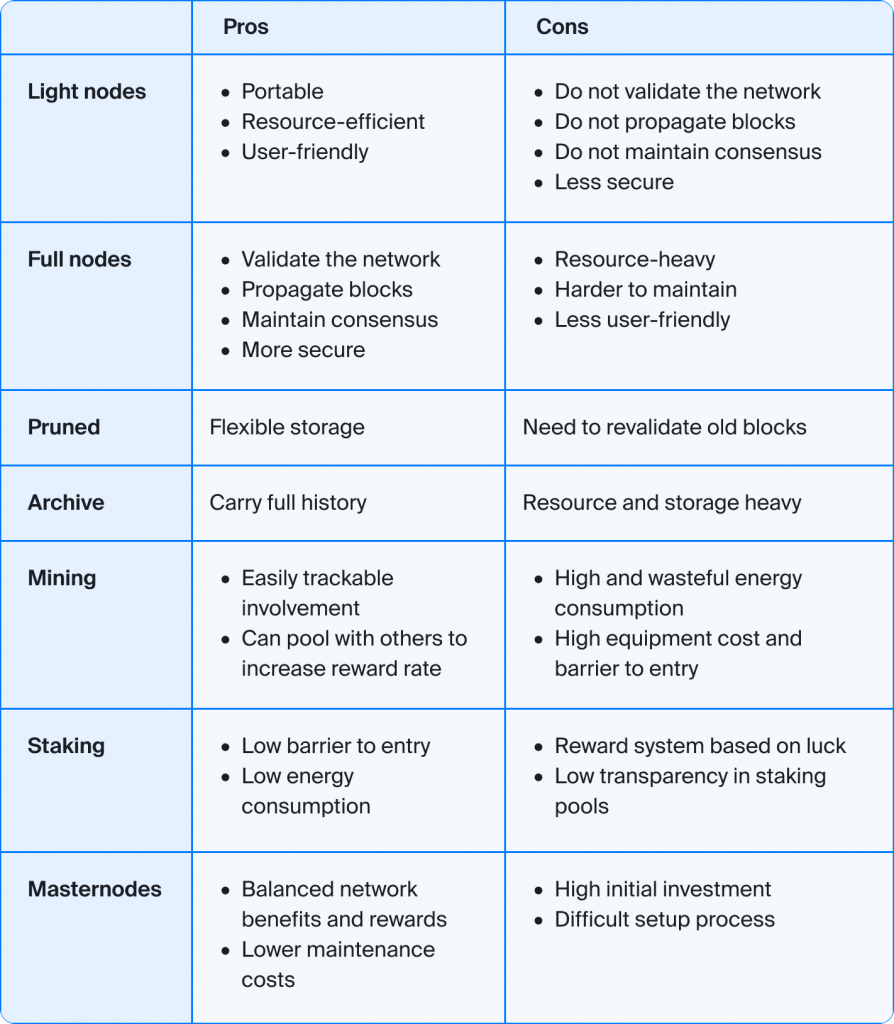
In essence, blockchain nodes are divided into two main types—full and light. The key difference? One contains a copy of the blockchain’s history (full), while the other downloads block headers only to save the hard drive space for its users. There is more to nodes than just that, however, so let’s dig further down into the specifics.
Light nodes
As just mentioned, light nodes do not carry the entire weight of the blockchain but rather only the headers of blocks to allow portable interaction with Web3. This type of node is the most commonly seen throughout the space, as it is usually found on the user side, such as a wallet interface.
Light nodes, or Simple Payment Verification (SPV) nodes as they are technically referred to, rely on full nodes to provide them with the data they need to perform their operations. And considering they don’t carry a copy of the blockchain themselves, they can only query the status of the last block and broadcast transactions to the network for processing.
That being said, it becomes clear what makes light nodes such a portable implementation that requires a significantly lower number of resources than a full node would. Even so, this convenience does come at the cost of security.
Full nodes
On the other hand, full nodes are the bread and butter of a blockchain network. They act as a server within the distributed network and are mainly responsible for the verification of transactions. This type of node carries the full weight of a blockchain network by holding a copy of it on its local storage.
Full nodes are also responsible for the consensus mechanism, which ensures only valid transactions are propagated on the network. In doing so, these nodes vote on proposals and make decisions for the future of a network, should 51% of them agree on a certain outcome.
If a particular outcome fails to hit the 51% voting mark, it is automatically rejected by the network, in turn creating what is called an “orphaned block.” In some cases, especially when it comes to large networks with many full nodes involved, this can result in a network split called a hard fork.

The result of this is two separate networks supported by the full nodes that backed their proposals. One of the most well-known occurrences of this was the Bitcoin Cash Fork, which caused the creation of two new networks—ABC and SV.
Archive nodes and pruned full nodes
Full nodes come in two main forms—archive nodes and pruned full nodes. Both of these nodes synchronize blocks from the beginning of the blockchain’s history. The main difference between them, however, is that pruned full nodes have a certain limit, after which old blocks begin being replaced.
To put this into a better perspective, setting a size limit of 1GB for a pruned full node would result in a blockchain history of no more than 1GB being saved to local storage. If new blocks being propagated increase the size beyond that 1GB limit, the node begins to delete the history of the first blocks, in order to make room for the new ones. And should you wish to get the state of a block that was already replaced, the node needs to go through the entire chain to validate those blocks once again.
On the other hand, archive nodes can be quite heavy, when it comes to storage requirements, as they contain the entire chain state history that can be queried. See also EVM nodes: A dive into the full vs. archive mode.
Which nodes secure the network?
Technically, all types of full nodes can be used to secure the network, add blocks to it, and maintain consensus. There are some subtle and less so differences, however, especially when it comes to archive nodes, as we are about to see:
Mining nodes
In Proof-of-Work (PoW) blockchains, such as Bitcoin, or Ethereum (as of this post), mining nodes, or simply put miners, are responsible for completing the work required to create a block. This work usually involved solving complex mathematical operations, in order to come up with the correct result in the form of hash output that validates the block.

Depending on the protocol specifics, this work is completed with various hardware components, like the Central Processing Unit (CPU), Graphics Processing Unit (GPU), or Application-Specific Integrated Circuit (ASIC). The first that successfully completes the work in question and broadcasts it to the network, claims the right to propagate the block, should consensus be achieved prior.
Because performing the operations involved in mining can be quite resource-heavy, miners are rewarded a pre-set number of tokens plus all transaction fees used for transactions in that particular block. This reward is called a “coinbase,” or a “coinbase transaction” and is free of charge, considering it is the first transaction in a block, created by the miner of the block itself.
Staking nodes
Much like mining nodes in a PoW blockchain, staking nodes, or stakers, carry the same responsibilities but for Proof-of-Stake (PoS) networks, like the upcoming Ethereum after The Merge, Polygon, or Tezos. The key difference between PoS and PoW chains is that staking does not require the completion of complex mathematical operations, in order to validate blocks, but rather a locked number of tokens called a stake.

This makes PoS chains much less resource-dependent, which significantly lowers the barrier to entry for network participants. Naturally, there are many different implementations of the PoS mechanism, but they all bear similar characteristics to that of a lottery. Based on a set of rules in combination with a bit of luck and chance, the network chooses who will propagate the next block.
These factors can range anywhere from coin age, or how long you have held your tokens as a stake, to stake size (total number of tokens you have held) and ratio, or size of your staking share compared to the total locked. And should the network chooses you based on these criteria, you get to earn the dedicated reward.
Authority nodes
Up until now, all blockchain nodes that were mentioned can operate on a permissionless basis, or are in other words in essence decentralized. That is not the case for all, however, as decentralization does come with a certain set of drawbacks that the next type of node aims to resolve—authority nodes.
Authority nodes are used in consensus mechanisms, such as Delegated Proof of Stake (dPoS), Delegated Byzantine Fault Tolerance (dBFT), Proof-of-Authority (PoA), and others. Examples of such implementations can be found in Fantom, Quorum, Multichain and BNB Smart Chain networks. The benefits of such chains are in higher transaction processing speed, for example, and are achieved by introducing a higher level of centralization on the protocol level.

To do that, a fixed number of authority nodes are defined for the network in question. Much like full nodes, authority nodes are used to create and validate blocks, in addition to the distribution of relevant data to users. This means that all other network participants will be running light nodes instead and will not participate in network validation, block propagation, and maintaining consensus.
Masternodes
Last on our list of nodes are masternodes. Unlike full nodes, masternodes cannot propagate new blocks to the blockchain. Instead, their primary goal is to record transactions and validate them. Other nodes in the network, regardless of whether they are miners in a PoW, or stakers in a PoS setup, take full responsibility for propagating blocks on the chain.
To deploy a masternode, you first need to designate a number of tokens as collateral that is then locked. This entitles you to not only securing the network but also earn a slice of the rewards pie for your participation. But as the “Sword of Damocles” saying goes—“With great power, comes great responsibility,” which means that if you are running a masternode, you are expected to be there for the network 24/7. And failure to do so results in your collateral, or a share of it being lost.
Comparing nodes
That being said, we have reached the end of our overview of the various kinds of nodes, involved in a blockchain network. Even so, the list itself can be quite a tough nut to crack, especially for beginners, which is why, it is best to give you a quick reference sheet for nodes, what they are good at and their pitfalls:
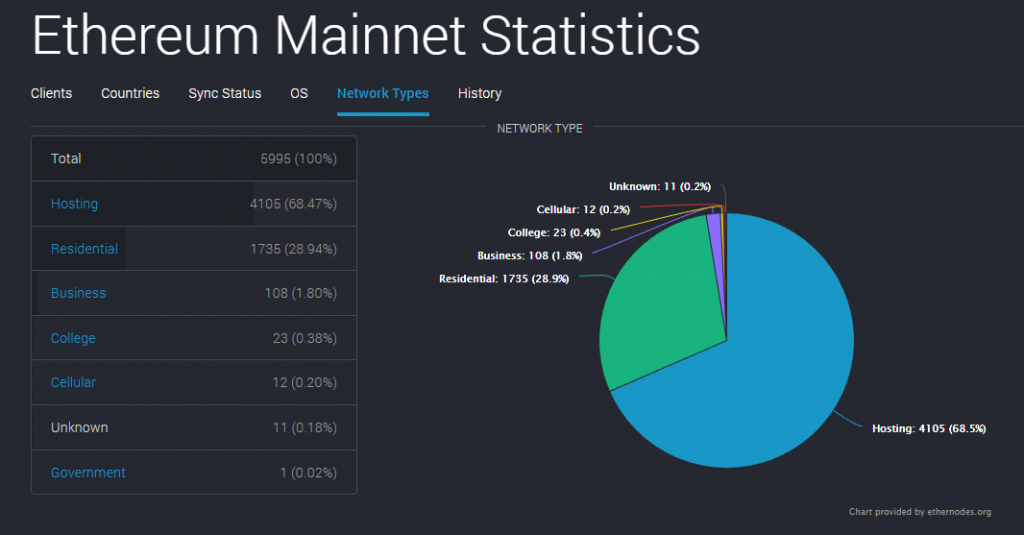
Case study: Cloud vs. on-premises nodes on Ethereum
Running a blockchain node can be a cumbersome process and not everyone has the means to do that with their own setup at home, or at the office. But at the same time, this also begs the question of just how many nodes are being run on-premises compared to those on the cloud. Fortunately for you, back in 2019, Chainstack took the time to dig into the details and do some research on just that.
The protocol that was selected for that was Ethereum, considering it was and still is to a larger extent, one of the most significant chains, when it comes to the number of nodes participating in the network and the load, they bear for the development of Web3. You can find the full case study here, but if you’re looking for the latest data, it is best you refer to the original data source—Ethernodes:
Interacting with nodes
To start interacting with a node, it goes without saying that you first need to have one. If you already have one up and running on a local instance that is great, but if you don’t, you can deploy it in a matter of minutes and completely free of charge with Chainstack. All you need to do is head over to the console to create an account and once you are registered, you can proceed with deployment.
For this example, we will pick Ethereum, as it is one of the most common choices to get started. With an Ethereum node deployed already, go ahead and find the RPC endpoint (HTTP) for your node, as it is one of the primary means of interacting with your node. You do not need to install any Web3 libraries at this point, but you will still need a way to transfer data to and from a server using HTTPS, such as cURL.

You can install cURL using a wizard, or by hopping on to the Command Line Interface (CLI) of your choice and inputting the following command from a preferred directory:
npm install curl Once you have successfully installed cURL, you can begin interacting with your node. To do that just enter the following line of code:
curl -X POST -H "Content-Type: application/JSON" --data \ '{"jsonrpc":"2.0","method":"eth_blockNumber","params":[],"id":1}' \ https://chainstack-node-endpoint This, in turn, will invoke the eth_blockNumber method and you will get the latest block number in a format with hex encoding, as a return value:
{ "jsonrpc": "2.0", "id": 0, "result": "0xe3acf4"} With that successfully completed, it’s time to congratulate you on your first interaction with a node!
Managing nodes
While basic interactions, such as that mentioned above, are relatively simple to execute, building a Web3 application requires a palette of ever more complex operations, depending on your use case. On top of that, some may not even be possible without the use of a certain type of full node, which can make the entire process a living nightmare.
That is especially the case, should you opt for running your own on-premises node, placing the cumbersome load of managing the infrastructure all by yourself. This is an enormous responsibility that involves a ton of waiting, during node synchronization and sometimes doing it all over for various maintenance operations.
This gets even worse, considering a single node will hardly be enough for a product that is intended for a market release and not an educational project. And to top it all off, you will not only need to manage these nodes effectively but need to ensure that they suffer as little downtime as possible, in order to deliver a seamless user experience. This brings us to the next topic.
Scaling node operations
As just mentioned, running a single node is relatively straightforward, but the real challenge begins when you need to scale up your operations by using multiple nodes. To do that you will need significant server resources, like storage, bandwidth, processing power, and memory. But what if you don’t have such means at your disposal?
The typical go-to method of resolving this is to use something called a load balancer. A load balancer is a tool that helps you distribute incoming network traffic efficiently across a group of backend servers, or in your case nodes. And considering just how vast the volume of concurrent user requests can be for Web3 applications, this is certainly no easy task, even for the best load balancers.
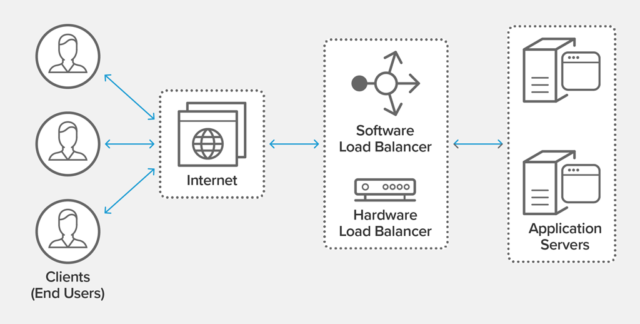
The biggest challenge in using a load balancer is keeping things consistent. This is so, because every node in a blockchain network perceives the latest state of the chain in their own way so to say. In turn, this can create significant issues, due to inconsistent data being parsed, in addition to other pitfalls that impede a positive user experience.
Pitfalls in interacting with nodes
That being said, you now have a basic idea of what makes running a node so difficult. But to keep things simple, let’s do a quick recap of the major pitfalls involved in running your own on-premises node:
- Node synchronization can take a massive amount of time.
- Running a healthy node requires you to perform regular updates and maintenance.
- Nodes can timeout, which puts your entire operation to a grinding halt.
- Despite your best efforts, nodes can desynchronize, creating a ton of issues with it.
- Running multiple nodes can be quite difficult, especially because of desynchronization.
- All of these issues are further exacerbated during heavy network traffic.
Blockchain node providers
The good news, despite the pitfalls mentioned above, is that you don’t have to face these challenges alone. That is where node providers come in handy. Simply put, a node service provider handles all the nodes you deploy and all the routines involved in doing that, so you don’t have to. In doing, so node providers save you an enormous amount of time and effort that is better put towards further building your application.
The fact of the matter is, however, that if you followed the guide on interacting with nodes to the letter, you’ve already had the chance to experience just how handy using a node provider can be. After all, it allowed you to deploy a fully functioning node for the code example in a matter of minutes, instead of having to wait (sometimes days and weeks) by doing it yourself.
With a node service provider by your side, you were able to use its endpoint API to query the node you deployed to obtain information about the latest block and its number. And in reality, using a node provider to perform other operations such as that is just as simple. Now isn’t that a lifesaver?
Node provider benefits
Using a node provider is not needed for running local instances, but as you saw, once your Web3 application goes live on mainnet, or even testnet, it becomes a vital tool in your development. So having this in mind, let’s do a quick recap of what makes using a node service provider so great:
- Deploy well-maintained and regularly-updated nodes in just a few clicks and minutes.
- Leverage historical transaction data with archive nodes just as simply.
- Scale reliably, according to your needs and budget.
- Forget about pesky exceptions and desynchronization issues.
- Save your budget from investing in expensive server setups.
- Get professional help that will customize your nodes to your liking.
Node provider benchmark
Curious to see how well your node provider fairs against the rest? Compare your node’s performance with the benchmark tool built by our developer advocate Wuzhong Zhu and learn about its inner workings in the dedicated article here.

Chainstack as a node provider
Chainstack is a node-as-a-service (NaaS) provider, whose sole purpose is to make your life, as a Web3 developer, as easy as possible. The platform offers a “control panel for blockchains” that operates across a multitude of cloud service providers and supports a wide range of some of the most significant protocols to date.
Why Chainstack?
With Chainstack, you can build rapidly, deploy and manage decentralized networks with absolute ease in just a few clicks, whether you are an enterprise or a solo developer. Let’s walk through some of the factors that make Chainstack an excellent choice for your Web3 project.
Multi-chain: 14+ blockchain networks
Ethereum, BNB Smart Chain, Avalanche, Polygon, Fantom, Solana, Harmony, StarkNet, Tezos, Bitcoin, Quorum, MultiChain.
Multi-cloud: 4 clouds with 7 locations around the world
AWS, GCP, Azure, Virtuozzo clouds, located in US East, US West, Singapore, Tokyo, London, Frankfurt.
Hybrid: Chainstack-hosted, self-hosted, or a mix
Freedom of choice for you to run nodes either in Chainstack’s managed clouds, your own managed clouds, or a combination of the two.
Reliable: self-healing infrastructure with >99.9% uptime
3rd-party independent health status checker of the Chainstack’s platform shows more than 99.9% uptime across all services.
Scalable: run any number of nodes and networks, anywhere
- Elastic nodes fit growing businesses starting from a few requests to hundreds of million requests.
- Dedicated nodes fit businesses’ need for unlimited requests.
- Nodes can serve up to 4000 requests per second, from 1 to unlimited nodes.
Affordable: pay only for what you use
- Availability of free of charge plan for developers with up to 3M requests a month
- Dedicated nodes for an unlimited number of requests for predictable payments
Instant: Get started in minutes and experiment
A node can be run in less than a minute and start serving your business.
Support: enterprise-class SLAs and premium customer support.
- Discover how you can save thousands in infra costs every month with our unbeatable pricing on the most complete Web3 development platform.
- Input your workload and see how affordable Chainstack is compared to other RPC providers.
- Connect to Ethereum, Solana, BNB Smart Chain, Polygon, Arbitrum, Base, Hyperliquid, Robinhood Chain, Tempo, MegaETH, Monad, Plasma, Avalanche, Optimism, Scroll, Aptos, Cronos, Gnosis Chain, Kaia, Moonbeam, Celo, Aurora, TON, Ronin, and Bitcoin mainnet or testnets through an interface designed to help you get the job done.
- Fast access to blockchain archive data and gRPC streaming on Solana.
- To learn more about Chainstack, visit our Developer Portal or join our Telegram group.
- Connect your AI agent to Chainstack in seconds using Chainstack MCP — give Claude, Cursor, Codex, Gemini, and Windsurf live access to blockchain data, node management, and docs.
- Are you in need of testnet tokens? Request some from our faucets. Sepolia faucet, Base Sepolia faucet, Solana devnet faucet, Hoodi faucet, BNB faucet, zkSync faucet, Scroll faucet, Hyperliquid faucet, Monad faucet, Amoy faucet, Plasma faucet, TON faucet.
Have you already explored what you can achieve with Chainstack? Get started for free today.