Ethereum
 Hyperliquid
 Solana
 Arbitrum
 BNB Smart Chain
 Base
Base Polygon
 TRON
TRON Sui
Sui MegaETH


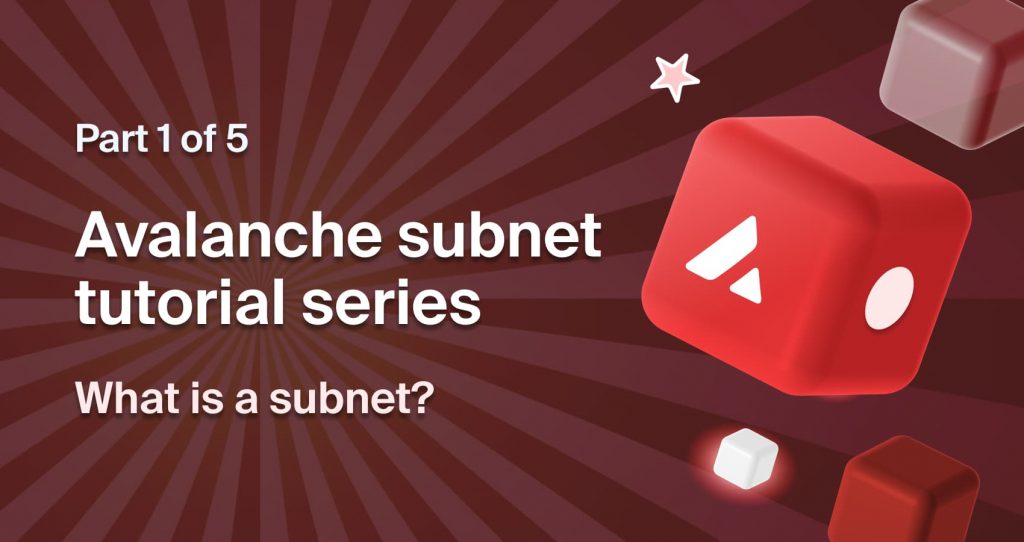
Avalanche subnets tutorial series: What are Avalanche subnets?
Avalanche is the 4th largest blockchain network with 10.6 billion total value locked (TVL) as of April 2022. The reason more and more developers choose Avalanche is because of its improved throughput and scalability.
- Performance-wise, Avalanche can process 4500 transactions per second (TPS) right now.
- Scalability-wise, subnet is the key feature making Avalanche stand out from its peers.
Avalanche subnets allow users to create and run their own blockchain networks, and it is very flexible. A subnet can be set to private, so its transactions are separated from the primary network. Subnet chains can also be tuned to meet different compliance requirements like geographical bounds and KYC/AML checks.
This tutorial series is created to help developers start their journey with Avalanche subnets. For testing purposes, it is based on Avalanche’s Fuji testnet, but the steps are applicable to mainnet too. It is extended from this article on Avalanche’s official website, so many code snippets were reused from there.
This tutorial consists of 5 parts:
- What is a subnet. <– You are here.
- Running a local Avalanche node on Fuji testnet.
- Creating a subnet, then create a blockchain on it.
- Deploying a smart contract.
- Indexing subnet with The Graph.
This is the first article in the series. It is a collection of essential background bits of knowledge and common doubts that may arise during development. It is optional and independent from other articles, so feel free to skip it if you think you have a foundation in Avalanche and come back in the future if needed.
The roadmap

This is a comprehensive roadmap of what this series is about. Please take note that all the sample codes, command line inputs, and system setups are macOS-based. Developers using different platforms should adjust accordingly depending on their system.
The summary of this tutorial:
- Running a node for Avalanche’s Fuji testnet.
- Making the node a validator node.
- Creating a subnet.
- Initializing a blockchain network.
- Deploying a smart contract on a blockchain network.
- Using The Graph with a subnet.
- Building a DApp.
About AVAX validator nodes
Many readers may already know what a node is; Nodes are actually AvalancheGo instances/servers/hosts. Nodes keep the state of the blockchain(s) and offer API endpoints for users to query the blockchain and send transactions.
In general, there are two types of nodes on Avalanche: validator nodes and non-validator nodes. Users can access Avalanche chains through either of them.
Non-validator nodes do not verify transactions, they are merely an endpoint to access the protocol.
Validator nodes are staked with AVAX. They participate in the transaction verification process on Avalanche following the Snowman consensus model with staking. On mainnet, the minimum amount that a validator must stake is 2,000 AVAX, while on the Fuji testnet there is no minimum.
This tutorial starts from scratch and begins with creating your own validator node. There are two main reasons for this:
- To create a subnet, a Keystore user is needed; and the username and password are all accessible by the node admin. It is recommended to do this on your own node(it doesn’t have to be a validator node).
- To start validating a subnet, the participating validator nodes must be configured and restarted to whitelist the subnet with its subnet ID.
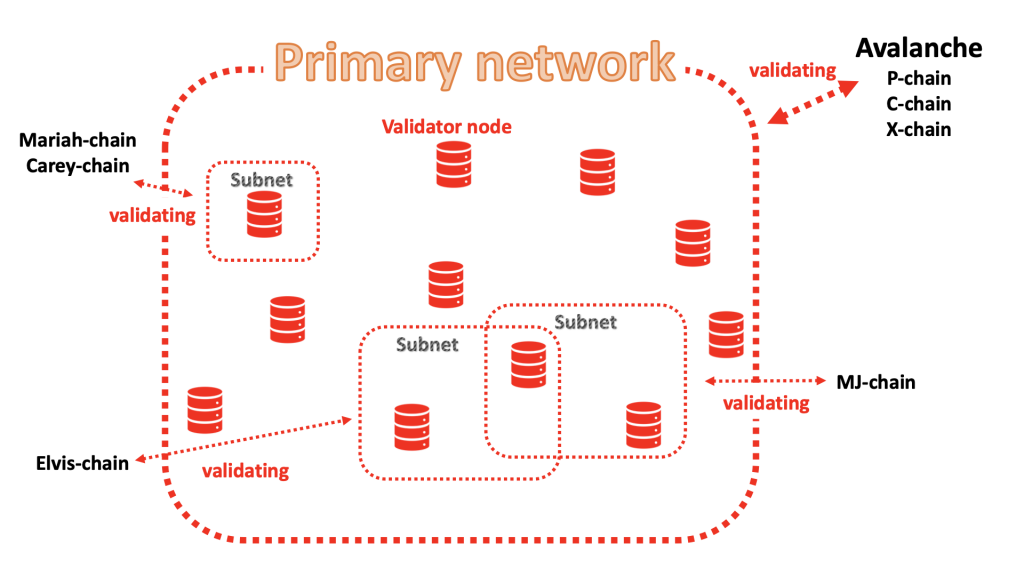
What are the Avalanche X-chain, P-chain, and C-chain?
There are 3 primary blockchains on Avalanche. Together they are running on the primary network of Avalanche, and all the nodes on Avalanche have access to these three chains. Validator nodes must always be a part of the primary network, so it is not possible to have a validator node for a subnet only.
Chains are accessed through different APIs. Each chain serves different purposes.
- The P-chain is for platform management. It handles requests related to the validator, the subnet, and the blockchain.
- The C-chain is for contract management. It is based on EVM; hence its API is almost identical to other EVM protocols. It has both RPC and WebSocket endpoints, and it handles requests for smart contracts.
- The X-chain is for asset exchange. It is Avalanche’s native platform; it is used for creating and trading assets like AVAX and NFTs.
About the AVAX currency and the wallet
AVAX is the native token on Avalanche, and it can be exchanged and consumed on all three chains, for different purposes though.
On the X-chain, AVAX is traded as the primary currency. The transaction fee is fixed to 0.001 AVAX.
On the P-chain, AVAX is used for validator node staking. A validator node earns AVAX rewards for validating transactions.
On the C-chain, AVAX is used in smart contracts or to pay for gas. The transaction and gas fees are not fixed as opposed to the X-chain. Unlike the X-chain and the P-chain, the C-chain address is Ethereum styled, and starts with 0x.
Subnets, on the other hand, do not exchange AVAX; they issue their own tokens.
AVAX tokens are stored in wallets. Each wallet has 3 addresses, one for each chain.
Users can easily manage them using the official Avalanche wallet.
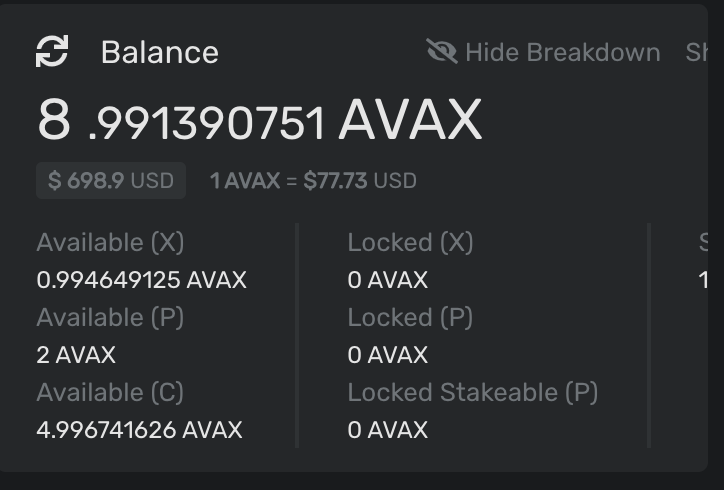
AVAX can be transferred either to:
- An address on the same chain.
- Different chains in the same wallet.
It is not possible to transfer AVAX to another address on a different chain.
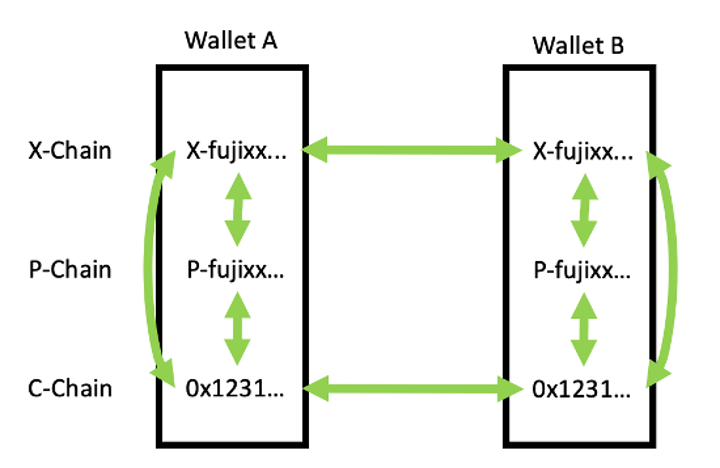
Note that addresses on P-chain cannot transfer tokens between each other. Neither can they request a faucet airdrop in testnet. To set up a validator node, AVAX needs to be transferred to the X-chain or C-chain address before moving it to P-chain.
About Avalanche subnets
There is a common misunderstanding that the subnet is a blockchain. A subnet is actually a set of validator nodes. The official documentation states that:
A subnet, or subnetwork, is a dynamic set of validators working together to achieve consensus on the state of a set of blockchains. Each blockchain is validated by exactly one subnet. A subnet can validate many blockchains. A node may be a member of many subnets.
To elaborate on this:
- A subnet is not a blockchain, it is a group of validator nodes.
- When a subnet contains no validator, its state becomes invalidated, and any blockchain on it stops functioning.
- One node can be a part of multiple subnets.
- Subnets can be assigned to many blockchains.
- One blockchain can only be validated by one subnet.
A very brief summary of how to use a subnet:
- A user owns one or more validator nodes on Avalanche’s primary network.
- The user creates a new subnet. No validator is assigned to the subnet yet.
- The primary network gets notified; a new subnet is created.
- A validator node is assigned to the subnet.
- The subnet starts getting validated.
- A new blockchain is created on the subnet.
About customized blockchain
Avalanche supports 3 distinct types of blockchain virtual machines(VM).
AVM creates a private X-chain.
The Subnet EVM creates a private C-chain.
By modifying the source code in the ChainVM interface, developers can create their own chain.
Conclusion
Hope this article helps to clarify doubts about Avalanche and subnet. In the next articles, we will dive deeper into creating our own subnet, so make sure you will not miss them.
If you need any help or have questions, feel free to reach us on our Discord channel!
Happy hacking.
- Discover how you can save thousands in infra costs every month with our unbeatable pricing on the most complete Web3 development platform.
- Input your workload and see how affordable Chainstack is compared to other RPC providers.
- Connect to Ethereum, Solana, BNB Smart Chain, Polygon, Arbitrum, Base, Hyperliquid, Tempo, MegaETH, Monad, Plasma, Avalanche, Optimism, Scroll, Aptos, Cronos, Gnosis Chain, Kaia, Moonbeam, Celo, Aurora, TON, Ronin, and Bitcoin mainnet or testnets through an interface designed to help you get the job done.
- Fast access to blockchain archive data and gRPC streaming on Solana.
- To learn more about Chainstack, visit our Developer Portal or join our Telegram group.
- Connect your AI agent to Chainstack in seconds using Chainstack MCP — give Claude, Cursor, Codex, Gemini, and Windsurf live access to blockchain data, node management, and docs.
- Are you in need of testnet tokens? Request some from our faucets. Sepolia faucet, Base Sepolia faucet, Solana devnet faucet, Hoodi faucet, BNB faucet, zkSync faucet, Scroll faucet, Hyperliquid faucet, Monad faucet, Amoy faucet, Plasma faucet, TON faucet.
Have you already explored what you can achieve with Chainstack? Get started for free today.