Ethereum
 Hyperliquid
 Solana
 Arbitrum
 BNB Smart Chain
 Base
Base Polygon
 TRON
TRON Sui
Sui MegaETH


How to create generative NFTs? Making abstract art with code
You may be expecting a dry and convoluted tutorial but we’re just going to have some fun this time instead. That is why you will be building a real Rube Goldberg NFT printing machine beyond the minds of even the maddest of scientists. Jokes aside, you really are about to start building an NFT doomsday machine.
But doing so will also be a great opportunity to practice some of the most foundational concepts behind programmatic or procedural generation as it’s commonly referred to. And since the goal of this tutorial is to show you how you can be an artist without ever touching the brush, you also get a chance to experience the diversity of code that the open-source community has to offer you as aid.
Will it be lean? Hardly! But how often will you get to have a real Dr. Frankenstein moment while doing a tutorial on Web3? So, put on your lab coat and start practicing your evil laughter, for you are about to go Lex Luthor on your code editor and programmatically mint yourself a brand-new horde of loyal minions as NFTs.
How to generate NFTs – Overview
- Planting the seed of procedural generation
- Build on existing foundations
- Out with the old and in with the new
- Structuring the script
- Outcome
Planting the seed of procedural generation
While procedural generation does sound quite scary and arcane, in reality, it is a relatively simple concept. What makes it complex, however, are the countless clockwork gears you can put together to assemble such mechanical golems to your liking. So, let’s forget about that for a moment and start off at ground zero.
At the core of everything procedurally generated lies the seed. The seed is a set of symbols in various arrangements like words, numbers, and any other nonsensical string of characters you can imagine. Planting such a seed in an algorithm like an NFT nuclear football generator tends to sprout into an endless chain of roots and branches, resulting in more possible combinations than the time it takes to mint them all.
How that is possible you may be asking, and the answer you will find by planting the seed in several generator layers. And the best thing about it? You only need a single seed to feed as many as you need. Split it, do some math, and transform it. Every digit is a value, and every byte is a part of the equation. A perfect opportunity to make up for all those boring arithmetic lessons. Sounds fun? It is! Let’s dive in:
Build on existing foundations
As the wise men say, there is no need to reinvent the wheel and as you will see soon, you will be rather taking a public transport ride instead. What this metaphor serves to point out is that you will be using plenty of ready-made tools and libraries to reach the finish line. In turn, this would allow you to focus more on having fun than writing the next few tomes of “Code and Release.”
Your first coding Uber ride for this tutorial will take you through our previous article on the subject of NFTs, where we explored every step from planning to coding and release with all their pesky details. And as the saying goes “if it ain’t broke don’t fix it,” so go ahead and rip the full tutorial files without shame. Up for a challenge instead? Then just feel free to start from the beginning with it:

In the end, what you really need to get things started with this tutorial is a working minting contract and a node endpoint at your disposal – all the metadata you get to generate inside your code. And if you have the former, not the latter, it’s time to take another shortcut that will take away the stress of running one on-premises. All you need to do is reach this stop to grab an endpoint with zero cost:

Out with the old and in with the new
To make the entire process easier to follow and understand, you won’t be taking an organic approach to set things up, as was the case when making this tutorial. Instead, you get to organize your toolset right off the bat in a clean and efficient manner. That being said, let’s move forward with the first half of the prerequisites for your procedural minter.
Assuming you have either successfully followed through on the first tutorial, or shamelessly ripped its end code, you will have a “mint.js” file with the following dependencies at your disposal:
require('dotenv').config();
const endpoint = process.env.ENDPOINT_URL;
const address = process.env.PUBLIC_KEY;
const privKey = process.env.PRIVATE_KEY;
const contractAdrs = process.env.CONTRACT_KEY;
var fs = require('fs');
var contractNFT = JSON.parse(fs.readFileSync('./PCHNFT_sol_PlaceholderHeroes.abi', 'utf8'));
var Web3 = require('web3');
var web3 = new Web3(Web3.givenProvider || endpoint);
var metadata = 'https://ipfs.io/ipfs/QmZZXrLMFFXYAcSQmjmtGNqc6ZhYe2ECCoANFAXVBS3T7y?filename=sampli.json';
As mentioned earlier, you won’t be reinventing the wheel in this tutorial, so go ahead and copy all of these to a new JS file, which you can call “generate.js” to best fit its end goal. You can skip the last variable “metadata,” however, as you won’t be working with pre-generated metadata. Instead, you will be taking care of it yourself. And the best thing about it? You won’t need to touch a single pixel.
Installing essential libraries
And speaking of which, now that you have the first half of the dependencies you need, it is time to take care of the second. To do that will need a diverse palette of libraries all of which are available with a seamless NPM installation. So, hop on to your CLI and start fetching those NPM packages:
npm i random-words text-to-image jdenticon canvas image-data-uri merge-images axios form-dataIn doing so, you will install the eight packages you need to reach the end of the tutorial. The first one – “random-words” is a generator package that will output a set of random words, given the number of words you want to have upon completion. “Text-to-image,” on the other hand will render those words into an image file you can use as one of the generator layers.
When it comes to “jdenticon,” it works in a similar manner to a gravatar but instead of looking cool on your website or wallet, for example, it will be exported to another image layer. The third image layer will be drawn “by hand” if you can call it that, using “canvas”. But rather than using your mouse or a paint brush, you will just input as code the points you want drawn and connected.
Even so, the “canvas” package will create a “dataURI” output, which you may have seen across the web as something similar to “data:image/gif;base64,R0lGODlhyAAiALM…DfD0QAADs=” and that is not something you can work with directly. That is why you will use the “image-data-uri” to process it into a “.png” file, like the rest of the image layers generated with other packages.
Once you have everything you need, in terms of layers, you will also need a library that will merge them all together to create the final form of your NFT image. For that you will use the “merge-images” package. And with everything pressed into a single image file, you won’t be able to make any further progress without an HTTP request module, such as “axios” to push relevant data to IPFS. Since you will be working with Pinata, you will also need “form-data” to help set the file metadata.
Once you have successfully installed all the libraries, don’t forget to reference them in your code too! Oh, and while we are still on the subject of forgetting and referencing, this would be a good starting point to integrate a coding best practice into your workflow – leaving a descriptive comment trail. This one will particularly come in handy, as the complexity of how everything is intertwined will increase exponentially, as you dig deeper into the tutorial.
And with this practical insight noted, you can move forward with the next steps. To make it easier for you, here’s what your “generate.js” file would look like with everything taken care of correctly:
//Process dependencies
require('dotenv').config();
const endpoint = process.env.ENDPOINT_URL;
const address = process.env.PUBLIC_KEY;
const privKey = process.env.PRIVATE_KEY;
const contractAdrs = process.env.CONTRACT_KEY;
var Web3 = require('web3');
var web3 = new Web3(Web3.givenProvider || endpoint);
var fs = require('fs');
var randomWords = require('random-words');
var textToImage = require('text-to-image');
var jdenticon = require('jdenticon');
const { Canvas, Image } = require('canvas');
const ImageDataURI = require('image-data-uri');
var mergeImages = require('merge-images');
var axios = require('axios');
var FormData = require('form-data');
var data = new FormData();
var contractNFT = JSON.parse(fs.readFileSync('./PCHNFT_sol_PlaceholderHeroes.abi', 'utf8'));
Initializing core variables
Despite having your dependencies adequately referenced, you may encounter issues when running your code, should your environmental variables be set incorrectly. After all, the entire backbone of the script relies on them to connect to the Goerli network and execute smart contract interactions. Fortunately for you, there is yet another shortcut you can take to make sure you got things right.
That is why, you will find an example environment setup here that clearly outlines the format of each variable, so you can just copy and paste it into a “.env” file and fill it with your own. You can use the same tool from the example setup to manage your Dapp secrets, which will especially come in handy once your project starts getting real or should you prefer to avoid dealing with “.env” files manually.
With environmental variables taken care of, you can move forward with initializing the ones you need for the procedural generation stages:
// Initialize variables

// Starting seed parameters
var randomHex; // The starting seed for procedural generation
var idHex = ''; // The unique ID generated from the initial seed
var wordNrs; // The output from converting the initial hex seed to decimal

// Text layer parameters
var digiRoot; // The digital root result of the decimal number string above
var randomStr; // The output of the random word generator
var wordsOut = ''; // The output from cleaning up the random word string
var colorHex = '#'; // The hex color output generated for the text layer
var bgColorHex = '#'; // The hex color output generated for the text background

// Shape layer parameters
var shapeSides = ''; // The number of sides generated for the polygon shape
var shapeSize = ''; // The size generated for the polygon shape
var shapeCtrX = ''; // The central X-axis position generated for the polygon shape
var shapeCtrY = ''; // The central Y-axis position generated for the polygon shape
var shapeStroke = '#'; // The generated polygon shape border color
var shapeFill = '#'; // The generated polygon shape fill color

// IPFS interaction parameters
var ipfsPath; // The IPFS CID generated for a particular upload and pin
var jsonPath; // The file system path generated for the JSON metadata file
Structuring the script
To create the script for the procedural generation of the NFTs, let’s first start by mapping out the structure that we will be following to make it easier to understand. Overall, the structure will contain 11 core fragments:
- An overlapping generator function
- Seed parameter generation
- Text layer generation
- Icon layer generation
- Shape layer generation
- Shape layer export
- Layer merge
- Merged image IPFS upload
- Metadata generation
- Metadata JSON IPFS upload
- Transaction commit
That being said, the first thing you need to do is create the overlapping generator function. To create this, start with an async function and be sure to leave its curly brackets open, as we will only be closing it, once everything is complete:
const generator = async () => {
  // Random generator layer 0: Seed preparations
  console.log('\nSeed generation started...\n');
Seed parameter generation
As mentioned previously, everything procedurally generated starts with the seed. Such is the case here too, which is why your first task is to generate a random hex string of 20 bytes with Web3.js. Generating a hex string of 20 bytes will deliver you one with the same length as an Ethereum address.
To do that you can use the built-in functionality of the library and to add further randomization you will be tying the result with a slice of the address. Make sure you exclude the “0x” before the address to make the resulting string uniform with the following code segment:
  // Generate random hex with 20 bytes for symbols (same as wallet addresses)
  randomHex = web3.utils.randomHex(20).concat(address.slice(2));
  console.log('Random hex generated: ' + randomHex + '\n');
Generating a unique ID
Next, let’s create a unique ID to be included within the text layer to add another opportunity for randomization. To generate this ID, you will be using the first three symbols from the randomHex string and combine them with the last three, which will be coming from the address:
  // Generate ids for filenames to organize easier
  idHex = randomHex.slice(2, 5).concat(randomHex.slice(79, 82))
  console.log('Used hex to generate ID: ' + idHex + '\n');
Generating text colors
To generate some colors for the text layer, such as font and background colors, you will be using the same randomHex string you generated earlier. To promote a higher degree of randomization, create a “for loop” that will repeat a total of six times for each of the needed characters.
You will need six characters, since a hex color code is composed of six characters, as is the case for the color “white,” for example, with #ffffff being its code. You will do this twice for each color – one for the font and one for the background. Keep in mind that adding a “#” will not be needed since it is already there from the variable initialization stage and you will be adding the characters after it:
  // Generate random hex color value by picking random characters from the generated hex string
  for (var i = 0; i < 6; i++) {
    colorHex = colorHex.concat(randomHex.slice(2).charAt(Math.floor(Math.random() * randomHex.slice(2).length)));
    bgColorHex = bgColorHex.concat(randomHex.slice(2).charAt(Math.floor(Math.random() * randomHex.slice(2).length)));
  }
  console.log('Used hex to generate text color: ' + colorHex + ' & background color: ' + bgColorHex + '\n');
Creating a number string
Next, it’s time to lay some more groundwork for the text layer beyond the simple hex colors you set up in the previous step. To do that, you will first need to transform the randomHex string into the decimal counting system with the built-in Web3.js functionality:
  // Generate new string by combining the random hex output with wallet address and converting it to number string
  wordNrs = web3.utils.hexToNumberString(randomHex);
  console.log('Transformed hex into number string: ' + wordNrs + '\n');
Setting shape generation parameters
Okay, this is the part, where things get a little more complicated. To generate the shape, you will need a set of several parameters, similar to those of the text layer we introduced before. These will be:
- shapeSides
- shapeStroke
- shapeFill
- shapeSize
- shapeCtrX
- shapeCtrY
Let’s start with the number of sides for the polygon shape that will be stored in the “shapeSides” variable. To determine the number of sides, grab the numbers string you converted in the previous step and grab some of its characters at random:
// Begin calculations for random shape layer generation parameters

  // Randomize shape parameters but ensure they are never zero
  // Find out the number of sides the shape has by picking a random number from the number string above
      shapeSides = parseInt(1 + wordNrs.charAt(Math.floor(Math.random() * wordNrs.length)));
  console.log('Used number string to determine polygon shape sides count: ' + shapeSides + '\n');
Once done it’s time to pick colors for the shape too. To do that, you can use the hex colors for the text layer generated earlier, while grabbing the first three and last three digits of each color for the “shapeStroke” variable and vice versa for the “shapeFill” one:
  // Combine the first three digits of one of the two hex color values picked above with the last three of the other for greater variation

      shapeStroke = shapeStroke.concat(colorHex.slice(4, 7).concat(bgColorHex.slice(1, 4)));
      shapeFill = shapeFill.concat(bgColorHex.slice(4, 7).concat(colorHex.slice(1, 4)));
  console.log('Used text & background colors to generate new border: ' + shapeStroke + ' & fill: ' + shapeFill + '\n');
Creating a loop for the remaining shape parameters
Next, it’s time to create a “for loop” that will generate the “shapeSize”, as well as the starting point on the X and Y axes for the drawing of the shape. This can normally be done without a loop but considering the desired values you are looking for are of at least two digits, it is necessary.
After all, given a maximum shape size of 350×350, which are the absolute dimensions of the image, two-digit values will land your shape somewhere in the middle with enough size to make it clearly visible:
  // Loop following calculations twice to generate double or higher digit values to have the shape
  for (var i = 0; i < 2; i++) {

 // Avoid negative results by converting result to absolute value
 // Pick a random digit from the number string above, add the current shapeSize value, serve as float, multiply by Pi and add 10 for sizes between ~50 and ~150 for greater balance
      shapeSize = Math.abs(10 + Math.PI * parseFloat(shapeSize + parseInt(wordNrs.charAt(Math.floor(Math.random() * wordNrs.length)))));

// Same as above except you substract 100 instead of adding 10. This will make the shape roll around the middle
      shapeCtrX = Math.abs(Math.PI * parseFloat(shapeCtrX + parseInt(wordNrs.charAt(Math.floor(Math.random() * wordNrs.length)))) - 100);
      shapeCtrY = Math.abs(Math.PI * parseFloat(shapeCtrY + parseInt(wordNrs.charAt(Math.floor(Math.random() * wordNrs.length)))) - 100);
  }

  console.log('Used number string to determine polygon shape size: ' + shapeSize + ' X-axis center value: ' + shapeCtrX + ' & Y-axis center value: ' + shapeCtrY + '\n');
Calculating the digital root of the number string
After you have successfully set the shape parameters, grab the number string once again and perform a digital root calculation. With this calculation, you will be able to reduce the number string to a single digit, which you will use to determine the number of randomly generated words and in doing so add another layer of randomization:
  //Reduce number string to single digit with the digital root formula
  function digitalRoot(input) {
      var nrStr = input.toString(),
          i,
          result = 0;

      if (nrStr.length === 1) {
          return +nrStr;
      }
      for (i = 0; i < nrStr.length; i++) {
          result += +nrStr[i];
      }
      return digitalRoot(result);
  }

  //Print digital root result
  digiRoot = digitalRoot(wordNrs);
  console.log('Calculated digital root of number string: ' + digiRoot + '\n');
Checking if the digital root result is odd or even
The digital root result will not be enough as is, however, as you want to output a specific number of words depending on whether the result is odd or even. Once you have determined this, you will use an odd result to generate a set of three words and an even one for a set of two words. This is also the last step of determining parameters, before moving on to the actual image layer generation:
  //Check if result is odd or even
  function NrChk(nr) {
     return nr % 2;
   }
  console.log('Checking if digital root is odd or even: ' + NrChk(digiRoot) + '\n');
  if (NrChk(digiRoot) > 0) {
  console.log('Generating 3 random words - digital root is odd\n');
  } else {
  console.log('Generating 2 random words - digital root is even\n');
  }
Procedural generation layer 1: Text
To generate the text layer, you will be using some of the parameters you set up during the previous steps, and run them through the “random-words” library you installed earlier. The first parameter you will be using is the odd/even digital root result you calculated in the last step:
  // Random generator layer 1: Text

  //Generate set of random words - 2 for even 3 for odd. Since result will always be 0 or 1 easiest and fastest way is to just add 2. Replace "," with space for natural appeal
  randomStr = (randomWords(NrChk(digiRoot) + 2).toString()).split(',');
  console.log('Random words generated are: ' + randomStr + '\n');
This will output a set of unformatted words, which will require a few extra touch-ups to make them truly useful. So, once the unformatted word string is generated, clean it up a bit like so:
  //Capitalize word set and join them as single string
  for (var i = 0; i < randomStr.length; i++) {
    randomStr[i] = (randomStr[i].charAt(0)).toUpperCase() + randomStr[i].slice(1);
  }
  wordsOut = randomStr.join(' ');
  console.log('Capitalizing random words string: ' + wordsOut + '\n');
And with that out of the way, it’s time to run it through the “text-to-image” library, so you can export the results into an image file that will be used as one of the layers. Make sure you have “debug” mode turned on, as otherwise, the image will remain as “dataURI”, instead of the image layer that you need. Feel free to experiment with other parameters within the settings:
  // Generate image from the random words, while using the library's debug mode to render to file
  // Exporting images to folders that do not exist yet may cause errors because of FS/OS permissions. Try creating them manually if you encounter such issue.
  var textPath = './texts/' + idHex + ' ' + wordsOut + ' ' + colorHex + ' [Text Layer].png';
  console.log('Exporting random words string as image to: ' + textPath + '\n');
  const dataUri = await textToImage.generate(idHex + ' ' + wordsOut, {
    debug: true,
    debugFilename: textPath,
    maxWidth: 330,
    customHeight: 33,
    fontSize: 18,
    fontFamily: 'Arial',
    lineHeight: 22,
    margin: 5,
    bgColor: bgColorHex,
    textColor: colorHex,
    textAlign: 'center',
    verticalAlign: 'top',
  });
Procedural generation layer 2: Icon
The icon layer is quite straightforward when comparing it with the others. To generate it you mainly need two parameters – the icon size and the icon seed, which is a string input. The icon size you will use is 350px, so go ahead and set that in the settings, while selecting the formatted random words string as seed:
  // Random generator layer 2: Icon

  // Set icon parameters
  var iconSize = 350;
  var iconSeed = wordsOut;
Once that is done, all you have to do is export the generated icon to an image and in doing so create the second layer of procedural generation:
    // Export icon to png
  const iconExport = jdenticon.toPng(iconSeed, iconSize);
  var iconPath = './icons/' + idHex + ' ' + wordsOut + ' ' + colorHex + ' [Icon Layer].png';
  console.log('Using random words string as seed to generate icon at: ' + iconPath + '\n');
  fs.writeFileSync(iconPath, iconExport);
Procedural generation layer 3: Shape
The last of the procedural generation layers is the shape and to create it successfully you will be using the “canvas” module. As mentioned previously, your dimensions parameters are 350×350, so make sure you have set these correctly for your canvas object. Additionally, since the generated image will be a 2D visual, go ahead and set that, as well:
  // Random generator Layer 3: Shape

  // Create new canvas object and set the context to 2d
  const shapeCanvas = new Canvas (350, 350);
  const shapeContext = shapeCanvas.getContext('2d');
Once that is done, it is time to start drawing the shape. To do that, start drawing with the “beginPath()” function, followed by four points outlined in the following formula for maximum randomization. The formula uses a combination of every shape parameter you have laid out previously, and running it through various calculations:
// Start drawing path on canvas
  console.log('Using polygon settings to draw path points & paint shape...\n');
  shapeContext.beginPath();

  // Pick four incomprehensively generated points for the drawing path. Feel free to play around with the formula until you get desireable results
  shapeContext.moveTo (shapeCtrX + shapeSize * (Math.floor(Math.random() * 100 * Math.cos(shapeSides))), shapeCtrY +  shapeSize * (Math.floor(Math.random() * 10 * Math.sin(shapeSides * shapeSize))), shapeCtrX + shapeSize * (Math.floor(Math.random() * 1000 * Math.tan(shapeCtrY * shapeSides))), shapeCtrY + shapeSize * (Math.floor(Math.random() * (1 / Math.tan(shapeCtrX * shapeSides)))));
We will not be getting into the details of the formula itself, as that is beyond the scope of the tutorial, but you can feel free to experiment with its values should you want to expand on its randomization factors. Even so, it is still relevant to know what the formula does in its essence, which is to set four points on the canvas, which will be connected with the following “for loop”:
  // Connect the path points according to randomly picked number of sides for the polygon
  for (var i = 1; i <= shapeSides;i++) {
      shapeContext.lineTo (shapeCtrX + shapeSize * Math.cos(i * 2 * Math.PI / shapeSides), shapeCtrY + shapeSize * Math.sin(i * 2 * Math.PI / shapeSides));
  }
With the four points of the shape connected, you can go ahead and finalize the polygon by closing the path and selecting the parameters for its styling, which you already generated earlier:
  // Close drawing path to complete the drawn object then proceed with applying border width and color, as well as fill color
  shapeContext.closePath();
  shapeContext.strokeStyle = shapeStroke;
  shapeContext.fillStyle = shapeFill;
  shapeContext.fill();
  shapeContext.lineWidth = shapeSides;
  shapeContext.stroke();
As the last step for this stage, all that’s left to do is to export the generated polygon shape to an image, using the following code segment:
  // Record shape data URI to image buffer then render to preferred path
  const shapeBuffer = shapeCanvas.toBuffer("image/png");
  var shapePath = './shapes/' + shapeSides + ' ' + shapeStroke + '.png';
  console.log('Exporting polygon shape as image to: ' + shapePath + '\n');
  fs.writeFileSync(shapePath, shapeBuffer);
Merging the three image layers
Once you have all three image layers successfully generated to their corresponding folders, it is time to merge them into one. To accomplish this, you will be using the “merge-images” module that you installed in the previous step in addition to the path variables that were set at each generation stage:
  // Merge existing layers by combining them in image buffer as data URI then output to file
  var mergePath = './merged/' + idHex + ' ' + wordsOut + ' ' + colorHex + ' [Merged].png';
  console.log('Merging all layers & exporting image to: ' + mergePath + '\n');
  mergeImages([shapePath, iconPath , textPath], {
    Canvas: Canvas,
    Image: Image
  }).then(function (response) {
    ImageDataURI.outputFile(response, mergePath)
  });
Uploading the merged image to IPFS
To make it easier to upload to IPFS and allow for faster fetching of newly uploaded data, you will be using Pinata’s pinning service. If you don’t have an account on the platform already, then this is a good time to make up for it and create one.
Once you have created it, click on your avatar in the top right corner and select “API keys.” Create a new API key with the “Admin” option ticked and copy the “JWT (secret access token)” field to a safe location for now. In your case that would be the “.env” file or the Vault WebUI, accordingly, resulting in a key-value pair like this:
PINATA_JWT="Bearer eyJhbGciOiJIUzI1NiIsInR5cCI6IlpXVCJ9.eyJ1c2VySW5mb3JtYXRpb24iOnsiaWQiOiI5NWZlN2E1Ni1lYjBhLTQzYTItYmFmZCo1ZjEyZDkyZDBlMmYiLCJlbWFpbCI6InBldGFyLmkuc3RveWtvdkBnbWFpbC5jb20iLCJlbWFpbF92ZXJpZmllZCI6dHJ1ZSwicGluX3BvbGljeSI6eyJyZWdpb25zIjpbeyJpZCI6IkZSQTEiLCJkZXNpcmVkUmVwbGljYXRpb25Db3VudCI6MX0seyJpZCI6Ik5ZQzEiLCJkZXNpcmVkUmVwbGljYXRpb25Db3VudCI6MX1dLCJ2ZXJzaW9uIjoxfSwibWZhX2VuYWJsZWQiOmZhbHNlLCJzdGF0dXMiOiJBQ1RJVkUifSwiYXV0aGVudGljYXRpb25UeXBlIjoic2NvcGVkS2V5Iiwic2NvcGVkS2V5S2V5IjoiYTFjMTNhMDdkMmFiNDIxOGE0ODkiLCJzY29wZWRLZXlTZWNyZXQiOiJjYmYzYjFkMGM3YzdiYmY5MmQzZTZhOTNhNjU2OTEzODQwMWFjMmE3ZTY2OTNjNTI2YjU4MTRiODM3YmFjZWFmIiwiaWF0IjoxNjYwNjIyOTc4fQ.dNXeLnIlekbnXx7gU36-FGVBn9UeiS_ARKQjI6m2CU0" Do note that you will need to add “Bearer,” followed by an interval before you paste your JWT token. Also keep in mind that the above JWT will not work, as some characters have been changed to protect the actual token and is just there as a formatting tip. Once you have set up the JWT in the “.env” file, don’t forget to reference it in your “generate.js” file like so:
const pinataJWT = process.env.PINATA_JWTWith this taken care of, it’s time to begin uploading with the following code segment. You will be using the FormData module, to set some basic file metadata for your upload to be made available on IPFS:
const addFile = async (source) => {
  console.log('Attempting to upload ' + source + ' via Pinata to IPFS...\n');
  const url = "https://api.pinata.cloud/pinning/pinFileToIPFS";
  const src = source;
  var status = 0;
  var data = new FormData();
  data.append('file', fs.createReadStream(src));
The above will set the settings for your IPFS upload but there is still more to take care of, before it is complete. That is why as a next step, you will be setting your access credentials for the Axios module by using the “JWT” token you copied earlier:
  //Set Pinata API access credentials and use it for the Axios configuration
    var config = {
      method: 'POST',
      url: url,
      headers: {
        "Content-Type": 'multipart/form-data; boundary=${data._boundary}',
        "Authorization": pinataJWT,
        ...data.getHeaders()
    },
  data: data
  };
Axios is essentially an HTTP request parser. Without it, you won’t be able to upload the data you need to IPFS. And once you have set the data you want uploaded in the previous code segment, as the final last step submit the Axios request. Don’t forget to ask for a receipt and close the “addFile()” function, while giving ample time for the merging to complete:
  // Submit Axios request and wait for it to finish
  const response = await axios(config);
  console.log(response.data);

  // Get receipt for the image IPFS link from the Axios response
  ipfsPath = 'https://gateway.pinata.cloud/ipfs/' + response.data.IpfsHash;
  console.log(source.slice(9) + ' successfully uploaded to: ' + ipfsPath + '\n');
  console.log('Allowing time for file propagation...\n');
  return ipfsPath;
        };
  setTimeout(() => {
  addFile(mergePath)
  }, 5000)
Since the entire operation is composed of several layers within one function, you can refer to the complete code segment here:
const addFile = async (source) => {
  console.log('Attempting to upload ' + source + ' via Pinata to IPFS...\n');
  const url = "https://api.pinata.cloud/pinning/pinFileToIPFS";
  const src = source;
  var status = 0;
  var data = new FormData();
  data.append('file', fs.createReadStream(src));

  //Set Pinata API access credentials and use it for the Axios configuration
    var config = {
      method: 'POST',
      url: url,
      headers: {
        "Content-Type": 'multipart/form-data; boundary=${data._boundary}',
        "Authorization": pinataJWT,
        ...data.getHeaders()
    },
  data: data
  };

  // Submit Axios request and wait for it to finish
  const response = await axios(config);
  console.log(response.data);

  // Get receipt for the image IPFS link from the Axios response
  ipfsPath = 'https://gateway.pinata.cloud/ipfs/' + response.data.IpfsHash;
  console.log(source.slice(9) + ' successfully uploaded to: ' + ipfsPath + '\n');
  console.log('Allowing time for file propagation...\n');
  return ipfsPath;
        };
  setTimeout(() => {
  addFile(mergePath)
  }, 5000)
Creating the metadata JSON
Now that the image is uploaded to IPFS, it is time to use its CID in the metadata JSON too. But you don’t have a JSON file already, so what needs to be done first is to create a data object called “dataObj.” Since uploading to IPFS and seeing the changes go live may take some time, make sure you give it some leeway by creating a waiting function for it too:
// Create the metadata JSON after making sure the image is already uploaded
  setTimeout(() => {
  var dataObj = {
    name: '#' + idHex + ': ' + wordsOut,
    image: ipfsPath,
    description: 'A programmatically generated NFT with metadata seeds. Words: ' + wordsOut + ', Color: ' + colorHex + ', Digital Root: ' + digiRoot
  };
Once you have created the data object, it is time to write it to file using the “fs” file system module. To do that you will need to convert the JSON object to a string using the “JSON.stringify” function. Keep in mind that this is part of the overarching code segment, which has not been closed as of yet:
// Convert the metadata JSON array into string so you can write it to file
  console.log('Attempting to create JSON metadata file...\n');
  var jsonObj = JSON.stringify(dataObj);
  fs.writeFile('./' + idHex + ' ' + wordsOut + ' ' + colorHex + '.json', jsonObj, 'utf8', function(err) {
    if (err) throw err;
    jsonPath = './json/' + idHex + ' ' + wordsOut + ' ' + colorHex + '.json';
  console.log('JSON metadata file created at: ' + jsonPath.slice(2) + '\n');
With that successfully out of the way, you can go ahead and close the code segment by calling the “addFile(),” and then the “startMint()” functions, while giving ample waiting time for their prerequisites to complete:
  // Upload the metadata JSON to IPFS after waiting for the file to be created
    setTimeout(() => {
    addFile(jsonPath);
  }, 10000)

  // Give ample time for the IPFS uploads to propagate or risk minting empty NFTs
        setTimeout(() => {
      startMint();
    }, 20000)
      });
  }, 10000)
And once again, to make sure the entire code segment is written correctly, you can refer to its complete state here:
setTimeout(() => {
  var dataObj = {
    name: '#' + idHex + ': ' + wordsOut,
    image: ipfsPath,
    description: 'A programmatically generated NFT with metadata seeds. Words: ' + wordsOut + ', Color: ' + colorHex + ', Digital Root: ' + digiRoot
  };

  // Convert the metadata JSON array into string so you can write it to file
  console.log('Attempting to create JSON metadata file...\n');
  var jsonObj = JSON.stringify(dataObj);
  fs.writeFile('./json/' + idHex + ' ' + wordsOut + ' ' + colorHex + '.json', jsonObj, 'utf8', function(err) {
    if (err) throw err;
    jsonPath = './json/' + idHex + ' ' + wordsOut + ' ' + colorHex + '.json';
  console.log('JSON metadata file created at: ' + jsonPath.slice(2) + '\n');

  // Upload the metadata JSON to IPFS after waiting for the file to be created
    setTimeout(() => {
    addFile(jsonPath);
  }, 10000)

  // Give ample time for the IPFS uploads to propagate or risk minting empty NFTs
        setTimeout(() => {
      startMint();
    }, 20000)
      });
  }, 10000)
Submitting the minting transaction
This is the final part of the procedural NFT generation and if you have followed the previous tutorial on the subject, it should be far from foreign for you. First, you need to set the transaction parameters as follows:
  // Set the parameters of the minting transaction then sign it for processing
  const contractObj = new web3.eth.Contract(contractNFT, contractAdrs)
  const startMint = async (tokenId) => {
 console.log('Attempting to mint to address: ' + address + '\n');
  const mintTX = await web3.eth.accounts.signTransaction(
        {
           from: address,
           to: contractAdrs,
           data: contractObj.methods.safeMint(address, ipfsPath).encodeABI(),
           gas: '2968862',
        },
        privKey
     );
Once you have set the parameters, go ahead and submit the transaction with the following code segment, while making sure you ask for a receipt in doing so:
  // Ask for a receipt of your transaction
  const createReceipt = await web3.eth.sendSignedTransaction(
        mintTX.rawTransaction
     );
 console.log('NFT successfully minted. Here is your receipt: ', createReceipt);
 setTimeout(() => {
 console.log("\nThank you for using Petar's Procedural Minter!");
    }, 3000)
  };

};
And to close the curtains on everything successfully, don’t forget to call the overarching “generator” function:
// Don't forget to run the entire process!
generator();
Here’s how the entire minting function should look like in your code:
  // Set the parameters of the minting transaction then sign it for processing
  const contractObj = new web3.eth.Contract(contractNFT, contractAdrs)
  const startMint = async (tokenId) => {
 console.log('Attempting to mint to address: ' + address + '\n');
  const mintTX = await web3.eth.accounts.signTransaction(
        {
           from: address,
           to: contractAdrs,
           data: contractObj.methods.safeMint(address, ipfsPath).encodeABI(),
           gas: '2968862',
        },
        privKey
     );

  // Ask for a receipt of your transaction
  const createReceipt = await web3.eth.sendSignedTransaction(
        mintTX.rawTransaction
     );
 console.log('NFT successfully minted. Here is your receipt: ', createReceipt);
 setTimeout(() => {
 console.log("\nThank you for using Petar's Procedural Minter!");
    }, 3000)
  };

};
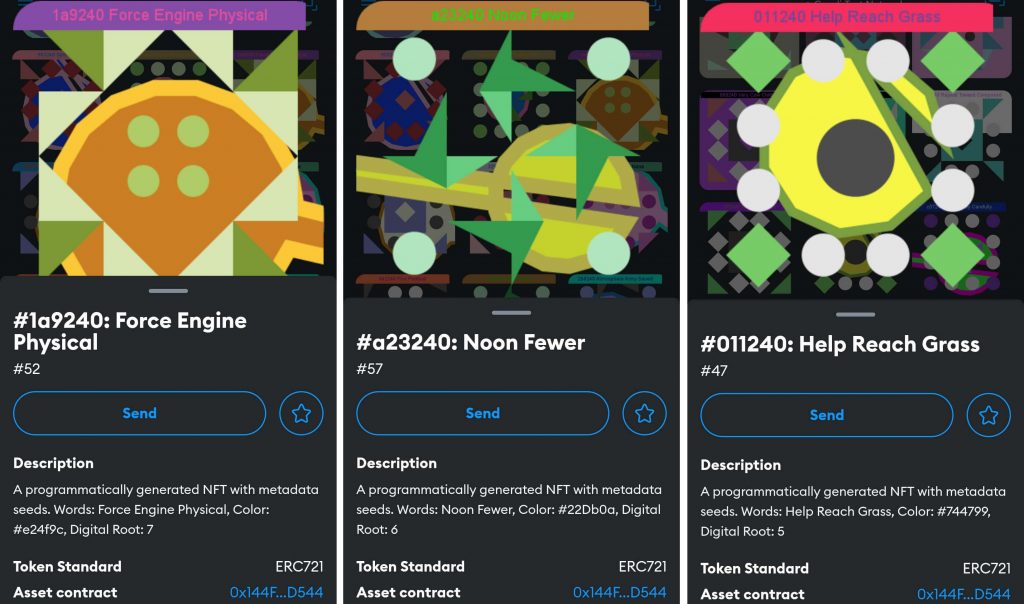
Outcome
With all the steps complete successfully you should now be the proud owner of a newly minted NFT that was brought forward entirely by procedural generation using code. And the best thing about it? All you need to do to mint some more is run the “generate.js” script. Here are some of the best results accomplished using the same tutorial code base, whose repo you can find here:
Power-boost your project on Chainstack
- Discover how you can save thousands in infra costs every month with our unbeatable pricing on the most complete Web3 development platform.
- Input your workload and see how affordable Chainstack is compared to other RPC providers.
- Connect to Ethereum, Solana, BNB Smart Chain, Polygon, Arbitrum, Base, Hyperliquid, Tempo, MegaETH, Monad, Plasma, Avalanche, Optimism, Scroll, Aptos, Cronos, Gnosis Chain, Kaia, Moonbeam, Celo, Aurora, TON, Ronin, and Bitcoin mainnet or testnets through an interface designed to help you get the job done.
- Fast access to blockchain archive data and gRPC streaming on Solana.
- To learn more about Chainstack, visit our Developer Portal or join our Telegram group.
- Connect your AI agent to Chainstack in seconds using Chainstack MCP — give Claude, Cursor, Codex, Gemini, and Windsurf live access to blockchain data, node management, and docs.
- Are you in need of testnet tokens? Request some from our faucets. Sepolia faucet, Base Sepolia faucet, Solana devnet faucet, Hoodi faucet, BNB faucet, zkSync faucet, Scroll faucet, Hyperliquid faucet, Monad faucet, Amoy faucet, Plasma faucet, TON faucet.
Have you already explored what you can achieve with Chainstack? Get started for free today.