Ethereum
 Hyperliquid
 Solana
 Arbitrum
 BNB Smart Chain
 Base
Base Polygon
 TRON
TRON Sui
Sui MegaETH


Web3 DApps: From architecture to interaction

Introduction
In this article, we’ll dive into the Web3 Decentralized Applications, or DApps, architecture, and you will also get to build one with a bonus tutorial at the end.
By now, you’ve likely heard of Web3 and its potential to revolutionize the internet as we know it. The demand for Web3 DApps is continuously increasing over time. A thorough understanding of Web3 applications and how they work will undoubtedly be helpful for developers as they build the internet of the future.
DApps run on the blockchain as part of a distributed or decentralized peer-to-peer network. The network participants, also known as nodes, are connected in public and often open-source, aiming to reduce the influence of centralized control over the network.
Three main components
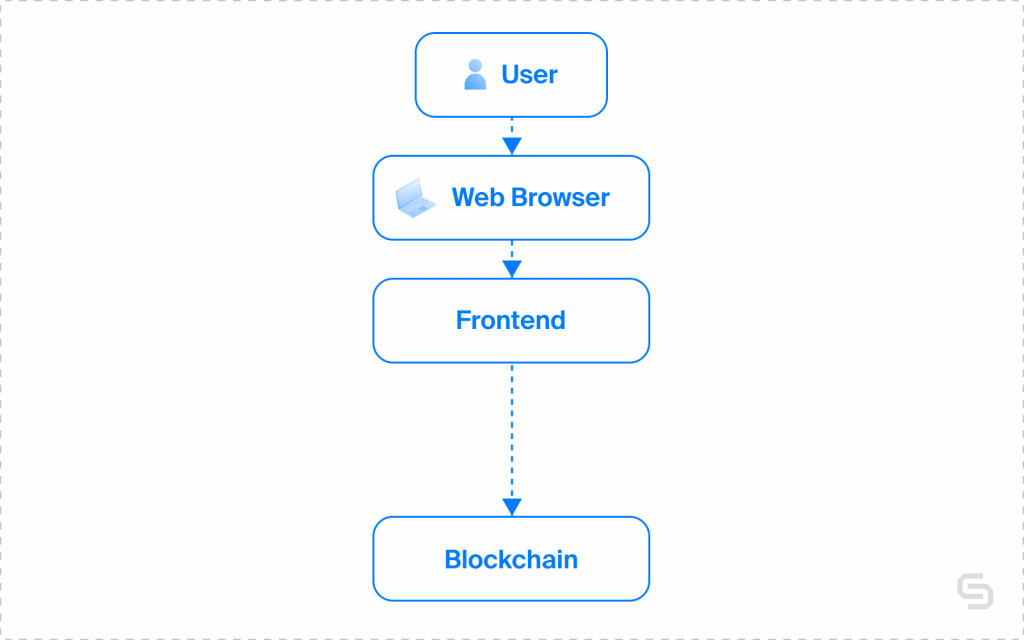
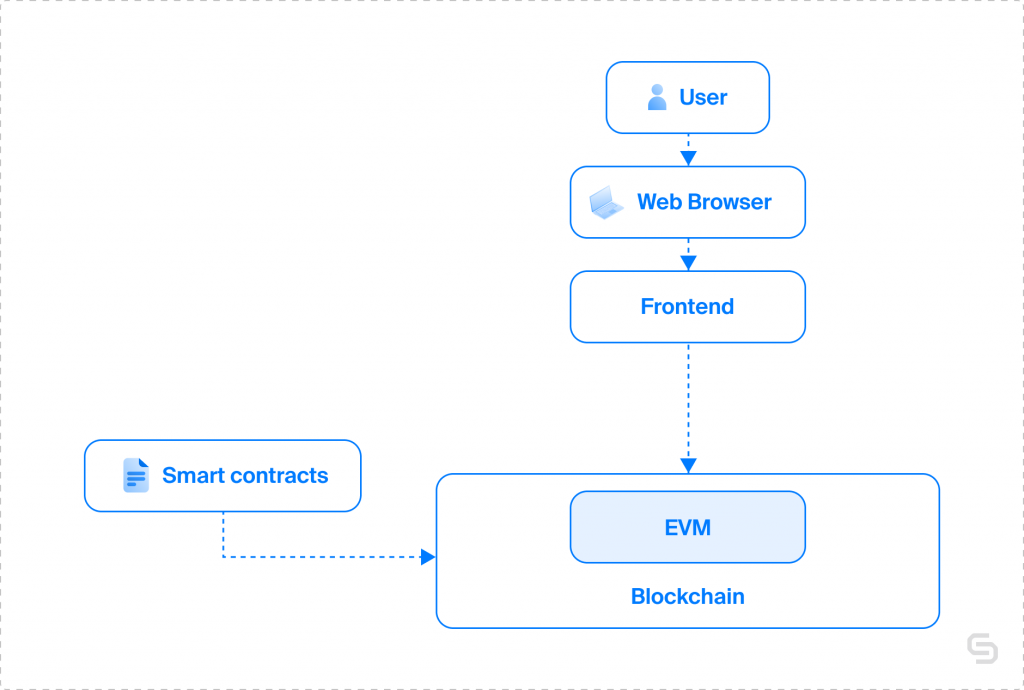
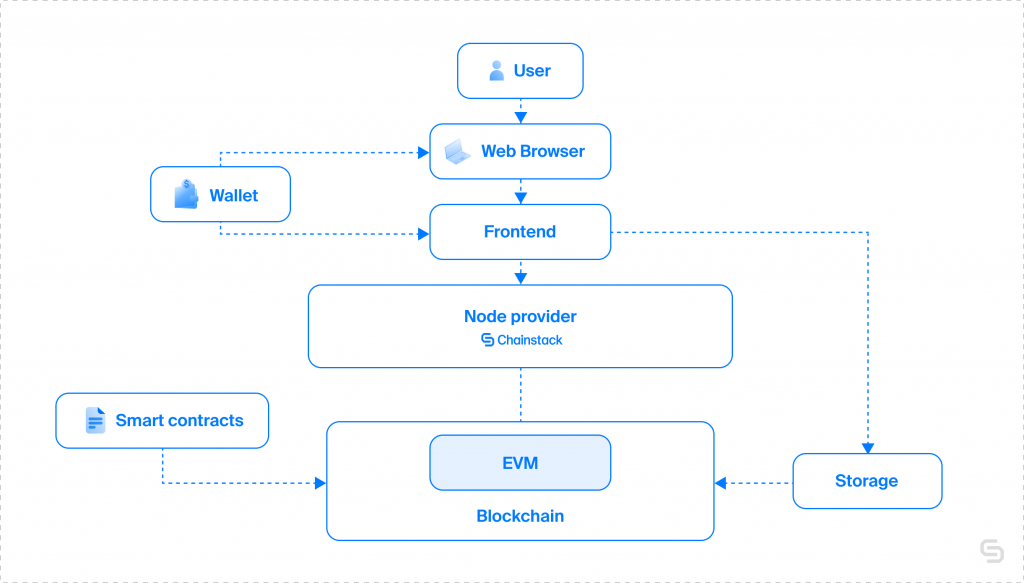
The internet that has shaped our modern lives for better or for worse until the arrival of blockchain technology is known as Web2. It is commonly referred to as the read-and-write web, and its architecture consists of three main components:
- Frontend – The user interface (UI) of an application. It consists of elements such as navigation menus, sidebars, and other elements visible to the end user. The front end of an application can be written in HTML, CSS, and JavaScript, or any other such frameworks like React, Vue, and Angular.
- Backend – Where the underlying application logic is defined. It is used to perform tasks such as authentication, notifications, and pretty much any form of automation you can imagine. The application backend is typically written in Python, Go, or Ruby.
- Database – A storage place for all your data. This is where the application keeps and fetches user information and other relevant operational data from. You will find MongoDB, SQL, and MariaDB as some of the go-to database choices.
The Web3 architecture
DApps, in contrast, however, have an entirely different architecture which consists of a wider range of elements. And by the time you finish this article, you should have gained a much deeper understanding of Web3 applications and how they work.
So, let’s start with the frontend component.
DAPPs’ frontend
Both Web2 and Web3 frontends share similar characteristics. Typically, developers use the same web languages (HTML, CSS, and JavaScript) and frameworks (React, Angular, etc.) to build a DApp’s frontend as they would for a standard web app. Even so, there are other aspects that differ when it comes to functionality. As you move forward with this article, you will gain deeper insight into just how these components work.

Blockchain
Unlike their Web3 counterparts, Web2 applications do rely on centralized servers or databases to store data. These can be, for example, AWS, Google Cloud Platform, and Microsoft Azure as some of the most notable alternatives.
Instead of centralized networks, blockchain technology is used to create apps on a distributed or decentralized state machine. The successful operation of such a machine is supported by the very same nodes that participate within the network. But unlike typical Web2 networks, there is a greater degree of anonymity and decentralization to be found here.
A blockchain is a data structure that stores a particular state, such as wallet balance and transaction data. Since the level of decentralization is much higher in a blockchain structure, the integrity of the network is better protected from hostile actions, as there is no central point of failure that holds the keys to the kingdom. This provides an extra layer of security that renders activities such as hacking or altering data mostly unfeasible. Additionally, the network’s users typically have a greater say in chain governance, as they maintain some level of ownership instead of a single entity doing so.
As mentioned above, you can store data on the blockchain but cannot alter or remove any data from it in general.
Some of the most notable blockchain protocols are Ethereum, Polygon, and Optimism, among many.
Smart contracts for DApps
Smart contracts provide the functionality to Web3 DApps. They are programs defined by business logic that run on the blockchain. They respond to data and execute when a specific set of conditions is met. The potential use cases for smart contracts are robust, and they are an integral part of Web3 applications. Solidity, Vyper, and Rust are common languages for smart contracts.
The following code shows the example of a simple “Hello World” smart contract in Solidity.
// SPDX-License-Identifier: MIT

pragma solidity 0.8.13;
contract HelloWorld {

      // This function can be called by anyone, does not change the state of the blockchain, and returns a string.
    function sayHelloWorld() public pure returns (string memory) {
        return "Hello World";
    }
}
EVM (Ethereum Virtual Machine)
The Ethereum Virtual Machine (EVM) is the Ethereum smart contract runtime environment. Its purpose is to execute code like a typical program but simultaneously across a wide range of network participants. In doing so, it essentially becomes a global computer that uses nodes as hardware and smart contracts as its software.
High-level programming languages, such as Solidity and Vyper, are used to write the executable code that runs on the EVM. And while Solidity code is human-readable, it turns into bytecode during interactions, so the machine that reads it can process it more efficiently. The Ethereum ecosystem owes its entire success to the EVM, which brought the concept of programmable money to the greater public.
You can learn more about the EVM and Ethereum clients by exploring our dedicated article on the Geth and Erigon clients.
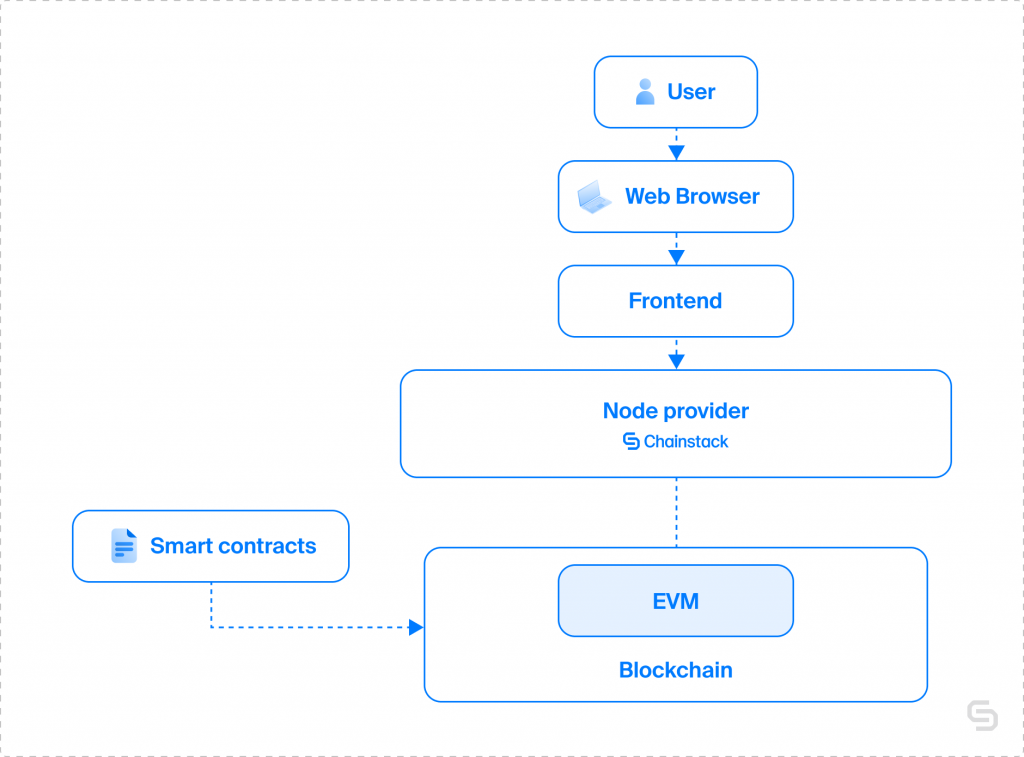
Communication between frontend and smart contract
Unlike many Web2 apps, the front end must interact with a node to communicate with the smart contract instead of using REST APIs or GraphQL. The term “Node” refers to a computer that runs Ethereum software and interconnects with other nodes in a peer-to-peer network to help secure it.
Find a deep dive into what nodes are by exploring our Blockchain node providers: What, how, and why guide.

Setting up a node on your own can be a very complex, time-consuming, and expensive process. Because of this, blockchain node providers such as Chainstack play an important role in alleviating the burdens of taking care of everything yourself.
Chainstack provides fast and scalable nodes as a service, which allows you to set up a node within minutes and stop worrying about its maintenance. This is also one of the primary reasons why many notable DApps choose to run their services on platforms like Chainstack.
You can deploy a node and access your RPC endpoint in three simple steps:
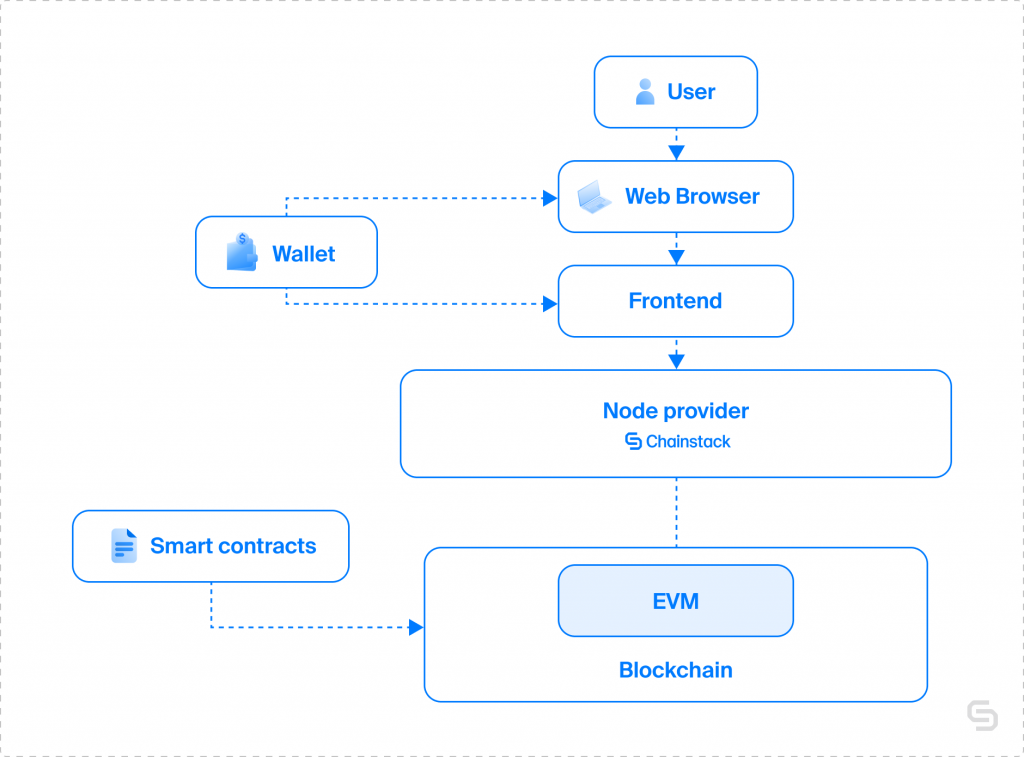
Providers supply Remote Procedure Call (RPC) and WebSocket (WSS) endpoints. Users can access data on the blockchain and submit transactions to various networks. An RPC is the most user-friendly API to communicate with servers and run programs remotely. In addition, DApps require RPC nodes to interact with the blockchain, making them a critical piece of technology.
As mentioned above, you can read data from the blockchain using RPC, but you need to sign a message to store any data on the blockchain. This means that users must use their private key to perform such an operation. Herein lies the role of an externally owned account, or EOA, such as the MetaMask wallet. It is one of the most widely used blockchain wallets, making it easy for users to interact with DApps, access vital key management tools, and sign transactions.
Usually, DAPPs interact via ‘Web3 libraries.’ These tools allow you to use languages like JavaScript and Python to communicate with a node and retrieve data, interact with smart contract methods, and send transactions. Using these libraries is the most efficient way to implement your DApp logic while being able to create user-friendly interfaces.
The most common JavaScript libraries are web3.js and ethers.js, while the web3.py library does so for Python.
Storage
Storage also plays a vital role in DApps. However, since storing images, videos, or any other kind of file in a blockchain is not ideal as it is expensive and not scalable, many users use decentralized storage services like IPFS, Arweave, and others instead.
IPFS is a decentralized file system for storing and accessing data. The IPFS protocol distributes and stores data in a peer-to-peer network rather than doing so within a centralized database.
On the other hand, Arweave enables the creation of an immutable decentralized database, allowing anybody to assess and debate the data’s validity. Moreover, it permanently stores files on a vast network of machines.
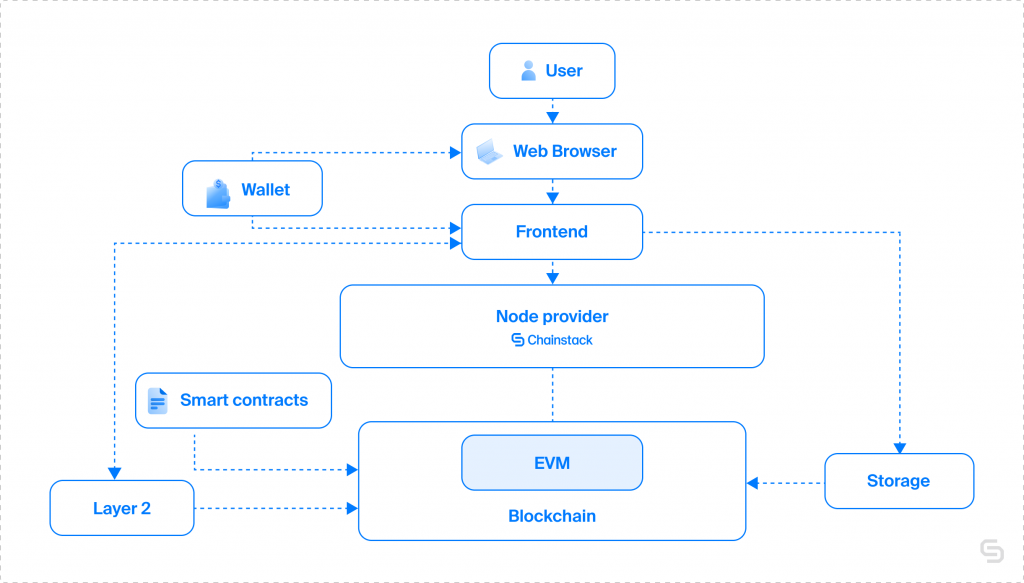
Although most decentralized applications utilize this architecture because it is adequate when your application grows, it is difficult for blockchains like Bitcoin and Ethereum to execute thousands of transactions per second, which makes them slow and expensive. This is where layer 2 solutions are helpful; they assist in scaling the already existing blockchain.
Scaling
The phrase “Layer 2”, or L2, refers to a protocol based on an existing blockchain and addresses the scaling issues of Layer 1 (L1) blockchains. Many scaling solutions – layer 2 chains like Polygon, Optimism, and Arbitrum exist and can serve as an extension to Ethereum to ease its network load and make transactions both faster and cheaper.
Although layer 2 chains would do most of the work this way, layer 1 still serves as the main chain and offers additional security. In contrast, layer 2 offers quick transactions, low transaction fees, and the ability to process thousands of transactions per second.
Build simple DApps
Now that you have a good understanding of the DApps structure, it’s time to build one, so you can get some hands-on experience. This time you will create one using “vanilla” tools like HTML and CSS for the front end. The DApp interacts with the smart contract using a JavaScript file via the ethers library.
The DApp you’ll be building leverages the powerful data-storing capabilities of blockchain technology, and although this will be a simple project, it will help you practice the fundamentals.
We’ll build an application that allows users to connect their MetaMask wallet to the page, input a string in a text box, which can be a word, number, or sentence, and save it in the smart contract as a variable using MetaMask to sign the transaction. After that, only that same address can retrieve the saved string, which is displayed on the screen as an alert box.
You can find the full code base with explanations in this GitHub repository.
Requirements
Before starting, you must consider some basic requirements for the webpage.
To serve the page, you can use a simple Node.js server. So, let’s start by installing Node.js and the lite-server library to see the page.
Follow these instructions:
- Install Node.js (download and instructions)
- Install lite-server (with NPM in a terminal/command prompt)
npm install -g lite-serverNow, you have the tools to serve a webpage on localhost.
- Create a new project directory, clone the repository, or create each file separately and paste the code manually
- Serve the webpage via terminal/command prompt from the directory that has index.html in it and run:
lite-serverNow, your webpage will be available on http://127.0.0.1:3000/, and you can view and use it from your browser.
As a development environment, I recommend using Visual Studio Code.
The smart contract
It’s finally time to dive into the code. Let’s start with the smart contract. The logic is simple:
- A mapping associates the address saving the string with it
- A function named
saveStringtakes a string as the parameter and saves the string into the mapping associating it to the address calling the function - A function named
getStringthat allows retrieving the saved string
// SPDX-License-Identifier: MIT
pragma solidity ^0.8.0;
contract SaveString {
// This mapping allows to associate an address with a string
mapping(address => string) public savedStrings;
// Function to save a string into the mapping with the address calling the function
function saveString(string memory _string) public {
savedStrings[msg.sender] = _string;
}
// Function to retrieve a string from the mapping, based on what address is calling it
function getString() public view returns(string memory) {
return savedStrings[msg.sender];
}
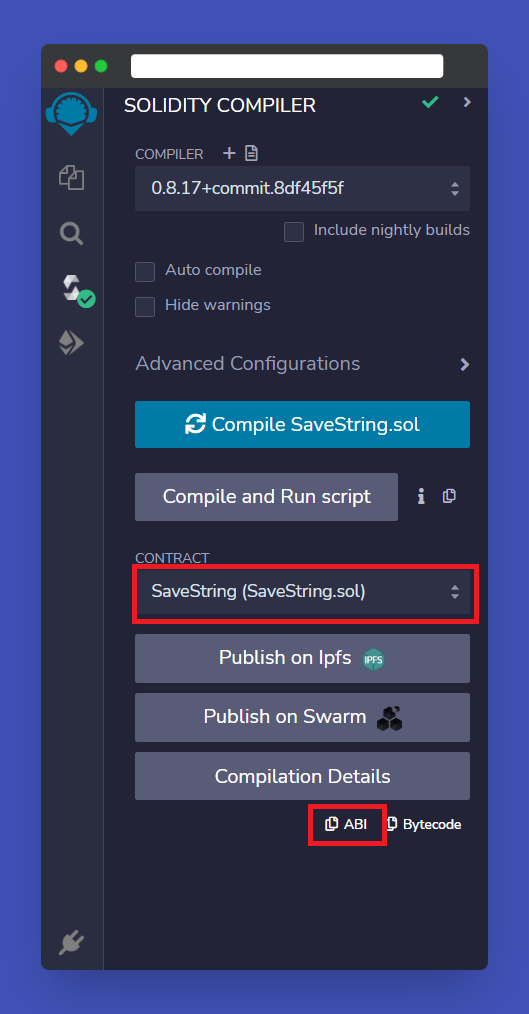
} Create a file named SaveString.sol in the project’s directory. To keep it simple, you can test and deploy the smart contract using the Remix IDE. You will find a section dedicated to this in the repository. In a more advanced setting, you can use a smart contract developing a framework like Foundry or Hardhat, Brownie, or Ape.
If you don’t want to deploy a new contract, you can use the smart contract that we already deployed and verified on the Fantom testnet.
To interact with it, you’ll need some Fantom testnet tokens (FTM); you can get some from the Fantom faucet.
The front end
Once you set up the smart contract, we can go ahead and build the front end. As I mentioned, we’ll build it with the basic tools.
Start by creating an HTML file named index.html and paste the following code into it.
<!DOCTYPE html>
<html lang="en">
<head>
<meta charset="UTF-8" />
<meta http-equiv="X-UA-Compatible" content="IE=edge" />
<meta name="viewport" content="width=device-width, initial-scale=1.0" />
<link rel="stylesheet" type="text/css" href="./style.css" />
<script src="https://cdn.ethers.io/lib/ethers-5.2.umd.min.js" type="application/javascript"></script>
<script src="script.js"></script>
<title>Save a string on the blockchain</title>
</head>
<body>
<div class="parent">
<div class="div1">
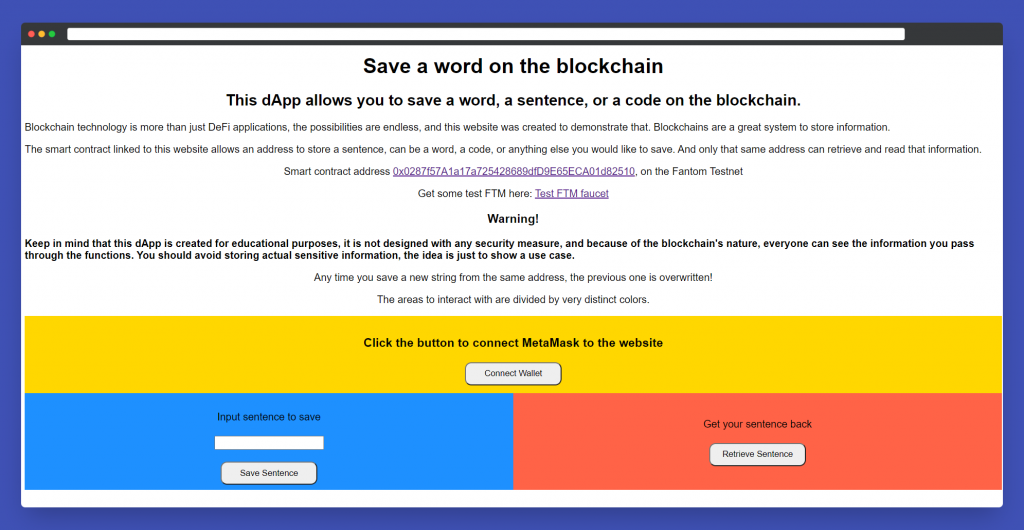
<h1 class="center">Save a word on the blockchain</h1>
<h2 class="center">This DApp allows you to save a word, a sentence, or a code on the blockchain.</h2>
<p>Blockchain technology is more than just DeFi applications, the possibilities are endless, and this website was created to demonstrate that. Blockchains are a great system to store information.</p>
<p>The smart contract linked to this website allows an address to store a sentence, can be a word, a code, or anything else you would like to save. And only that same address can retrieve and read that information.</p>
<p class="center">Smart contract address <a href="https://testnet.ftmscan.com/address/0x0287f57a1a17a725428689dfd9e65eca01d82510#code" target="_blank">0x0287f57A1a17a725428689dfD9E65ECA01d82510</a>, on the Fantom Testnet</p>
<p class="center">Get some test FTM here: <a href="https://faucet.fantom.network/" target="_blank">Test FTM faucet</a></p>
<h3 class="center">Warning!</h3>
<p><b>Keep in mind that this DApp is created for educational purposes, it is not designed with any security measure, and because of the blockchain's nature, everyone can see the information you pass through the functions. You should avoid storing actual sensitive information, the idea is just to show a use case.</b></p>
<p class="center">Any time you save a new string from the same address, the previous one is overwritten!</p>
<p class="center">The areas to interact with are divided by very distinct colors.</p>
</div>
<div class="div2">
<h3>Click the button to connect MetaMask to the website</h3>
<button onclick="connect()">Connect Wallet</button>
</div>
<div class="div3"><label>Input sentence to save </label>
<input type="text" id="input" /><br>
<button onclick="saveString()">Save Sentence</button>
</div>
<div class="div4"> <label>Get your sentence back</label>
<button onclick="getString()">Retrieve Sentence</button><br>
</div>
</div>
</div>
</body>
</html>If you look in the <head> section, you will notice this line:
<script src="https://cdn.ethers.io/lib/ethers-5.2.umd.min.js" type="application/javascript"></script> This injects the ethers.js library directly into the browser without installing extra dependencies. Note that this is good for our testing/learning environment. Still, it is not recommended to do so in production environments as it could expose some security risks.
We also import the script.js file and the style.css file, which we’ll build next.
<script src="script.js"></script>

<link rel="stylesheet" type="text/css" href="./style.css" />
The <body> of the HTML file holds the page’s structure. This example is simple overall; it has a few paragraphs explaining the DApp, an input field, and three buttons.
The styling
The front end would already be entirely functional, so this part is technically optional, but we can add some styling to make it more organized. Please note that my styling is the opposite of fancy. This is on purpose as I want to mainly highlight the different sections.
In the project’s directory, create a file named style.css and paste the following:
body {
    text-align: left;
    font-family: Arial, Helvetica, sans-serif;
}

.center {
    text-align: center;
}

.parent {
    display: grid;
    grid-template-columns: repeat(2, 1fr);
}

.div1 {
    grid-area: 1 / 1 / 2 / 3;
}

.div2 {
    grid-area: 2 / 1 / 3 / 3;
    background-color: #FFD700;
    height: 120px;
    display: flex;
    justify-content: center;
    align-items: center;
    flex-direction: column;
}

.div3 {
    grid-area: 3 / 1 / 4 / 2;
    background-color: DodgerBlue;
    height: 150px;
    display: flex;
    justify-content: center;
    align-items: center;
    flex-direction: column;
}

.div4 {
    grid-area: 3 / 2 / 4 / 3;
    background-color: Tomato;
    height: 150px;
    display: flex;
    justify-content: center;
    align-items: center;
    flex-direction: column;
}

button {
    width: 150px;
    padding: 8px;
    border-radius: 10px;
}

label {
    padding: 20px;
}
This will apply the styling to the page, and if you try to run it in your browser the page will look like this.
You can serve it in the browser by running lite-server in the terminal.
The JavaScript logic
Now it’s time for the important part, so far, we have a working front end, but all these nice buttons don’t do anything yet. Let’s fix that.
Create a file named script.js and paste this code:
// Smart contract address
const contractAddress = "0x0287f57a1a17a725428689dfd9e65eca01d82510";

// Smart contract ABI
const contractABI = [{
        "inputs": [{
            "internalType": "string",
            "name": "_string",
            "type": "string"
        }],
        "name": "saveString",
        "outputs": [],
        "stateMutability": "nonpayable",
        "type": "function"
    },
    {
        "inputs": [],
        "name": "getString",
        "outputs": [{
            "internalType": "string",
            "name": "",
            "type": "string"
        }],
        "stateMutability": "view",
        "type": "function"
    },
    {
        "inputs": [{
            "internalType": "address",
            "name": "",
            "type": "address"
        }],
        "name": "savedStrings",
        "outputs": [{
            "internalType": "string",
            "name": "",
            "type": "string"
        }],
        "stateMutability": "view",
        "type": "function"
    }
]

// Identify the accounts and connect MetaMask to the website.
async function connect() {

    const provider = new ethers.providers.Web3Provider(window.ethereum, "any");

    // Prompt user for account connection
    await provider.send("eth_requestAccounts", []);

    // define the address signing the transactions (account selected)
    const signer = provider.getSigner();
    console.log("Account:", await signer.getAddress());

    // create smart contract instance usinf address and ABI
    smartContract = new ethers.Contract(
        contractAddress,
        contractABI,
        signer);
}

// call the saveString function from the smart contract, use the input field as parameter
async function saveString() {
    const string = document.getElementById("input").value;
    smartContract.saveString(string);
}

// call the getString function from the smart contract
async function getString() {
    const getSPromise = smartContract.getString();
    const string = await getSPromise;
    alert("Your saved string is: " + string);
}
Note that the smart contract address here is the same as the contract we already deployed on the Fantom testnet. So, replace it with the address of your smart contract if you re-deployed it.
Here you will use the ethers.js library to “connect” the smart contract to your front end.
The first section initializes the contract address and ABI. ABI stands for Application binary interface, and you need it to be able to interact with a smart contract. The ABI describes variables and functions in the contract, so the ethers library knows what to do with your instructions.
You can find the ABI in Remix if you used it to compile the contract. If you used a framework like Hardhat, it would have generated an ABI file when you compiled the smart contract.
The first function allows the page to connect to MetaMask and use it to interact with the smart contract. In this case, it injects a provider called ‘window.ethereum’ in the browser so you can use MetaMask.
Then you have the two functions to save the string on-chain and retrieve it. Again, the repository has a deeper explanation of how those functions work.
This was the last step! Now your project structure should look something like this:
Project’s directory
  |
  |_ index.html
  |_ style.css
  |_ script.js
  |_ SaveString.sol
Note that the smart contract file does not need to be in the directory, but all the other files do.
Now serve the page with lite-server and play with your new creation.
- Click
Connect Walletand follow the instructions on MetaMask - Input the piece of information that you want to save in the smart contract, which can be a word, a number, or a sentence
- Click
Save Sentenceand complete the transaction from MetaMask - Click
Retrieve Sentenceto show an alert on the screen containing the word you saved from that address
Try to save multiple words from different addresses, so you can see how each piece of info saved is based on the address!
Note that if you use the smart contract already deployed, you’ll need to use the Fantom testnet and ensure that your wallet has the Fantom testnet selected.
Conclusion
This is it for this article. I hope that you now have a good understanding of Web3 applications and how they work. You also spent some time building a real DApp using a basic structure.
The next step would be to learn more about building DApps using tools like React and Next.js!
👋 Thanks for reading; see you next time.
Power-boost your project on Chainstack
- Discover how you can save thousands in infra costs every month with our unbeatable pricing on the most complete Web3 development platform.
- Input your workload and see how affordable Chainstack is compared to other RPC providers.
- Connect to Ethereum, Solana, BNB Smart Chain, Polygon, Arbitrum, Base, Hyperliquid, Tempo, MegaETH, Monad, Plasma, Avalanche, Optimism, Scroll, Aptos, Cronos, Gnosis Chain, Kaia, Moonbeam, Celo, Aurora, TON, Ronin, and Bitcoin mainnet or testnets through an interface designed to help you get the job done.
- Fast access to blockchain archive data and gRPC streaming on Solana.
- To learn more about Chainstack, visit our Developer Portal or join our Telegram group.
- Connect your AI agent to Chainstack in seconds using Chainstack MCP — give Claude, Cursor, Codex, Gemini, and Windsurf live access to blockchain data, node management, and docs.
- Are you in need of testnet tokens? Request some from our faucets. Sepolia faucet, Base Sepolia faucet, Solana devnet faucet, Hoodi faucet, BNB faucet, zkSync faucet, Scroll faucet, Hyperliquid faucet, Monad faucet, Amoy faucet, Plasma faucet, TON faucet.
Have you already explored what you can achieve with Chainstack? Get started for free today.