Ethereum
 Hyperliquid
 Solana
 Arbitrum
 BNB Smart Chain
 Base
Base Polygon
 TRON
TRON Sui
Sui Robinhood


NEAR smart contracts tutorial – Hello World with JS – NEAR protocol tutorial set
NEAR is deprecated on Chainstack and is no longer available for new deployments.
In this article, we will be looking into the elements of a JavaScript-based NEAR smart contract, and we will also see how to use the NEAR Command Line Interface (CLI), a powerful tool that lets you interact with the NEAR network.
Introduction
Greetings fellow BUIDLers; welcome to the third article in the NEAR protocol tutorial set:
The previous articles gave you a detailed overview of the NEAR protocol, its features, and of course, a neat little tool called the NEAR explorer. So, by now, you are equipped with almost all the knowledge required in order to start building your own NEAR DApps, well, almost!
A crucial part of the DApp building puzzle that we have yet to explore is the structuring of a NEAR smart contract. Sure, we have ways to quickly set up the codebase for a simple DApp, but I am talking about complex DApps with tons of cool functionalities. To create one of those, you need to understand the components of a NEAR smart contact and how to use them. Also, creating and deploying a smart contract is step one towards building your own DApps; after that, you need to find ways to interact with the contract.
Fret not; this article covers all that and much more. So let’s get started.
Understanding a NEAR smart contract
Like its counterparts, NEAR smart contracts are essentially executable programs stored on the NEAR network. In NEAR, after you write a contract, it gets compiled into WebAssembly, and from there, it gets deployed onto an account in the NEAR network. Once the network associates a contract with an account, the users are free to interact with it.
One of the major differences between an Ethereum smart contract and one in NEAR is that you can write NEAR smart contracts using general-purpose programming languages like JavaScript, TypeScript, or Rust.
In this article, we will be using pure JavaScript to write a NEAR smart contract.
Setting up the environment
Alright! before we start writing contracts, make sure that you have the following dependencies installed on your system.
Once all the requirements are installed, we can use the create-near-app package to quickly set up a NEAR project. To use the package:
- Create a new directory
- Open a new terminal in the directory
- Type the following command:
npx create-near-app@latestThe command will ask you to select a:
- Preferred language (TypeScript)
- Preferred template (No frontend)
- Name for your application (hello-world…maybe)
You can also select the option for installing all the required NPM packages.
Once all that is said and done, the package will create a properly structured codebase, complete with a sample smart contract inside the contract/src directory.
Now, the package, as per our command, generates a smart contract written in TypeScript, but since the article promises a pure JavaScript-based contract, you can delete the TypeScript file inside the contract/src directory (one with the .ts extension) and create a new JavaScript file in its place (contract.js).
Note that TypeScript is like a superset of JavaScript, which means that any valid JavaScript code is also valid TypeScript code. However, TypeScript has some additional features that are not present in JavaScript. So, if you are a TypeScript aficionado, feel free to use TypeScript for the contract.
Also, if you open the contract/build.sh file, you will find the command for building (compiling) our contract and generating the corresponding WebAssembly file. Since we are using a JavaScript (.js) file for this article, make sure to edit the command and replace <file_name>.ts with the name of your JavaScript file (contract.js, in this case).
The build.sh shell script comes with the create-near-app package, and it helps you build your contracts. You can also build your contracts by manually running the command mentioned in the shell script.
Ok, with that, we have everything we need in order to develop our smart contract, so let’s get to it.
Writing the smart contract
Now, we will be writing a voting contract (a bit of a cliché, I know!). Our contract will enable the users to:
- Add new candidates
- Cast votes
- View the list of candidates
- View the result
The imports
To start things off, open the contract.js file (inside the contract/src directory) in your code editor and add the following lines:
import {
  NearBindgen,
  call,
  view,
  near,
  UnorderedMap,
  initialize,
  assert,
} from "near-sdk-js";
Now, this is a pretty straightforward import statement that adds a couple of useful things to our contract (we will explain each of them soon). As you can see, all the entities are being imported from a single package, the near-sdk-js. This package gets automatically installed when we generate the codebase using create-near-app.
Class declaration
After the import statement, we can declare our contract class:
@NearBindgen({})//decorator
export class voteContract {
	//write functions here
}
In NEAR, a contract is defined using a class; within this class, we can add all the required properties and functions. Based on your use case, you can even declare other “non-contract” classes within the same file, but the class containing the core contract logic should be preceded or decorated using NEAR Bindgen.
The decorator @NearBindgen({}) separates the “contract” class from the rest and also helps generate the code to:
- Convert the class into a valid NEAR contract
- Set the visibility of public functions
- Serialize objects for internal storage and communication with external actors
Setting default values
Once we have declared the class, we can start working on the functions for setting some default values and state initialization:
@NearBindgen({})
export class voteContract {
	constructor() {
    this.vote_map = new UnorderedMap("vote-map");
    this.owner_id = "";
  }

  @initialize({})
  init(_owner_id) {
    this.owner_id = _owner_id;
  }
}
The constructor() function, as per usual, helps set the default values for the class attributes (the ones referred to using this keyword) upon contract deployment. Here, we are using it to create a new class attribute called vote_map, which contains an empty UnorderedMap, and also to create owner_id, a class attribute for storing the account ID of the user who deployed the contract.
The UnorderedMap works exactly like a Python dictionary or mapping in Solidity. It helps model the data as key-value pairs. Here, we will use this to map the name of the candidates to the corresponding votes that they receive.
In NEAR, complex structures like UnorderedMap should be initialized using a unique prefix (vote-map, in our case). This prefix is used to identify the structure’s keys in the serialized state.
Apart from UnorderedMap, the NEAR SDK provides a set of other complex data structures that the developers can use while writing smart contracts. To learn more about these data structures, you can refer to the official NEAR docs.
After the constructor() function, we declared an initialization function, init(). The purpose of this function is to help set the initial state values. The initialization function should be decorated using the initialization macro—@initialize({}).
Here, the init() function is used to set the account ID of the user deploying the contract onto this.owner_id class attribute. We will pass the user’s account ID to the init() function when we deploy the contract.
By default, the initialization functions are public functions, meaning that they can be called by anyone. Keeping with the safety practices, it is best that you declare them as a private function or a function that can only be called by the account that hosts the contract (the contract’s account). To do this, we need to modify the @initialize({}) decorator:
@NearBindgen({})
export class voteContract {
	constructor() {
    this.vote_map = new UnorderedMap("vote-map");
    this.owner_id = "";
  }

  @initialize({privateFunction: true}) //private function
  init(_owner_id) {
    this.owner_id = _owner_id;
  }
}
In the contract, you can also make the initialization function mandatory. This will prevent other “state-changing” functions from being executed before you initialize the state. For this, you need to modify the @NearBindgen({}) decorator and add the requireInit parameter:
@NearBindgen({requireInit: true})
export class voteContract {
	constructor() {
    this.vote_map = new UnorderedMap("vote-map");
    this.owner_id = "";
  }

  @initialize({privateFunction: true})
  init(_owner_id) {
    this.owner_id = _owner_id;
  }
}
Adding the functions
Once we set the default values, we can work on the rest of the functions. In the NEAR smart contracts, apart from what we just saw ( constructor(), init() ), there are two other types of functions, they are:
- Call functions
- View functions
A call function is what you call a “state-changing” function. These functions contain the code for manipulating the state. These functions can also call other contracts. A view function can only read the state data and cannot cause any changes to it. These functions are free for everyone to access, and users can call a view function without needing a NEAR account.
The call and view functions are decorated using @call({}) and @view({}) decorators, respectively.
So, as discussed, let’s write the functions for adding and viewing candidates, casting a vote, and viewing the results:
//add new candidates
  @call({})
  addCandidate({ _candidate_name }) {
    //getting the account ID of the user who called this function
    let caller_id = near.predecessorAccountId();
    //make sure that only the owner can add new candidates
    assert(caller_id == this.owner_id,"Only owner can add candidates")
    //add the candidate name to the map,
    //along with the default number of votes (o)
    this.vote_map.set(_candidate_name,0);
  }

  //view the list of candidates
  @view({})
  listCandidates({ }) {
    //get the keys(candidate names) from the unorderedmap
    return this.vote_map.keys.toArray();
  }


  @call({})
  castVote({_candidate_name}) {
    //get the number of votes obtained by a candidate
    //and update it
    let currentVote = this.vote_map.get(_candidate_name) + 1;
    //increment the vote and add it to the map
    this.vote_map.set(_candidate_name,currentVote);
  }

  @view({})
  showResult(){
    //convert the map to an array and return it
    return this.vote_map.toArray();
  }
Here, you can see that the addCandidate() and castVote() functions are decorated with @call({}), while the others are decorated using @view({}). This basically points to the nature of these functions i.e. whether they are a call function or a view function.
The addCandidate() function takes the name of the candidate as the parameter (_candidate_name) and, using the assert() statement, makes sure that the account ID of the person calling the function (caller_id) and the account ID of the person who deployed the contract (this.owner_id) are one and the same. If they are not the same, the function will throw an error and halt its execution. The idea is to prevent anyone other than the contract owner from calling this function.
The castVote() function takes the name of the candidate as a parameter and gets the number of votes (using the get(<key>) function) that is stored against the candidate’s name in our UnorderedMap. The value is then updated and added back into the UnorderedMap using the set(<key>,<value>) function. Both the get() and set() functions come as part of the map structure.
The listCandidates() function is a view function that takes the keys (candidate names) from our UnorderedMap and returns them. The showResult() function converts the UnorderedMap into a list of lists (carrying the candidate’s name and votes) and returns them.
Once you add all the functions, the completed smart contract should look something like this:
import {
  NearBindgen,
  call,
  view,
  near,
  UnorderedMap,
  initialize,
  assert,
} from "near-sdk-js";

@NearBindgen({requireInit: true}) //set mandatory initialization
export class voteContract {
  constructor() {
    // creating a map for tracking the candidates
    // and the number of votes they receive
    this.vote_map = new UnorderedMap("vote-map");
    //creating a variable for storing the account id of the contact owner
    this.owner_id = "";
  }

  //initialize the account id of the contract owner
  @initialize({privateFunction: true})
  init({_owner_id}) {
    this.owner_id = _owner_id;
  }
  //add new candidates
  @call({})
  addCandidate({ _candidate_name }) {
    //getting the account ID of the user who called this function
    let caller_id = near.predecessorAccountId();
    //make sure that only the owner can add new candidates
    assert(caller_id == this.owner_id,"Only owner can add candidates")
    //add the candidates' name to the map,
    //along with the default number of votes (o)
    this.vote_map.set(_candidate_name,0);
  }

  //view the list of candidates
  @view({})
  listCandidates({ }) {
    //get the keys(candidate names) from the unorderedmap
    return this.vote_map.keys.toArray();
  }


  @call({})
  castVote({_candidate_name}) {
    //get the number of votes obtained by a candidate
    //and update it
    let currentVote = this.vote_map.get(_candidate_name) + 1;
    //increment the vote and add it to the map
    this.vote_map.set(_candidate_name,currentVote);
  }

  @view({})
  showResult(){
    //convert the map to an array and return it
    return this.vote_map.toArray();
  }

}
To deploy the contract onto the network, you must build (compile) it and create the corresponding WebAssembly file. To build your contract, open a terminal in the root directory of your project and use the following command:
npm run buildThis will compile your contract and store all the output files in the contract/build directory. Within the directory, you will find the corresponding WebAssembly file of your contract (<project-name>.wasm), along with other artifacts.
So, now that we have a compiled contract, let’s deploy it.
Smart contract deployment
To deploy the contract, we will use the NEAR CLI tool. This tool allows the users to:
- Access accounts
- Deploy and interact with contracts
This tool is automatically installed by the create-near-app package, and you can use it by opening a terminal in the project root directory and typing the following command:
npx nearThis will display all the available NEAR CLI commands and their usage:
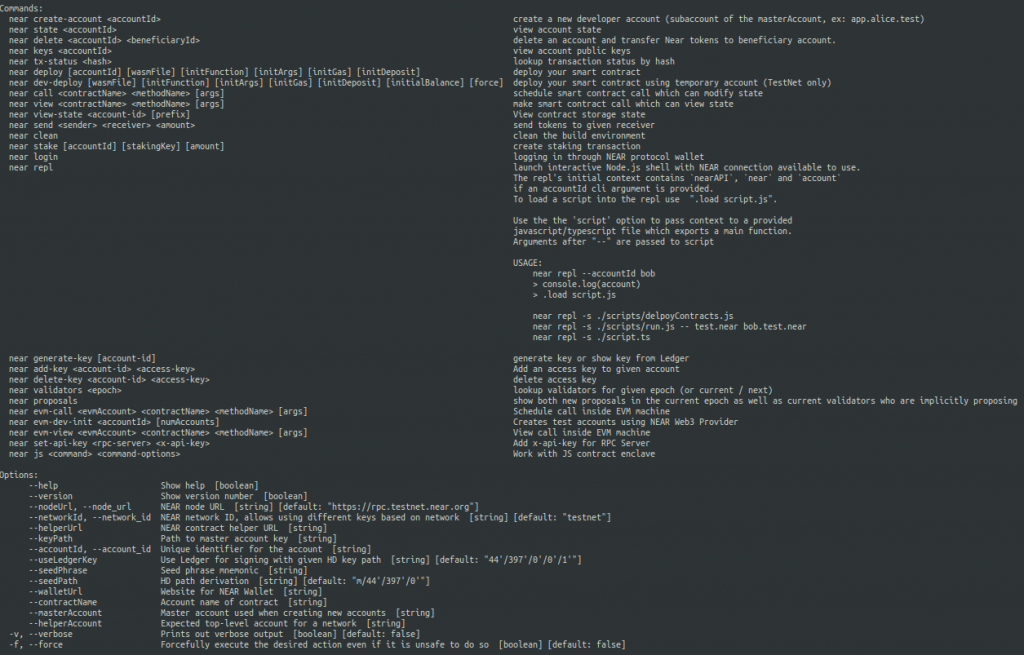
You can install the NEAR CLI tool globally onto your system using the following:
npm install -g near-cl
This will allow you to directly run the tool from anywhere within your system without the npx prefix. In this article, we are using and running the NEAR CLI package from within our project directory, hence the npx prefix.
To deploy a smart contract to the NEAR network, you would also require a valid NEAR account (a NEAR testnet account will suffice).
You can use the previous tutorial to learn how to set up a NEAR account.
Accessing the account
Once you have the CLI tool and the account, the first thing that you need to do is to log in to your account. You can use the following NEAR CLI command in order to access your testnet account:
npx near loginThis will automatically open a page in your browser that will prompt you to select the account that you want to access:
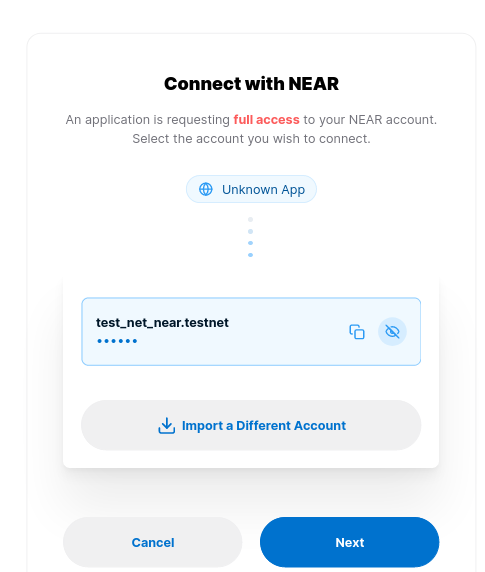
Once you authorize access to the account, the CLI tool will log in to your account.
Deploy contract
Now, we can deploy the contract using the following command:
npx near deploy --wasmFile contract/build/<file-name>.wasm --accountId <your-account-id> --initFunction init --initArgs '{"_owner_id":"<account-id>"}'The command takes in the path to the WebAssembly (.wasm) file, the user account ID, the name of the initialization function (init(), in our case), and the parameter value for the init() function. After deploying the contract and initializing it with the value, the command will output the transaction ID.
Since we are running the CLI commands from within our project directory, the path to the WebAssembly file is kept relative to the directory. If you are running it from any other location, be sure to provide the correct (absolute) path to the WebAssembly file.
Once the contract is deployed, we can use the CLI tool and contract ID (the account ID of the contract) to interact with it.
Here’s how you can call the addCandidates() function using the NEAR CLI:
npx near call <contract-id> addCandidate '{"_candidate_name":"alice"}' --accountId <user-account-id>Here, the command takes in the contract ID (account ID of the contract), the function’s name, the required parameter values, and the account ID of the user invoking the function. Since addCandidate() is a call function, we have to use the call keyword at the start of the command.
To view the list of candidates, we can use the following command:
npx near view <contract-id> listCandidatesAs you can see, with view functions like listCandidates(), you don’t need to add the account ID of the user invoking it since these functions are free for all to access.
All the other call and view functions in the contract follow the same command pattern, do play around with it.
And with that, we have successfully created, deployed, and interacted with a JavaScript-based NEAR smart contract.
Conclusion
This article is aimed at giving you an overview of the various elements involved in a NEAR smart contract and showing you how to use them in order to create complex contracts. In the coming tutorials, we will further explore NEAR smart contracts and write actual scripts for testing, deploying, and interacting with the contracts and will do all this from your own NEAR node, hosted in the Chainstack Platform.
- Discover how you can save thousands in infra costs every month with our unbeatable pricing on the most complete Web3 development platform.
- Input your workload and see how affordable Chainstack is compared to other RPC providers.
- Connect to Ethereum, Solana, BNB Smart Chain, Polygon, Arbitrum, Base, Hyperliquid, Robinhood Chain, Tempo, MegaETH, Monad, Plasma, Avalanche, Optimism, Scroll, Aptos, Cronos, Gnosis Chain, Kaia, Moonbeam, Celo, Aurora, TON, Ronin, and Bitcoin mainnet or testnets through an interface designed to help you get the job done.
- Fast access to blockchain archive data and gRPC streaming on Solana.
- To learn more about Chainstack, visit our Developer Portal or join our Telegram group.
- Connect your AI agent to Chainstack in seconds using Chainstack MCP — give Claude, Cursor, Codex, Gemini, and Windsurf live access to blockchain data, node management, and docs.
- Are you in need of testnet tokens? Request some from our faucets. Sepolia faucet, Base Sepolia faucet, Solana devnet faucet, Hoodi faucet, BNB faucet, zkSync faucet, Scroll faucet, Hyperliquid faucet, Monad faucet, Amoy faucet, Plasma faucet, TON faucet.
Have you already explored what you can achieve with Chainstack? Get started for free today.