Ethereum
 Hyperliquid
 Solana
 Arbitrum
 BNB Smart Chain
 Base
Base Polygon
 TRON
TRON Sui
Sui Robinhood


NEAR protocol tutorial set – Learn how to deploy DApps on NEAR – Quickstart with JS
NEAR is deprecated on Chainstack and is no longer available for new deployments.
This is the first article in “The NEAR tutorial set”, which aims to help you break into the NEAR ecosystem and build highly scalable applications on top of the NEAR network. In this article, we will see how to quickly deploy a NEAR DApp using the JavaScript SDK.
Introduction
Exploring blockchain protocols is quite fun. Every new protocol is essentially a variant that puts forth a solution to the general problem of attaining the right amount of scalability and performance for decentralized computation (and by extension, decentralized applications) in order for it to gain mass adoption. Some variants follow a fix-as-you-go approach, where they improve the underlying architecture and protocol as the demand for performance increases and then there are other protocols that come with inherent solutions that helps it to scale according to the performance demands. NEAR belongs to the latter class of variants. NEAR is branded as a community-operated cloud platform on top of which people can deploy and run decentralized applications. This article is all about exploring the basics of NEAR and seeing how quickly we can deploy an application on top of it.
What is NEAR protocol?
NEAR is a general-purpose, Layer 1 blockchain protocol that uses the proof-of-stake consensus mechanism. What this means is that with NEAR, you have a base layer blockchain that uses the proof-of-stake algorithm to reach an agreement regarding the data that is to be stored in the chain and you can use the NEAR platform to build virtually any kind of application.
Once you build a DApp, the growth of the application revolves around the ease with which it can onboard new users and deliver a seamless user experience. In order to encourage both these features, a large part of the NEAR design philosophy is built around the ease of use or usability of an application. NEAR allows developers to build DApps that can provide an all-too-familiar experience to the end user. This involves providing functionalities like wallet-less (initial) interaction, readable account addresses, etc. Apart from smooth onboarding, to sustain the user base, the application should also be able to provide and maintain high performance, even during times of great network demand. For this, NEAR relies on an elegant solution called sharding.
Split the load through sharding
As all of us might know, a blockchain network is a collection of computational devices, referred to as nodes. These nodes take care of the processing, validation, propagation, and storage of transactions in the blockchain network. When you analyze some of the most popular blockchain networks out there, you can see that when a new node joins a network, the amount of computational effort that it contributes (based on its role) is the same as the average computational effort of the network (as per the role), meaning as the network load increases, every node in the network will equally feel the pain. This strategy may not be optimal in the long run as all the nodes will get overworked every time there is an increase in network traffic, and this leads to processing delays and a decline in performance. A simple alternative to this strategy is to split the overall computational effort of the network among its participants. This is the essence of sharding. In a sharded blockchain network, the chain is split into separate fragments or shards and a subset of nodes are given the responsibility of maintaining these shards.

In such a network, the nodes are only required to put forth the computational effort required to maintain a particular shard and not the entire network. Each shard can perform computational tasks, independent of each other. This means that as the number of nodes increases, the processing capacity of the network also increases. Given that there is no upper limit to the number of nodes that can join the network, one can theorize that networks like NEAR, which uses sharding, can be scaled to infinity.
This sounds exciting, but what about the uniformity of data across the chain? How do we take care of the data consensus in such a “partitioned” network?
Validation through proof of stake
As mentioned previously, NEAR uses proof of stake consensus. In this mechanism, a node must stake a certain amount of NEAR tokens in order to participate in the decision-making process. The nodes that participate in the process are called validators, and in NEAR, a new set of validators is chosen every 12 hours (an epoch). The selection of validators is done via an auctioning mechanism and a user who does not run a NEAR node can also participate in the process by delegating or entrusting his tokens with a validator of his choice. Compared to the proof-of-work consensus, in NEAR, if a validator is proven to be malicious, the stake that they deposited to partake in the consensus process will be slashed, meaning, they will lose all their stake. Since the payout of a malicious action might not be worth the stake, it ensures good behaviour among the validators in the network.
Note: In the NEAR network, based on the computational capabilities, a validator node can either choose to validate and produce a chunk (a group of transactions from a shard) or a block (a group of chunks).
A Serverless experience
So, with NEAR, we are talking about the proof-of-stake-based sharded blockchain network, in which nodes called the validators take care of the consensus process. Now, given the complexity of the architecture, a developer might feel a bit overwhelmed when it comes and developing applications on top of the network. But as we have already established, ease of use is at the core of the NEAR design principles, so apart from a strong network and a seamless end-user experience, NEAR also comes with a serverless computing model, meaning that to develop an application on top of NEAR, a developer need not worry about the underlying architectural management.
To put this feature to the test, let’s see how quickly someone with a basic understanding of the platform (yes, I am talking about us) can deploy and run an application on top of it.
A NEAR DApp
This section is all about quickly creating and running an application on top of the NEAR network, so before we get started with the app-building process, make sure you have the following things installed on your system:
All done? Great, now let’s build a NEAR DApp.
NEAR smart contracts
As with countless other DApps, the core component of a NEAR application is also the smart contract. A smart contract essentially helps define the logic of the application and in NEAR you can write the smart contract using one of these two languages:
Note: Since TypeScript is the most popular of the two languages, we will be using it to develop our smart contract.
Regardless of the language that you choose, when compiled, all NEAR smart contracts are converted to a WebAssembly (.wasm) file.
A project in seconds
NEAR has this neat little functionality where it allows us to create and deploy a sample project with minimal coding. To try this out:
- Create a new folder.
- Open a new terminal in the folder.
- Type the following command.
$ npx create-near-app@latest When you run this command, it will prompt you to select the following:
- Preferred language (TypeScript).
- Preferred template (Vanilla JavaScript).
- A name for your application.
You may also choose to install all the required NPM packages.

After execution, the command will generate a project structure complete with:
- A TypeScript smart contract.
- A basic front-end for your application.
- Some integration test files.
The smart contract will be stored in the contract/src folder.
import { NearBindgen, near, call, view } from 'near-sdk-js';

@NearBindgen({})
class HelloNear {
  greeting: string = "Hello";

  @view({}) // This method is read-only and can be called for free
  get_greeting(): string {
    return this.greeting;
  }

  @call({}) // This method changes the state, for which it cost gas
  set_greeting({ greeting }: { greeting: string }): void {
    // Record a log permanently to the blockchain!
    near.log(`Saving greeting ${greeting}`);
    this.greeting = greeting;
  }
}
The contract is built using the JavaScript SDK package (near-sdk-js). In the contract, you can see that it stores and retrieves a greetings message using the two functions:
- set_greetings()
- get_greetings()
Every function (and the contract class) in the contract is preceded by a decorator. They are used to add annotations and extra information about the functions (or the class).
To build the given contract, open a terminal in the root folder of the project and type,
$ npm run build The command will compile the contract and store the corresponding WebAssembly file of the contract inside the contract/build folder.
And with that we have a compiled contract in our hand, now all we need to do is to deploy it onto the network.
Setting up an account
Before we start deploying the contract onto the network, we need to set up a NEAR account. These accounts are used to store different assets, conduct transactions and have other general interactions with the network. In NEAR, instead of the public key hash, users can allocate human-readable IDs for account identification. This means that you can create accounts with IDs like account.near. This is very similar to a website domain name, and it provides a super convenient way to use and remember accounts in the NEAR network. The length of the account ID can be anywhere between 2 and 64 characters. In NEAR, users can also create multiple “sub-accounts” from one main account. Since there is a limit to the length of the account ID, you can only create a finite amount of sub-accounts.
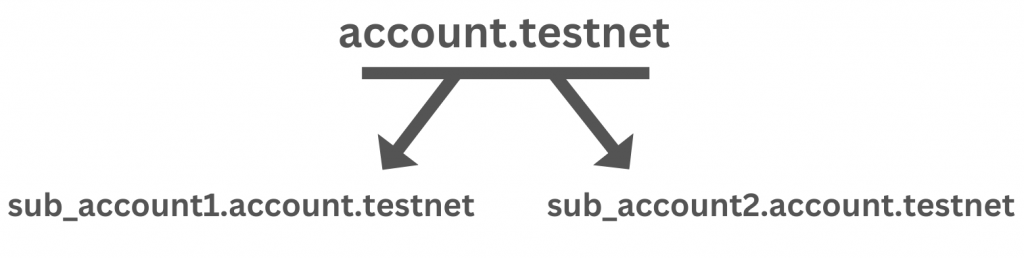
Every account in NEAR can hold a single contract. While building large applications, multiple contracts are stored across the sub-accounts originating from the main account.
To create an account, we can use a NEAR wallet. You can create an account in both the NEAR testnet and the mainnet, for development purposes, we usually stick to testnet accounts.
To create a testnet account:
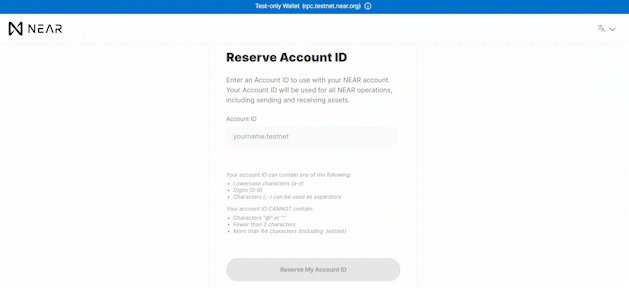
- Head over to https://wallet.testnet.near.org/ and click Create Account.

- This will prompt you to enter a human-readable ID for the account. Provide an ID with the given requirements and click on Reserve my Account ID.
- The next step is to select a method for securing the account. You can select the Secure Passphrase and click Continue.
- This will show you 12 random words and you are required to safely store these words. Once you saved them, click on Continue.

- Next, the wallet will ask you to enter a random word from the passphrase in order to verify the phrase. Once you enter the right word, it will take you to the newly generated account.

And with that, we have created a testnet account. Once you open the account, you may notice that the account will already have close to 200 NEAR test tokens available. This is the NEAR way of making things easy for the developer.
Deploy smart contract
Now that we have an account, we can use it for deploying and storing the contract. To do this, we need the help of the near-cli tool. This is a command line tool that helps you interact with the NEAR network. To install near-cli, use the following command:
$ npm install -g near-cli Once you have the CLI tool installed, you can use the following command to deploy the contract to our account.
$ near deploy --accountId example-contract.testnet --wasmFile example.wasm As you can see, the command takes the account ID and the location of the compiled WebAssembly file as the parameters.
In NEAR, there is an even simpler way to deploy and run your contracts in a testnet and this involves the NEAR dev-deploy command. This command:
- Automatically generates a temporary account in the testnet.
- Deploys the contract onto that account.
Unlike the deploy command, the dev-deploy command only requires the location of the WebAssembly file as a parameter:
$ near dev-deploy --wasmFile example.wasm In our sample project, we will be using this command to deploy the contract, so open a terminal in the root folder of the project and type:
$ npm run deployThis will call the dev-deploy command and deploy our contract onto a testnet. The command also creates a new folder /neardev in our project folder. This folder will contain the details of the temporary account that we have created.
Once you deploy the contract, you can view the transaction on the NEAR block explorer using the link provided at the end of the command execution
A quick interaction
Now that we have the contract up in the chain, we can interact with it using the front end provided by the sample application. To run the front end, open a terminal in the project root folder and type:
$ npm run start This will spin up the application using the localhost. You can view it at http://localhost:1234

Once you click on the sign-in option, the application will automatically connect to your testnet account and it will let you interact with the contract.

In the backend, the contract interaction is handled using /frontend/near-interface.js file and /frontend/near-wallet.js helps you connect with the wallet. To connect and interact with the wallet, we use the near-api-js package.
Note: The near-api-js is a complete library used for interacting with the NEAR blockchain. Once you connect to the network using the library, it lets to interact with wallets, accounts and smart contracts that are part of the network. In the coming tutorials, we will be extensively using this library while building applications.
And just like that we deployed and interacted with a basic application running on top of the NEAR network.
Wrapping up
This tutorial was all about giving you an introduction to the NEAR ecosystem and helping you understand the various elements that make up the NEAR network and the NEAR application development process. In the coming tutorials, we will dive deep into the various aspects of NEAR and learn how to create more complex applications using the platform.
- Discover how you can save thousands in infra costs every month with our unbeatable pricing on the most complete Web3 development platform.
- Input your workload and see how affordable Chainstack is compared to other RPC providers.
- Connect to Ethereum, Solana, BNB Smart Chain, Polygon, Arbitrum, Base, Hyperliquid, Robinhood Chain, Arc, Tempo, MegaETH, Monad, Plasma, Avalanche, Optimism, Aptos, Cronos, Gnosis Chain, Moonbeam, Celo, Aurora, TON, Ronin, and Bitcoin mainnet or testnets through an interface designed to help you get the job done.
- Fast access to blockchain archive data and gRPC streaming on Solana.
- To learn more about Chainstack, visit our Developer Portal or join our Telegram group.
- Connect your AI agent to Chainstack in seconds using Chainstack MCP — give Claude, Cursor, Codex, Gemini, and Windsurf live access to blockchain data, node management, and docs.
- Are you in need of testnet tokens? Request some from our faucets. Sepolia faucet, Base Sepolia faucet, Solana devnet faucet, Hoodi faucet, BNB faucet, zkSync faucet, Robinhood Chain faucet, Hyperliquid faucet, Monad faucet, Amoy faucet, Plasma faucet, TON faucet.
Have you already explored what you can achieve with Chainstack? Get started for free today.