Ethereum
 Hyperliquid
 Solana
 Arbitrum
 BNB Smart Chain
 Base
Base Polygon
 TRON
TRON Sui
Sui MegaETH


Blockchain transactions in Ethereum mempool – Coding edition

Welcome. This is part two of the “developer’s guide to the transactions in mempool” series.
- The way of the mask.
- The way of the code. <– You are here.
In the previous article, we discussed some of the reasons for transaction confirmation delays in blockchain networks. With the help of the MetaMask wallet, we tried to understand the causes of these delays from a high-level user perspective.
This article looks at the same situations from a more in-depth viewpoint. Here, we will be using the web3.py library to guide us through pending transactions, nonce gaps, transaction replacements, etc.
Just like the previous article, this one will also be focusing on the Ethereum network. Thus, most of the technical aspects discussed in the article apply to Ethereum-based protocols.
Under the hood
So, you might know that you need access to a blockchain node in order to interact with a blockchain network. Given enough technical expertise, you can set up your own physical node and establish a connection with a network. Still, even then, the entire process of setting up a node and maintaining it on your own can be quite daunting, to say the least. Therefore, most of the developers use services like Chainstack to help them build, manage, and maintain the required blockchain infrastructure, while they focus on other important stuff like application development.
Right, so let us say that our developer has deployed an Ethereum node, and they have an application in mind. Now, how do they make the application communicate with the node?
Well, theoretically, an Ethereum node is any computational device that can interact with the Ethereum network. Based on the differences in network interaction, data synchronization and storage, these nodes are divided into 3 major types: archive nodes, full nodes, and light nodes. (You can refer to this article for an in-depth explanation of each of these types.)
Despite the functional differences, all nodes are capable of network interaction. This general functionality is facilitated by a piece of software that runs inside the nodes, called the Ethereum client. The Ethereum client is an implementation of the Ethereum protocol’s technical specifications. As we saw in the previous article, people have developed different clients using different programming languages. All these client implementations are based on the Ethereum yellow paper.
The Ethereum client helps the node access data from the Ethereum blockchain, verify all transactions in each block, establish peer-to-peer (p2p) communication with other clients (running in separate nodes) and maintain the security and accuracy of the data in the network. One can say that the client makes the node “Ethereum-ready.”
Why the “Ethereum client” detour? Well, technically, the client is the part of the node that the application communicates with in order to interact with the network. Despite the differences in implementation, all the clients offer a uniform set of JSON-encoded remote procedure call (RPC) commands (based on the JSON-RPC specification) and an application program interface (commonly known as JSON-RPC API) that allows programs and applications to interact with the network via the client.
Developers can interact with the RPC interface using basic HTTP requests. The HTTP interaction, however, would require you to write a lot of code in order to deal with the different RPC commands. That’s no fun.
The other option is to use specialized libraries that take care of all requesting and processing of the commands and allow the developer to interact with the Ethereum network using some cleverly named functions. These libraries are called the web3 libraries. They are available in multiple languages like Python (web3.py), JavaScript/Typescript (web3.js, ether.js), PHP (web3.php), etc. Though there might be slight differences in the approach, all these libraries provide a simple interface that helps the developers interact with the Ethereum nodes and, by extension, the Ethereum network.
In this article, we will be using the Python-based web3 library, web3.py, to interact with our Ethereum nodes.
The way of the code

All right, we are no longer going to rely on fancy UIs and flashy warnings. We are going to use the way of the code to guide ourselves through the mempool.
Before we get started with the code, here is what I want you to do:
- Make sure you have Python (version ^3.6) installed on your system.
- Install the corresponding version of the Python package manager (pip).
- Get yourself a nice code editor (I would recommend Visual Studio Code).
- Copy and save the account addresses from MetaMask.
- Make sure that these accounts have some (test) tokens in them. (You can get test tokens from these faucets).
Great, that takes care of the coding requirements, but in order to interact with the Ethereum network, we also need an Ethereum node, so, get yourself a node by:
Note: Since we are working on the Ethereum network, any Ethereum testnet node will be fine. This article, for instance, uses a Ropsten node.
Now that you have the nodeL
- Get the RPC endpoints (HTTP) of the node.
Before we start using the web3 library, we can try and invoke some of the Ethereum RPC commands using HTTP.
To do that:
- Install cURL
Note: cURL (client URL) is a command-line tool that helps you transfer data to and from servers, using protocols like HTTP/HTTPS
- After installing cURL, open the terminal and type the following command:
curl -X POST -H "Content-Type: application/JSON" --data \
'{"jsonrpc":"2.0","method":"eth_blockNumber","params":[],"id":1}' \
<https://chainstack-node-endpoint>
This will invoke the eth_blockNumber method and return the latest block number (as hexadecimal).
This is how you invoke the RPC commands using cURL and HTTP.
Now, let us try and do the same thing using the web3.py library:
- Open a terminal and use
pipto install web3.py
$ pip install web3==5.29.2

#Replace the version number with the latest one
Once you install python web3:
- Open your code editor > create a new python file > add the following code:
#imports the Web3 class from web3 module
from web3 import Web3

#store the node endpoint value
CHAINSTACK_NODE_ENDPOINT = '<https://chainstack-node-endpoint>'

#connect to your remote chainstack node
w3 = Web3(Web3.HTTPProvider(CHAINSTACK_NODE_ENDPOINT))

#check if the node is connected
print(w3.isConnected()) #returns true, if connected
The code will establish a connection with your remote Chainstack node.
To get the latest block number, add the following lines to the above code:
#get the latest block number
latestBlockNumber = w3.eth.block_number
print(f"Latest Block Number : {latestBlockNumber}")
And with that, we have successfully established a connection with a node and retrieved the latest block number using the web3.py library. Now, let’s see what else we can do with the library.
Setting the gas fee price
As we discussed in the previous article, one of the most common ways of getting your transaction stuck in the mempool involves paying a “less than reasonable” transaction fee.
In MetaMask, we are given the transaction (gas) fee estimates based on the previous block’s gas information. We rely on these estimates to set the fee for our transactions.
Now that we are using the web3.py library, how do we get similar estimates, so that we won’t end up paying a low fee?
Generally, the transaction fee is calculated using the following formula,
Fee = unit of gas used * (base fee + priority fee)
Here, the base fee represents an algorithmically determined fee that the user must pay for the inclusion of a transaction in a block. This amount is determined by the network, and it can fluctuate according to the network congestion. The priority fee is the amount that you are willing to pay the node responsible for the validation and verification of your transaction (miners/validators, in Ethereum).
In MetaMask, the users are provided with different transaction fee estimates based on different user priorities (high, medium, low) and the user is free to choose any of these prices based on their preference. This helps the user from both underspending and overspending on a transaction.
According to some of the MetaMask code, they use the following logic in order to generate these different estimates:
- Get the details of the 5 most recent blocks.
- Get the base fee of the latest block.
- Adjust the base fee according to the high, medium, or low user priority.
- From each block, collect the priority fee for transactions at the 10th, 20th, and 30th percentiles.
Note: Here, percentiles represent the contribution level of the transaction to the overall gas used by the block, higher percentile = higher fees
- Sort the priority fees according to the percentile and get the medians of each of the sorted list of priority fees.
- Adjust the medians according to the high, medium, or low user priority.
- Get the gas estimates of your transaction.
- Calculate the fee using the following formula,
- fee = (gas estimates) * (adjustedBaseFee + adjustedPriorityFeeMedian)
Here, the value adjustments are made according to the user priority. The adjustments either increase or decrease the values, i.e., the base fee is adjusted by increasing the latest base fee value by 10%, 20%, and 25% with respect to the low, medium, and high user priority. Similarly, the priority fee medians are adjusted by decreasing the value by 6%, 3%, and 2% based on the low, medium, and high priority. The adjustments in value result in different fee estimates for each of the priorities.
Now that we know the logic, let us try and implement it using our web3 library.
In web3.py, we have a neat little function called eth.fee_history that helps us retrieve block information, percentile-based priority fee values, etc. We can use this function to generate transaction fee estimates like that of MetaMask.
To implement this:
- Import the necessary libraries:
#import Web3 class from web3 module
from web3 import Web3
#import the in-built statistics module
import statistics # for median calculation- Declare all the necessary values and variables:
# Setting node endpoint value
CHAINSTACK_NODE_ENDPOINT = '<NODE_ENDPOINT>'

# Setting account addresses
# you can copy the account addresses from metamask]

FROM_ACCOUNT = "<FROM_ACCOUNT_ADDRESS>"
TO_ACCOUNT = "<TO_ACCOUNT_ADDRESS>"

# setting the values for gas fee estimation.
# The values are based on the metamask code

# Setting the percentage multiplier for the basefee
# The base fee is adjusted by INCREASING the value,
# thus the percentage multiplier is calculated using the formula
#       PERCENTAGE MULTIPLIER = 1 + percentage value ,
# 10 % increase means, PERCENTAGE MULTIPLIER = 1 + (10/100)
# the multipliers are chosen according to the priority [low , medium , high]
BASEFEE_PERCENTAGE_MULTIPLIER = {
    "low": 1.10,  # 10% increase
    "medium": 1.20,  # 20% increase
    "high": 1.25  # 25% increase
}

# Setting the percentage multiplier for the priority fee
# priority fee median is adjusted by DECREASING the value,
# the percentage multiplier is calculated using the formula
#       PERCENTAGE MULTIPLIER = 1 - percentage value,
# 6 % decrease means, PERCENTAGE MULTIPLIER = 1 - (6/100)
# the multipliers are chosen according to the priority [low , medium , high]
PRIORITY_FEE_PERCENTAGE_MULTIPLIER = {
    "low": .94,  # 6% decrease
    "medium": .97,  # 3% decrease
    "high": .98  # 2% decrease
}

# the minimum PRIORITY FEE that should be payed,
#  corresponding to the user priority (in WEI denomination)
MINIMUM_FEE = {
    "low": 1000000000,
    "medium": 1500000000,
    "high": 2000000000

}

#  a dictionary for storing the sorted priority fee
feeByPriority = {
    "low": [],
    "medium": [],
    "high": []
}
- Connect to your Chainstack node:
w3 = Web3(Web3.HTTPProvider(CHAINSTACK_NODE_ENDPOINT))- Get the priority fee, base fee, etc using the
eth.fee_historyfunction:
# parameters :
# Number of  blocks - 5
# newest block in the provided range -
#    latest [or you can give the latest block number]
# reward_percentiles - 10,20,30 [ based on metamask]
feeHistory = w3.eth.fee_history(5, 'latest', [10, 20, 30])- Get the base fee of the latest block:
latestBaseFeePerGas = feeHistory["baseFeePerGas"][-1] #the last one in the list- Set the ETH value to be transferred and calculate the estimated gas usage:
# Setting the ether value to be transferred
ETH_VALUE = .5
# Calculating the estimated usage of gas in the following transaction
estimateGasUsed = w3.eth.estimateGas(
    {'to': TO_ACCOUNT, 'from': FROM_ACCOUNT,
        'value': w3.toWei(ETH_VALUE, "ether")})
- Sort the priority gas fees:
# The reward parameter in feeHistory variable contains an array of arrays.
# each of the inner arrays has priority gas values,
# corresponding to the given percentiles [10,20,30]
# the number of inner arrays =
#     the number of blocks that we gave as the parameter[5]
# here we take each of the inner arrays and
# sort the values in the arrays as low, medium or high,
# based on the array index
for feeList in feeHistory["reward"]:
    # 10 percentile values - low fees
    feeByPriority["low"].append(feeList[0])
    # 20 percentile value - medium fees
    feeByPriority["medium"].append(feeList[1])
    # 30 percentile value - high fees
feeByPriority["high"].append(feeList[2])- Adjust the values and perform the calculations:
# Take each of the sorted arrays in the feeByPriority dictionary and
# calculate the gas estimate, based on the priority level
# that is given as the key in the feeByPriority dictionary
for key in feeByPriority:
    # adjust the basefee,
    # use the multiplier value corresponding to the key
    adjustedBaseFee = latestBaseFeePerGas * BASEFEE_PERCENTAGE_MULTIPLIER[key]

    # get the median of the priority fee based on the key
    medianOfFeeList = statistics.median(feeByPriority[key])

    # adjust the median value,
    # use the multiplier value corresponding to the key
    adjustedFeeMedian = (
        medianOfFeeList * PRIORITY_FEE_PERCENTAGE_MULTIPLIER[key])

    # if the adjustedFeeMedian falls below the MINIMUM_FEE,
    # use the MINIMUM_FEE value,
    adjustedFeeMedian = adjustedFeeMedian if adjustedFeeMedian > MINIMUM_FEE[key] else MINIMUM_FEE[key]

    suggestedMaxPriorityFeePerGasGwei = w3.fromWei(adjustedFeeMedian, "gwei")
    # [optional] round the amount
    suggestedMaxPriorityFeePerGasGwei = round(
        suggestedMaxPriorityFeePerGasGwei, 5)

    # calculate the Max fee per gas
    suggestedMaxFeePerGas = (adjustedBaseFee + adjustedFeeMedian)
    # convert to gwei denomination
    suggestedMaxFeePerGasGwei = w3.fromWei(suggestedMaxFeePerGas, "gwei")
    # [optional] round the amount to the given decimal precision
    suggestedMaxFeePerGasGwei = round(suggestedMaxFeePerGasGwei, 9)
    # calculate the total gas fee
    totalGasFee = suggestedMaxFeePerGasGwei*estimateGasUsed
    # convert the value to gwei denomination
    totalGasFeeGwei = w3.fromWei(totalGasFee, "gwei")
    # [optional] round the amount
    totalGasFeeGwei = round(totalGasFeeGwei, 8)

    print(f"""
        PRIORITY: {key.upper()}\n
        MAX PRIORITY FEE (GWEI): {suggestedMaxPriorityFeePerGasGwei}\n
        MAX FEE (GWEI) : {suggestedMaxFeePerGasGwei}\n
        GAS PRICE (ETH): {totalGasFeeGwei}
    """)
    print("="*80)  # guess what this does ?
Note: here is the complete code for reference: gas fee estimation.
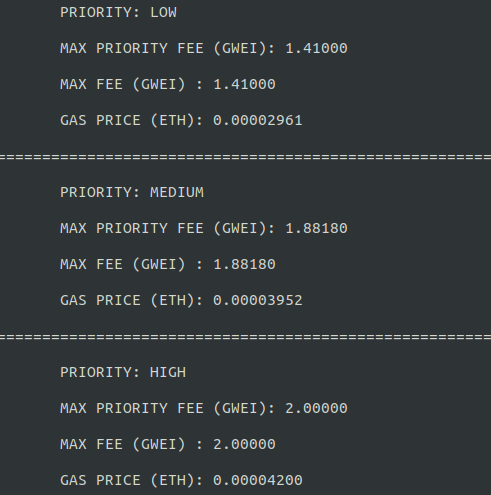
OK, now, once you run the whole code, your result will look something like this,
Tip: instead of displaying the gas fee estimates, you can modify the code and return the gas estimates.
Note that during times of high network traffic, there might be some difference between our estimates and that of MetaMask. You can, however, use these estimates for sending a transaction, as they fall within the “reasonable fee” range.
How to send a transaction?
Now that we have the gas estimates, let us use them to send a transaction:
To send a transaction:
- Create a new Python file and import the web3.py library.
- Copy and store the MetaMask account addresses.
- Use the Chainstack node endpoint and establish a connection with the node.
(I trust, by now, you are familiar with this part of the code!)
In addition to the addresses and the endpoint, we would also require the sender’s private key to sign the transaction. Under normal circumstances, you should never reveal the private key of your account. Even during development, explicitly stating the private key within your code is frowned upon!
The right way to access your private key, during the development phase, would be to set it as an environment variable (you can use a .env file) and access those variables from within the code (the same procedure should also be used with the account addresses, as an added measure). But since this article is all about explaining the code, we will skip these measures for now.
You can get your account’s private key from MetaMask:
Once you have the private key, store it in your code.
By now, your code will look something like this:
# import Web3 class from web3 module
from web3 import Web3
# Setting node endpoint value
CHAINSTACK_NODE_ENDPOINT = '<https://chainstack-node-endpoint>'

# Setting account addresses
# you can copy the account addresses from MetaMask

FROM_ACCOUNT = "<FROM_ACCOUNT_ADDRESS>"
TO_ACCOUNT = "<TO_ACCOUNT_ADDRESS>"

# Setting the user private key
SENDER_PRIVATEKEY = "<SENDER_PRIVATE_KEY>"

# Connect to the node
w3 = Web3(Web3.HTTPProvider(CHAINSTACK_NODE_ENDPOINT))
Now, to conduct the transaction, you also need some additional information like:
- chain ID,
- account nonce,
- the maximum fee per gas,
- the maximum priority fees,
- the ETH value that you wish to send.
You can get the fee details by running our gas estimation script, the ETH value can be any random number that the user chooses (do keep your MetaMask account balance in mind!).
You can use the following code to get the chain ID and account nonce:
# Setting the transaction variables

# get the MAX_PRIORITY_FEE and MAX_FEE_PER_GAS values
# by running the gas estimation script.
# you can choose your preferred priority [low, medium, high]
# and copy the corresponding values
MAX_PRIORITY_FEE = 0
MAX_FEE_PER_GAS = 0

# Setting the ETH value that you wish to send
ETH_VALUE = 0.05

# Getting the account-nonce value
ACCOUNT_NONCE = w3.eth.getTransactionCount(FROM_ACCOUNT)
# Setting the value for chainID
CHAIN_ID = w3.eth.chain_id
Now that we have all the values, let us create a transaction out of them.
# While sending the transaction,
# we must represent all the fee related values and
# the ETH value in wei denomination.
transaction = {
    'nonce': ACCOUNT_NONCE,
    'to': TO_ACCOUNT,  # reciever's address
    'value': w3.toWei(ETH_VALUE, "ether"),
    # maximum gas that can be used for the transaction execution
    'gas': 210000,
    'maxFeePerGas': w3.toWei(MAX_FEE_PER_GAS, 'gwei'),
    'maxPriorityFeePerGas': w3.toWei(MAX_PRIORITY_FEE, 'gwei'),
    'chainId': CHAIN_ID
}
Once you build the transaction, you can sign it using the sender’s private key and then send it using the following code:
# signing the transaction using the sender's private key
signedTransaction = w3.eth.account.sign_transaction(
    transaction, SENDER_PRIVATEKEY)
# sending the signed transaction,
# this will return the transaction hash in byte encoded format
transactionHash = w3.eth.send_raw_transaction(
    signedTransaction.rawTransaction)
# converting the byte-encoded transaction hash to hex string
transactionHashHex = w3.toHex(transactionHash)
print(transactionHashHex)
Note: here is the complete code for reference: send transaction.
You can use the web3.eth.wait_for_transaction_receipt function to confirm the inclusion of the transaction in a block. The function works by waiting for the specified transaction to be included in a block and once it gets added, the function returns the transaction receipt.
# waits till the transaction becomes a part of the block
transactionReceipt = w3.eth.wait_for_transaction_receipt(transactionHashHex)
print(f"Transaction Receipt : {transactionReceipt}")
While running the code, the function will make the execution thread wait (sleep) until the transaction receipt is received. You can control the wait time by adding the timeout parameter to the function. This will make the function wait for the given number of seconds, before returning a TimeExhausted exception.
# waits 60 seconds for the receipt
transactionReceipt = w3.eth.wait_for_transaction_receipt(transactionHashHex, 60)
How to fix a stuck pending transaction?
So far, we have looked at the priority-based gas fee estimations and transaction generation. Now, we need to figure out a way to get our transactions out of the mempool in case they get stuck. To help with the pending transactions, the first order of business would be to get the details of such transactions. In MetaMask, we were provided with tags that indicated whether a transaction is pending or confirmed (successful).
Of course, with web3.py, we have a more technical approach. Using the library, we can get the list of pending transactions, directly from the node (and its mempool). To do this, we can use something called the filter.
The basic purpose of a filter is to inform us of certain events that take place in the Ethereum network. The developers can leverage this feature and create specialized filters that inform us of events like the addition of a new pending transaction, new block creation, etc.
You can use the following code to set up a filter that gets you the details of new pending transactions.
# setting a new filter that looks for new pending transaction
pendingTransactionFilter = w3.eth.filter('pending')
# check for new entries and return the transaction hash
pendingTransactionList = pendingTransactionFilter.get_new_entries()
print(pendingTransactionList)
The get_new_entry function returns a list of transaction hashes in the byte encoded format. You can convert the byte encoded transaction hash into the corresponding hex value and use it to retrieve the pending transaction details. The function will return an empty list if there are no new entries (changes) since the last poll.
pendingTransactionDetail = w3.eth.get_transaction('<Pending_Transaction_Hash_Hex>')Once you have the details, you can use them to determine the cause of the delay. You can use our gas estimation script to check if we are using a low fee. You can also retrieve the nonce value of the transaction and see if there is a gap.
The following code demonstrates a nonce gap check:
currentAccountNonce = w3.eth.getTransactionCount('<Account-Address')
pendingTransactionDetail = w3.eth.get_transaction('<Pending_Transaction_Hash_Hex>')
pendingTransactionNonce = pendingTransactionDetail['nonce'] #getting the nonce value
# get the sender's address
pendingTransactionSender = pendingTransactionDetail['from']
# check if the transaction has a higher nonce value
if(pendingTransactionSender == '<Account-Address>' and currentAccountNonce < pendingTransactionNonce):
    print("Nonce Gap Detected !")
Note: while looking for nonce gaps, know that, due to network traffic or broadcasting delays, transactions can take time to reach a particular node’s mempool, so make sure that you waited a reasonable amount of time (a couple of minutes) before trying to rescue a transaction. (Here is a little something that can help you test the speed of your node: speed-tester).
OK, we have made sure that the transaction is stuck, and we saw how to look for the cause of it, so, now, how do we rescue the transaction?
Well, just like MetaMask, in order to “rescue” a pending transaction, you can either cancel it, speed it up or fill the nonce gap, if there is one.
Here’s how you can check for nonce gaps and “dynamically” fill them up by sending transactions carrying the previous account-nonce values.
- Get the pending transaction details and set the required values:
# Getting the pending transaction details
pendingTransactionDetail = w3.eth.get_transaction(
    '<Pending_Transaction_Hash_Hex>')

# getting the current account nonce value
currentAccountNonce = w3.eth.getTransactionCount("<FROM_ACCOUNT_ADDRESS>")
# getting the nonce value
pendingTransactionNonce = pendingTransactionDetail['nonce']
# get the sender's address
pendingTransactionSender = pendingTransactionDetail['from']- Once you have the values, check for nonce gap > if yes, then reconstruct transaction > send transaction:
# check if the transaction is from your account and
# if it has a higher nonce value
if(pendingTransactionSender == FROM_ACCOUNT and currentAccountNonce < pendingTransactionNonce):
    for nonce in range(currentAccountNonce, pendingTransactionNonce):
        # you can dynamically get the MAX_PRIORITY_FEE
        # and MAX_FEE_PER_GAS values by modifying gas_estimate.py script
        # to return the values corresponding to your priority
        MAX_PRIORITY_FEE = 0
        MAX_FEE_PER_GAS = 0

        transaction = {
            'nonce': nonce,
            'to': pendingTransactionDetail['to'],
            'value': 0,
            # maximum gas that can be used for the transaction execution
            'gas': pendingTransactionDetail['gas'],
            'maxFeePerGas': w3.toWei(MAX_FEE_PER_GAS, 'gwei'),
            'maxPriorityFeePerGas': w3.toWei(MAX_PRIORITY_FEE, 'gwei'),
            'chainId': pendingTransactionDetail['chainId']
        }
        # signing the transaction using the sender's private key
        signedTransaction = w3.eth.account.sign_transaction(
            transaction, SENDER_PRIVATEKEY)
        # sending the signed transaction,
        transactionHash = w3.eth.send_raw_transaction(
            signedTransaction.rawTransaction)
        transactionHashHex = w3.toHex(transactionHash)
        transactionReceipt = w3.eth.wait_for_transaction_receipt(
            transactionHashHex)
        print(transactionReceipt)
Note: here is the complete code for reference: fill up the nonce gap.
Now that the nonce gap is dealt with, we can try and help transactions with a lower gas fee. This would require us to send a separate transaction with the same nonce, higher gas fee and a zero or similar ETH value (based on whether you want to cancel the transaction or replace it).
In the previous article, we talked about transaction replacement and how we need to increase our current gas fee by a certain percentage, in order to replace the pending transaction—remember the txpool.pricebump option in Geth client.
In MetaMask, while trying to “speed up” a transaction, they recreate the transaction with a 10% increase in the MaxFeePerGas and MaxPriorityFee values. This increases the overall gas fee. For cancelling a transaction, they increase the values by 50%. But if we are dealing with an extremely low transaction fee, an increase in value (within the 10%-50% range) might still give us a “less than reasonable” fee.
A solution to this would be to increase the values by the given percentage and then compare the values with the ones that are generated using our gas fee estimator script. You can then use the “more reasonable” values for sending the transaction.
Here is how you can do it:
- Get the pending transaction details and set the required values:
# get the pending transaction details using the hash value
pendingTransactionDetail = w3.eth.get_transaction(
    '<Pending_Transaction_Hash_Hex>')

# Set the Value for the percentage multipliers
SPEEDUP_MULTIPLIER = 1.10  # 10 % increase
CANCEL_MULTIPLIER = 1.5  # 50 % increase
# you can obtain the values by running the gas estimation script
# you can choose your preferred priority [ low,medium,high]
# and copy the corresponding values
maxPriorityFee = 0
maxFeePerGas = 0

# convert the estimated values to wei denomination
maxPriorityFeeWei = w3.toWei(maxPriorityFee, 'gwei')
maxFeePerGasWei = w3.toWei(maxFeePerGas, 'gwei')

# generate the suggested MaxPriorityFee and
# suggested MaxFeePerGas using the pendingtransationDetail
# and the multipliers.
# Here we are using the SPEEDUP_MULTIPLIER,
# you can use the CANCEL_MULTIPLIER if you wish to cancel the transaction

## For rounding numbers,make sure you import the in-built "math" module
suggestedMaxPriorityFee = math.ceil(
    pendingTransactionDetail['maxPriorityFeePerGas'] * SPEEDUP_MULTIPLIER)

suggestedMaxFeePerGas = math.ceil(
    pendingTransactionDetail['maxFeePerGas'] * SPEEDUP_MULTIPLIER)
# compare the values and choose the bigger one
maxFeePerGas = suggestedMaxFeePerGas if suggestedMaxFeePerGas > maxFeePerGasWei else maxFeePerGasWei
maxPriorityFee = suggestedMaxPriorityFee if suggestedMaxPriorityFee > maxPriorityFeeWei else maxPriorityFeeWei
- Reconstruct the transaction and send it:
transaction = {
    'nonce': pendingTransactionDetail['nonce'],
    'to': pendingTransactionDetail['to'],  # recever's address
    'chainId': pendingTransactionDetail['chainId'],
    # 0 if you are canceling the transaction
    'value': pendingTransactionDetail['value'],
    # maximum gas that can be used for the transaction execution
    'gas': pendingTransactionDetail['gas'],
    'maxFeePerGas': maxFeePerGas,
    'maxPriorityFeePerGas': maxPriorityFee,
}
signedTransaction = w3.eth.account.sign_transaction(
    transaction, "<SENDER_PRIVATEKEY>")

transactionHash = w3.eth.send_raw_transaction(
    signedTransaction.rawTransaction)
transactionHashHex = w3.toHex(transactionHash)
transactionReceipt = w3.eth.wait_for_transaction_receipt(transactionHashHex)
print(transactionReceipt)
Note: here is the complete code for reference: cancel or speed up transaction.
And that takes care of the “low fee” conundrum.
The circle is now complete
Over the course of these articles, we discussed some of the causes of transaction confirmation delays in blockchain networks. We were able to look at the causes of these delays and their solutions from different perspectives. The idea behind these articles is to help developers understand the inner workings of the transaction and its journey through the mempool.
If you have any queries or doubts regarding the things that we discussed, feel free to reach out to us!
- Discover how you can save thousands in infra costs every month with our unbeatable pricing on the most complete Web3 development platform.
- Input your workload and see how affordable Chainstack is compared to other RPC providers.
- Connect to Ethereum, Solana, BNB Smart Chain, Polygon, Arbitrum, Base, Hyperliquid, Tempo, MegaETH, Monad, Plasma, Avalanche, Optimism, Scroll, Aptos, Cronos, Gnosis Chain, Kaia, Moonbeam, Celo, Aurora, TON, Ronin, and Bitcoin mainnet or testnets through an interface designed to help you get the job done.
- Fast access to blockchain archive data and gRPC streaming on Solana.
- To learn more about Chainstack, visit our Developer Portal or join our Telegram group.
- Connect your AI agent to Chainstack in seconds using Chainstack MCP — give Claude, Cursor, Codex, Gemini, and Windsurf live access to blockchain data, node management, and docs.
- Are you in need of testnet tokens? Request some from our faucets. Sepolia faucet, Base Sepolia faucet, Solana devnet faucet, Hoodi faucet, BNB faucet, zkSync faucet, Scroll faucet, Hyperliquid faucet, Monad faucet, Amoy faucet, Plasma faucet, TON faucet.
Have you already explored what you can achieve with Chainstack? Get started for free today.