Ethereum
 Hyperliquid
 Solana
 Arbitrum
 BNB Smart Chain
 Base
Base Polygon
 TRON
TRON Sui
Sui MegaETH


EVM speed tester: Measure how fast nodes respond to transactions
Overview
Ethereum is the most popular network among all blockchain protocols—it is adopted in a wide range of digital asset applications, including NFT and decentralized finance industries. Currently, it has over one million transactions every day and there are more than 6000 nodes running all over the world.
One of the most frequently asked questions from developers is how fast can a node catch a transaction in the mempool.
The mempool of Ethereum, or any EVM-based network, also called transaction pool or txpool, is the dynamic in-memory area where pending transactions reside before they are included in a block and thus become static. See also Exploring the methods of looking into Ethereum’s transaction pool.
The speed of a node receiving a transactions in its txpool is important in many ways: for a DeFi service provider, it means a better user experience; for NFT traders, it means being able to sell and buy tokens quicker.
Would it be useful to have a tool to measure the txpool performance of a node?
EVM speed tester is the tool that does exactly that. It measures how fast a node can get a transaction in its txpool sent from a different node. It is installation free and easy to use.
Prerequisites
An EVM address and a private key. Make sure there are some funds on the address to pay for the transaction. For testnets, use a faucet.
Any EVM-based node—for example, Ethereum, Polygon, Binance Smart Chain, Avalanche C-Chain, Fantom.
Some funds in the wallet, testnet Faucet is perfectly fine.
At least two different nodes on the same network with a WebSocket endpoint:
To get nodes:
About the speed tester
The EVM speed tester is a serverless web app. You can simply open it on this JSFiddle. The code is explained in the second half of this article, it is recommended to any reader who wants to customize it or dive into the mechanics.
Two WebSocket endpoints and one address are required to run the app. After the program start, the transaction is initiated on both endpoints one after another. It is a simple transaction. The address (identified using the private key) sends the network’s base currency (e.g., ether) to itself over and over again. So the user can see how fast both nodes received the transaction.
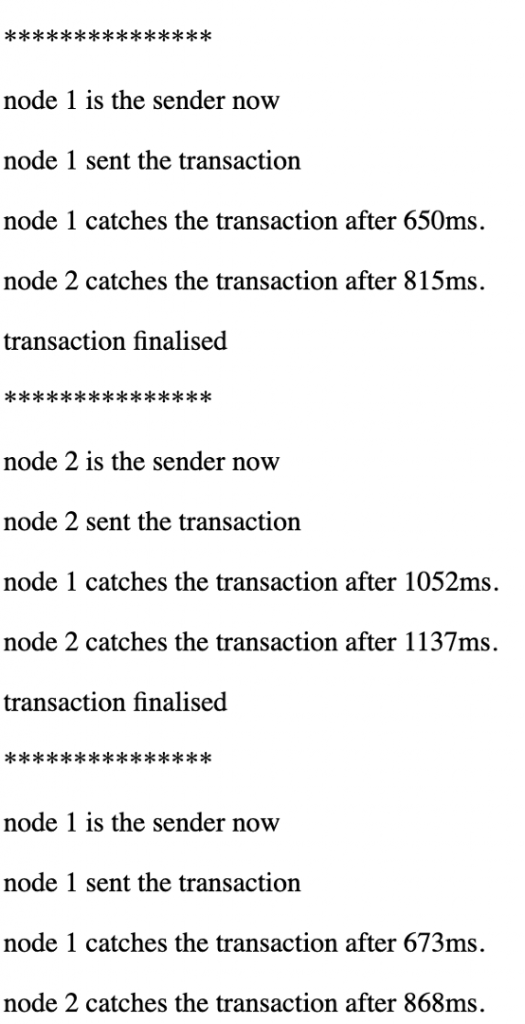
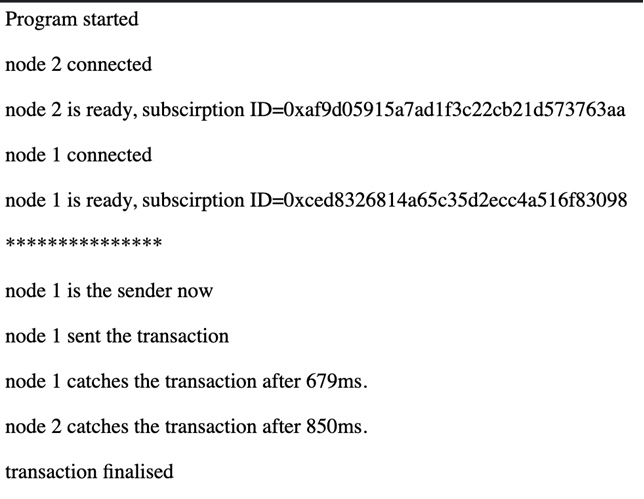
This is a sample output when the code is successfully run:
Imagine playing fetch with two dogs, this code is similar to that. The difference is now both dogs take turns throwing the ball to keep the game going.

This app was tested with the Ethereum Ropsten testnet but it should be easily configured to use on any other EVM networks, mainnet, or testnet.
Using the speed tester
The tool needs an address and a private key to send transactions. Every transaction burns a small amount of gas fee, so please try it on testnets before running it on the mainnet.
The code is explained in detail in the next section. If further assurance is needed, feel free to jump on our Discord.
The live code:
- Enter the private key and your address.
- Enter the amount of the base network currency (e.g., ether) to transfer in each transaction. The default value is 0.1 ether, the minimum value is 1 wei.
- Enter the address of the WebSocket endpoints, it usually starts with
ws://orwss://. - Click start;
- Wait until both connections are established, the speed test starts after that:
Now the code is up and running. Your address is sending the currency to itself over and over again. It is a meaningless transaction but it helps to leverage the performance of nodes behind these endpoints.
Inner workings
The only external source referenced in this app is web3.js, it was hosted on cdn.jsdelivr.net and it is also used in this tutorial on Ethereum’s official website.
Init()
The initialization function is bare. Mainly getting user inputs and passing it to another function initNode():
function init(){
    walletPrivateKey = document.getElementById("walletPrivateKey").value
    walletPublicKey = document.getElementById("walletPublicKey").value
    wsURL1 = document.getElementById("wsURL1").value
    wsURL2 = document.getElementById("wsURL2").value

    node1IsReady = false
    node2IsReady = false

    transValue = Web3.utils.toWei(document.getElementById("transValue").value,"ether")

    initNode ("node 1",wsURL1,"web3_1","subscribe_1","timer_1","node1IsReady")
    initNode ("node 2",wsURL2,"web3_2","subscribe_2","timer_2","node2IsReady")
}
InitNode()
InitNode function initializes a node with the given parameters.
function initNode(node_name, wsURL, web3_name, subscribe_name, timer_name,readyFlag_name)node_name—node 1ornode 2.wsURL— the WebSocket URL the user filled in.web3_name— reference to the web3 global instance. The web3 object is from web3.js and is declared at the beginning of code block. In functions, it is referenced aswindow[“web3_1”]orwindow[“web3_2”], therefore the parameter is a string. Same forsubscirbe_name,timer_name, andreadyFlag_name.subscribe_name— reference to the subscription instance. It keeps a WebScoket connection and receives feedback when events are triggered.timer_name— reference to the variables record time.readyFlag_name— reference to a boolean object for the nodes’ readiness for a new transaction.
Below is the pseudocode of initNode():
Create a new web3 instance.
Connect to the wallet using private key.
Get the balance of the wallet to test if everything is successfully setup. If yes:
  Update connection success message.
    Start Ethereum subscription on two events:
      “connected”:
      If both node1 and node2 are ready, initiate the first transaction
      “data” :
      Waiting for pending transactions. When it comes in, calculate the      difference between its initiation and receiving timestampe. This event triggers for all transactions, so unrelated transactions are filtered.
pitch()
Transaction is crafted and sent out in the pitch function.
function pitch(){
    var web3_pitcher
    updateInfo("***************")
    updateInfo(pitcher + " is the sender now")
    if(pitcher == "node 1")
        web3_pitcher = web3_1
    else
        web3_pitcher = web3_2
    node1IsReady = false
    node2IsReady = false
    pitch_time = new Date();
    web3_pitcher.eth.sendTransaction({
        from: walletPublicKey,
        to: walletPublicKey,
        value: transValue,
        gas:"21000"
    }).on('sent', function(payload){
    })
    .on('sending', function(payload){
    })
    .on('transactionHash', function(hash){
    })
    .on('receipt', function(receipt){
    })
    .on('error',function(error){
    });
}
When the transaction is finalized, the listening event on.receipt is called. The pitcher is changed and a new transaction is initiated by calling the pitch() function again.
.on('receipt', function(receipt){
        updateInfo("transaction finalised")
        endedTrxHistory.push(receipt.transactionHash)
        console.log(endedTrxHistory)
        if (!node1IsReady)
            updateInfo("node 1 misses")
        if (!node2IsReady)
            updateInfo("node 2 misses")
        if(pitcher == "node 1")
            pitcher = "node 2"
        else
            pitcher = "node 1"
        pitch()
    })
Conclusion
Read more about the web3.js subscription and transaction methods. Feel free to tweak around with the code and try it out on other networks. Have fun playing.
Happy coding!
One more thing
There is an upgradeable version of the app. It is called: The node-lympics! It supports an unlimited number of nodes and a user-defined number of rounds. It is in GitHub repo too, enjoy!
Power-boost your project on Chainstack
- Discover how you can save thousands in infra costs every month with our unbeatable pricing on the most complete Web3 development platform.
- Input your workload and see how affordable Chainstack is compared to other RPC providers.
- Connect to Ethereum, Solana, BNB Smart Chain, Polygon, Arbitrum, Base, Hyperliquid, Tempo, MegaETH, Monad, Plasma, Avalanche, Optimism, Scroll, Aptos, Cronos, Gnosis Chain, Kaia, Moonbeam, Celo, Aurora, TON, Ronin, and Bitcoin mainnet or testnets through an interface designed to help you get the job done.
- Fast access to blockchain archive data and gRPC streaming on Solana.
- To learn more about Chainstack, visit our Developer Portal or join our Telegram group.
- Connect your AI agent to Chainstack in seconds using Chainstack MCP — give Claude, Cursor, Codex, Gemini, and Windsurf live access to blockchain data, node management, and docs.
- Are you in need of testnet tokens? Request some from our faucets. Sepolia faucet, Base Sepolia faucet, Solana devnet faucet, Hoodi faucet, BNB faucet, zkSync faucet, Scroll faucet, Hyperliquid faucet, Monad faucet, Amoy faucet, Plasma faucet, TON faucet.
Have you already explored what you can achieve with Chainstack? Get started for free today.