Ethereum
 Hyperliquid
 Solana
 Arbitrum
 BNB Smart Chain
 Base
Base Polygon
 TRON
TRON Sui
Sui MegaETH


How to use Solflare wallet with Chainstack
What is Solflare?
Solflare is a popular wallet for the Solana network which allows users to buy, store and swap tokens & NFTs. It is one of a few wallets which supports custom nodes, and this article will guide you through the process of setting up Solflare with Chainstack.
Why do you need a custom endpoint?
There are several reasons for a user to implement their own custom endpoint.
- Congestion. The default endpoint for Solflare is the Solana official endpoint :
https://api.mainnet-beta.solana.com
This address is automatically set up and initially is the same across all the users, making it amazingly easy to get up and running. This also means this address is probably the most widely used endpoint in the network and it is shared among many users. Transactions through this endpoint may experience high latency. - Stability and connectivity. It is always a good idea to have a backup endpoint that is available 24/7 just in case the main one fails. Setting up custom endpoints with Chainstack protects yourself from network instability, as well as makes transactions faster and fault-tolerant.
- Cost. Chainstack provides a free endpoint on the Developer subscription. Anyone can start developing without worrying about the cost.
How to set up a Solana node?
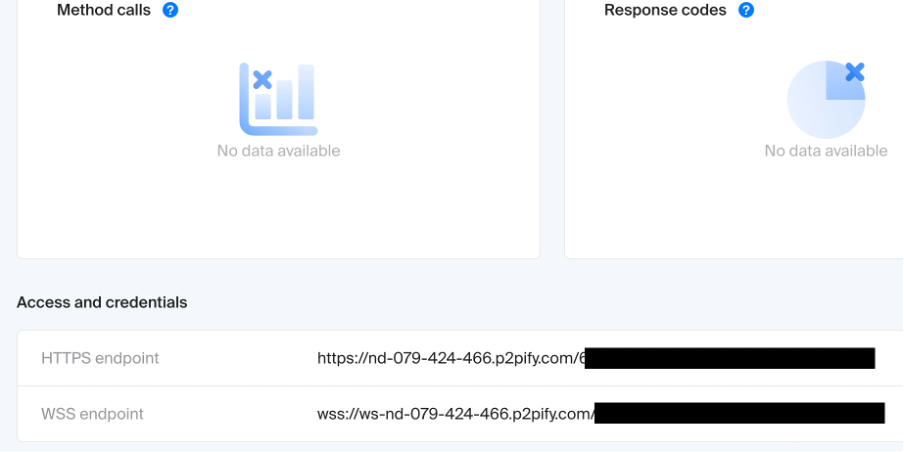
Follow this guide to set up a Chainstack Solana node. Once the node is successfully deployed, the HTTPS endpoint will be available for consumption.
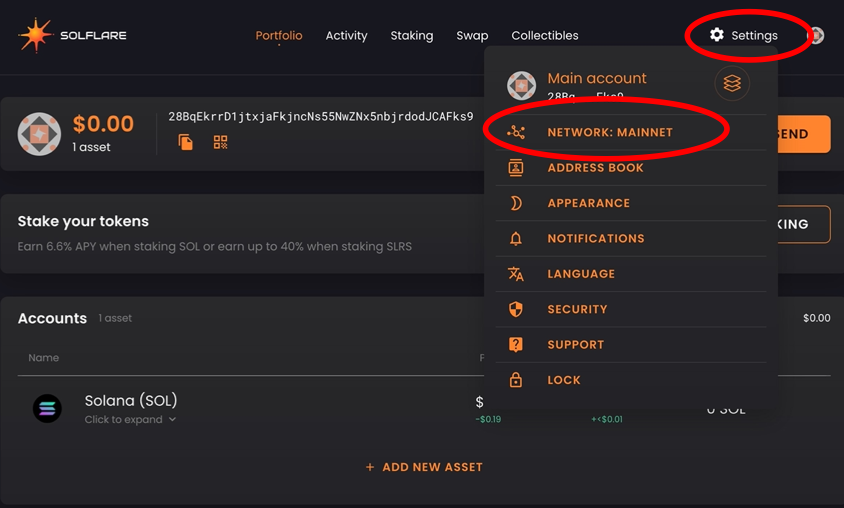
1. Open Solflare, and click Settings > Network.
2. Select Add custom node.

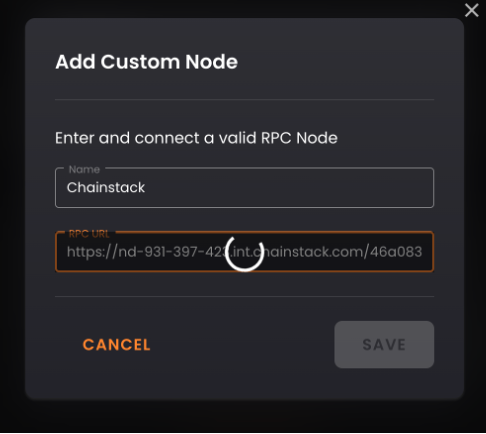
3. Fill in the name and RPC address. Example:
4. Check if the custom RPC is listed and pre-selected.
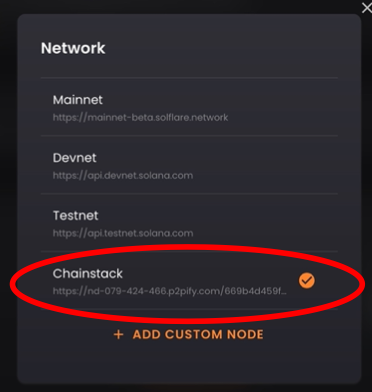
There it is, your Solflare wallet is ready for use.
Conclusion
That is the end of this article. If you have any question, feel free to ping us in our Telegram/Discord. Happy coding, Cheers!
- Discover how you can save thousands in infra costs every month with our unbeatable pricing on the most complete Web3 development platform.
- Input your workload and see how affordable Chainstack is compared to other RPC providers.
- Connect to Ethereum, Solana, BNB Smart Chain, Polygon, Arbitrum, Base, Hyperliquid, Tempo, MegaETH, Monad, Plasma, Avalanche, Optimism, Scroll, Aptos, Cronos, Gnosis Chain, Kaia, Moonbeam, Celo, Aurora, TON, Ronin, and Bitcoin mainnet or testnets through an interface designed to help you get the job done.
- Fast access to blockchain archive data and gRPC streaming on Solana.
- To learn more about Chainstack, visit our Developer Portal or join our Telegram group.
- Connect your AI agent to Chainstack in seconds using Chainstack MCP — give Claude, Cursor, Codex, Gemini, and Windsurf live access to blockchain data, node management, and docs.
- Are you in need of testnet tokens? Request some from our faucets. Sepolia faucet, Base Sepolia faucet, Solana devnet faucet, Hoodi faucet, BNB faucet, zkSync faucet, Scroll faucet, Hyperliquid faucet, Monad faucet, Amoy faucet, Plasma faucet, TON faucet.
Have you already explored what you can achieve with Chainstack? Get started for free today.