Ethereum
 Hyperliquid
 Solana
 Arbitrum
 BNB Smart Chain
 Base
Base Polygon
 TRON
TRON Sui
Sui Robinhood


The Brownie tutorial series—Part 4

Welcome, you are about to enter the last leg of the Brownie development journey.
- Part 1 – Introduction.
- Part 2 – Scripts, tests, and testnets.
- Part 3 – Brownie deep dive.
- Part 4 – Move forward with Brownie. <- you are here
The series aimed to introduce you to this robust development framework and help you understand all its features so that you can build complex web3 applications relatively quickly. In the last article of the series, we will discuss some additional features of Brownie that will help you better analyze your smart contract, handle external packages and help you quickly set up a React-based front-end for your project.
Looking under the hood of a smart contract
The true mastery of any subject depends on the number of “whys” you can answer. This is especially true when it comes to programming. Anybody can write and run code, but it takes a master to understand why a particular piece of code will/won’t work once you run it, and with smart contract contracts, you are not dealing with any random code; you are dealing with a code that will be stored in an immutable fashion across multiple machines and one that takes a considerable amount of effort to change or update. This means that you can never be too careful when it comes to testing and analyzing your smart contracts. Brownie knows this, and that is why Brownie comes with a GUI tool that helps you easily investigate your code.
The Brownie GUI
The Brownie GUI is a minimal interface tool built using the Python Tkinter package. It provides deeper coverage of your smart contracts. You see, a smart contract, when compiled, produces a corresponding machine-level code, i.e., the bytecode, that eventually gets stored in the ledger. The GUI tool helps you analyze the code on a bytecode level.
Note: The Tkinter package usually comes preinstalled with Python. If you are facing any issues with the package, you can always refer to the Tkinter official doc.
To run the GUI tool, open a terminal in your project root folder and type:
brownie gui The command will:
- Detect all the available contracts
- Compile the contracts
- Create the build materials
- Load the GUI
Note: You can run the Brownie GUI on any of our previous codebases.
Using the GUI, you can select the contract that you want to analyze, and it will display the Solidity contract along with the corresponding bytecode, side-by-side.
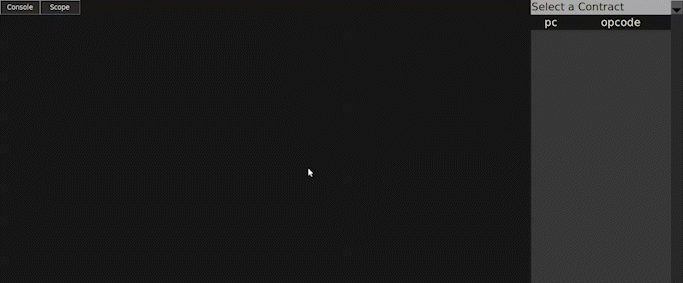
To get the opcode related to a particular section of code, you must select that portion of the code, and the tool will automatically highlight the corresponding opcode.
The scope option on the top left corner helps you focus on the bytecode of a selected portion of the code.
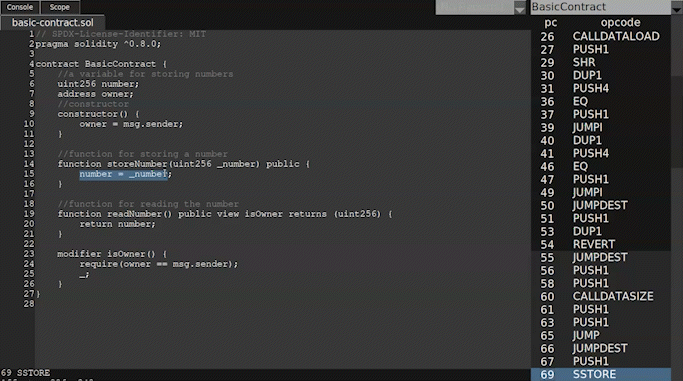
To fully utilize the tool, you need some familiarity with the opcode side of things. Still, once you get used to it, this tool can help you better analyze, optimize and even safeguard your code against any vulnerabilities, both logical and otherwise.
Importing a project
One of the most tempting things for any developer is another developer’s code. There are times when we see a project, and we immediately think of ways to integrate it into what we are doing (with proper credits, of course). Brownie understands this urge and provides ways to import external smart contract projects onto our codebase as packages so that we can reuse the given code. To enable this, Brownie introduced the Brownie package manager. The package manager allows users to import projects from both GitHub and the Ethereum package registry (ethPM) and use them as packages within their projects.
While importing a project onto Brownie, the project doesn’t need to use the same Brownie framework; when it comes to GitHub-based imports, the user has to make sure that the given Git repository has a directory called /contracts that stores the smart contract code, and that the repository has multiple tagged versions. If the code repository meets both these criteria, then the Brownie package manager will import the code, regardless of the framework that it uses.
Note: Popular code repositories like the ones by Openzepplin and Chainlink meet all the criteria, meaning that we can import their contracts onto our code using the Brownie package manager.
To install a git repository as a package, you should identify the repository using the organization’s name, the repository’s version, and the code’s version:
<ORGANISATION_NAME>/<REPOSITORY_NAME@<VERSION> For example, if you want to use uniswap contracts in your project, open a terminal and type the following command:
brownie pm install Uniswap/[email protected] This will automatically download the code, compile the contract and generate the build data.
Note: The compiled contracts and the build artifacts of the external projects won’t be stored inside your current project. Instead, they will be stored inside the root Brownie folder, under the /packages directory (~/.brownie/packages – for Linux)
You can view the list of all the deployed contracts using the following command:
brownie pm list To use one of the imported codes in your contract, add the following statement at the very top of your contract:
import “<ORGANISATION_NAME>/<REPOSITORY_NAME@<VERSION>/<PATH-TO_CONTRACT_FILE>” The path to the contract file will be the same as how it was arranged in the git repository. i.e., In the uniswap-v2 core repository, to import the “UniswapV2ERC20.sol” contract, we would use the following import statement:
import “Uniswap/[email protected]/contracts/ UniswapV2ERC20.sol Adding a front-end
Alright, we are at the end, the front-end, to be exact. The front-end of any application is what abstracts away all the messy code under the hood and presents the users with a delightful interface so they can easily interact with all the messy stuff. One of the most brutal truths about application development is that normal users don’t care much about what’s running under the hood. They want a seamless experience that helps them get what they want with minimal clicks and navigational efforts, meaning a good front-end matter.
When building a good front-end application, you can take endless routes; I mean, the whole process is only limited by the developer’s creativity. But, thus, it creates a new problem, where does one start?
Brownie solves this problem by including a React-based application template along with Brownie-mix. This template comes with sample contracts and React code that helps you get started with your front-end application.
To use this “mix,” you can use the Brownie bake command, so open a terminal and type:
brownie bake react-mix The command will create a new react directory that has a similar structure as that of a regular Brownie project, plus it will also include the code for the React front-end (inside the /client Folder)
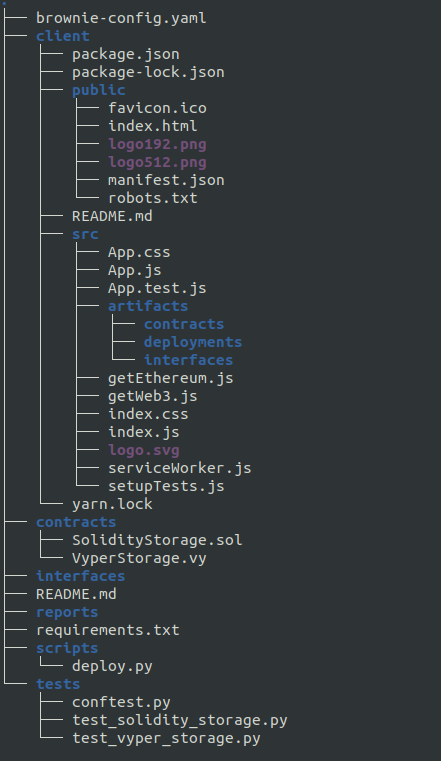
The template includes a sample value storage contract in both Solidity and Vyper languages. Just like our regular Brownie project, the project configurations can be found in the “brownie-config.yaml” file. Inside the configuration file, you will see that a .env file has been defined by default. The file presumably stores the user’s account private key using the PRIVATE_KEY variable.
So, before you try and run the project, make sure you create a .env file in the root directory of your project and store your account’s private key:
PRIVATE_KEY = 0x<ACCOUNT_PRIVATE_KEY> Instead of sticking with the default configurations, you can refer to our previous article and use other networks for contract deployment.
Note: In the wake of the merge, many major testnets like Ropsten, Rinkeby, Kovan (defined in the default config file), etc., have been deprecated. So, it is probably a good idea to refer to our previous article and use networks like the Goerli for contract deployment.
While using a new network, you should modify the network section of your config.yaml accordingly. Here are the changes required for including the details of the Goerli test network that we added to Brownie in our previous article:
networks:

  default: chainstack-goerli

  development:

    cmd_settings:

      mnemonic: brownie

      default_balance: 100000000000000000000

      unlock: <ACCOUNT ADDRESS HERE>

      # (requires explicit transfer of eth to accounts[-1])

    update_interval: 60

    verify: False


  chainstack-goerli:

    verify: False

    update_interval: 60
Now, since we added a new network for deployment, we should also update our deploy.py script (/scripts) to accommodate the changes:
from brownie import SolidityStorage, VyperStorage, accounts, network,config

def main():

    # requires brownie account to have been created

    # checking for the active network

    if network.show_active()=='development':

        # add these accounts to metamask by importing private key

        owner = accounts[0]

        SolidityStorage.deploy({'from':accounts[0]})

        # VyperStorage.deploy({'from':accounts[0]})


    elif network.show_active() == 'kovan':

        # add these accounts to metamask by importing private key

        owner = accounts.load("main")

        SolidityStorage.deploy({'from':owner})

        # VyperStorage.deploy({'from':owner})


    elif network.show_active() == 'chainstack-goerli':

        owner = accounts.add(config["wallets"]["from_key"])

        SolidityStorage.deploy({'from':owner})

        # VyperStorage.deploy({'from':owner})
Once you update the deploy.py script, you can deploy the contract onto the Goerli testnet using the following command:
brownie run deploy.py Since we have set the default network as Goerli in the config.yaml file, Brownie will automatically deploy the contract to the network without us having to state the network explicitly.
OK, now that we have our contract in the network, let’s try and spin up the front-end application.
To run the application, go to the /client directory and install all the dependencies:
npm install Once you install all the dependencies, you need to make specific changes to the App.js file within the /client/src directory before running the application.
The App.js file sits at the center of the React codebase, and since we deviated from the default and deployed our contract onto the Goerli testnet, we need to make specific changes to this file. Also, in our tutorial series, we almost entirely relied on Solidity for writing our smart contracts; this means we can remove any “Vyper” based code from the file.
Alright, with all said and done, your new App.js file should look like this:
import React, {Component} from "react"
import './App.css'
import {getWeb3} from "./getWeb3"
import map from "./artifacts/deployments/map.json"
import {getEthereum} from "./getEthereum"
class App extends Component {
state = {
web3: null,
accounts: null,
chainid: null,
solidityStorage: null,
solidityValue: 0,
solidityInput: 0,
}
componentDidMount = async () => {
// Get network provider and web3 instance.
const web3 = await getWeb3()
// Try and enable accounts (connect metamask)
try {
const ethereum = await getEthereum()
ethereum.enable()
} catch (e) {
console.log(`Could not enable accounts. Interaction with contracts not available.
Use a modern browser with a Web3 plugin to fix this issue.`)
console.log(e)
}
// Use web3 to get the user's accounts
const accounts = await web3.eth.getAccounts()
// set the current chain id
const chainid = 5;
this.setState({
web3,
accounts,
chainid
}, await this.loadInitialContracts)
}
loadInitialContracts = async () => {
console.log(this.state.chainid)
var _chainID = 5;
console.log(_chainID)
const solidityStorage = await this.loadContract(_chainID,"SolidityStorage")
if ( !solidityStorage) {
return
}
const solidityValue = await solidityStorage.methods.get().call()
this.setState({
solidityStorage,
solidityValue,
})
}
loadContract = async (chain, contractName) => {
// Load a deployed contract instance into a web3 contract object
const {web3} = this.state
// Get the address of the most recent deployment from the deployment map
let address
try {
address = map[chain][contractName][0]
} catch (e) {
console.log(`Couldn't find any deployed contract "${contractName}" on the chain "${chain}".`)
return undefined
}
// Load the artifact with the specified address
let contractArtifact
try {
contractArtifact = await import(`./artifacts/deployments/${chain}/${address}.json`)
} catch (e) {
console.log(`Failed to load contract artifact "./artifacts/deployments/${chain}/${address}.json"`)
return undefined
}
return new web3.eth.Contract(contractArtifact.abi, address)
}
changeSolidity = async (e) => {
const {accounts, solidityStorage, solidityInput} = this.state
e.preventDefault()
const value = parseInt(solidityInput)
if (isNaN(value)) {
alert("invalid value")
return
}
await solidityStorage.methods.set(value).send({from: accounts[0]})
.on('receipt', async () => {
this.setState({
solidityValue: await solidityStorage.methods.get().call()
})
})
}
render() {
const {
web3, accounts, chainid,
solidityStorage, solidityValue, solidityInput
} = this.state
if (!web3) {
return <div>Loading Web3, accounts, and contracts...</div>
}
console.log(solidityStorage)
if (!solidityStorage) {
return <div>Could not find a deployed contract. Check console for details.</div>
}
const isAccountsUnlocked = accounts ? accounts.length > 0 : false
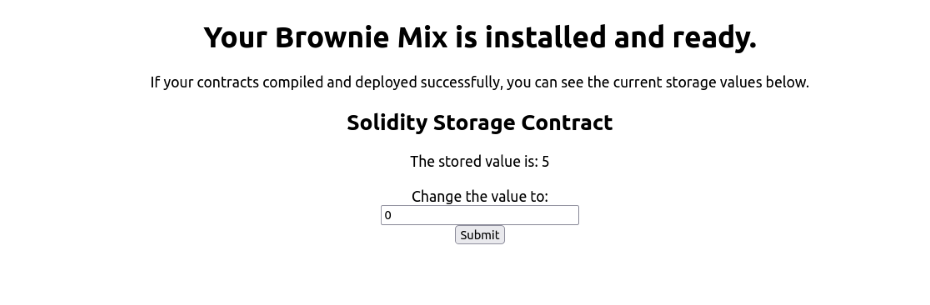
return (<div className="App">
<h1>Your Brownie Mix is installed and ready.</h1>
<p>
If your contracts compiled and deployed successfully, you can see the current
storage values below.
</p>
{
!isAccountsUnlocked ?
<p><strong>Connect with Metamask and refresh the page to
be able to edit the storage fields.</strong>
</p>
: null
}
<h2>Solidity Storage Contract</h2>
<div>The stored value is: {solidityValue}</div>
<br/>
<form onSubmit={(e) => this.changeSolidity(e)}>
<div>
<label>Change the value to: </label>
<br/>
<input
name="solidityInput"
type="text"
value={solidityInput}
onChange={(e) => this.setState({solidityInput: e.target.value})}
/>
<br/>
<button type="submit" disabled={!isAccountsUnlocked}>Submit</button>
</div>
</form>
</div>)
}
}
export default App Now, you can start the application by opening a terminal inside the /client folder and using the following command:
npm start This will run the front-end application locally, and it will be running at http://localhost:3000.
Note: To interact with the contract deployed onto the Goerli test network, we will be using MetaMask, so make sure that you have the MetaMask wallet installed on your browser and that your account has some Goerli tokens in it.
The application will automatically detect the deployed instance of the contract from the build artifacts (inside /client/src/artifacts) and connect to our MetaMask wallet from the browser to interact with the contract.
The default front-end that comes with the react-mix template is simple, but as mentioned above, the template is merely there to help you get started with the front-end application. Every aspect of the template is editable. Based on the complexity of your contracts and applications, users can improve upon the given code base and build more complex front-end applications.
Conclusion
Right, so this is the end of a journey spanning four articles. The idea behind the Brownie Tutorial Series was to give you an in-depth overview of this robust smart contract development framework and help you get started on the Brownie-based DApp building journey. Brownie comes with a set of easy-to-use and intuitive features that help with everything from smart contract creation to deployment, testing, and analysis. Learning Brownie not only enables you to build smart contracts faster but also helps you ensure the quality and safety of your contracts.
- Discover how you can save thousands in infra costs every month with our unbeatable pricing on the most complete Web3 development platform.
- Input your workload and see how affordable Chainstack is compared to other RPC providers.
- Connect to Ethereum, Solana, BNB Smart Chain, Polygon, Arbitrum, Base, Hyperliquid, Robinhood Chain, Arc, Tempo, MegaETH, Monad, Plasma, Avalanche, Optimism, Aptos, Cronos, Gnosis Chain, Moonbeam, Celo, Aurora, TON, Ronin, and Bitcoin mainnet or testnets through an interface designed to help you get the job done.
- Fast access to blockchain archive data and gRPC streaming on Solana.
- To learn more about Chainstack, visit our Developer Portal or join our Telegram group.
- Connect your AI agent to Chainstack in seconds using Chainstack MCP — give Claude, Cursor, Codex, Gemini, and Windsurf live access to blockchain data, node management, and docs.
- Are you in need of testnet tokens? Request some from our faucets. Sepolia faucet, Base Sepolia faucet, Solana devnet faucet, Hoodi faucet, BNB faucet, zkSync faucet, Robinhood Chain faucet, Hyperliquid faucet, Monad faucet, Amoy faucet, Plasma faucet, TON faucet.
Have you already explored what you can achieve with Chainstack? Get started for free today.