 Ethereum
 BNB Smart Chain
 Polygon
 Arbitrum
 Optimism
 Avalanche


 zkSync Era
 Starknet
 Scroll
 Aptos
Aptos Fantom
 Cronos
 Gnosis Chain
 Klaytn
 Moonbeam
 Celo
Celo Aurora
 Oasis Sapphire
 Polygon zkEVM
 Bitcoin
 Tezos
Tezos Harmony


Deploy Hyperledger Fabric v2 web app using the Node.js SDK
Introduction
One of the main highlights of Hyperledger Fabric v2 is the concept of decentralized governance for smart contracts. It introduce peer chaincode lifecycle, which focuses on improving chaincode management between multiple organizations. Using the new lifecycle, installation and upgrading of chaincodes requires approval from multiple organizations before the chaincode can be interacted with.
This article uses the Freedom Dividend chaincode as an example to show you how to build a complete Hyperledger Fabric v2 application using the new peer chaincode lifecycle together with the fabric-sdk-node and a network spun up with the Chainstack platform.
The main difference from developing a Hyperledger Fabric v1.4 application is the integration of the peer lifecycle commands into the application flow as illustrated in the diagram below.

Prerequisites
- A Chainstack account.
- Node.js 12.13.1 or higher.
- NPM 6 or higher.
- nodemon.
Tutorial overview
- Set up a Hyperledger Fabric network with Chainstack.
- Set up the environment.
- Set up the backend application.
- Set up the frontend client.
- Install the chaincode.
- Approve the chaincode.
- Commit the chancode.
- Interact with the installed chaincode through the front end.
- Upgrade the chaincode.
- Interact with the upgraded chaincode through the front end.
1. Set up a Hyperledger Fabric network with Chainstack
- Create a consortium project with Chainstack. See Create a project.
- Deploy a Hyperledger Fabric network. See Deploy a consortium network.
2. Set up the environment
Clone the freedomDividend repository on your local machine:
git clone https://github.com/chainstack/freedom-dividend-chaincodeInstall the Hyperledger Fabric v2 binaries using the downloadPeerBinary.sh script in the repository:
macOS:
bash downloadPeerBinary.shLinux:
bash downloadPeerBinary.sh linuxThe script will download a set of Hyperledger Fabric v2 binaries that you can execute to interact with the network.
Set the environment variables
In the webapp/server/.env file, replace the ORDERER_NAME, PEER_NAME, and MSP_ID variables with:
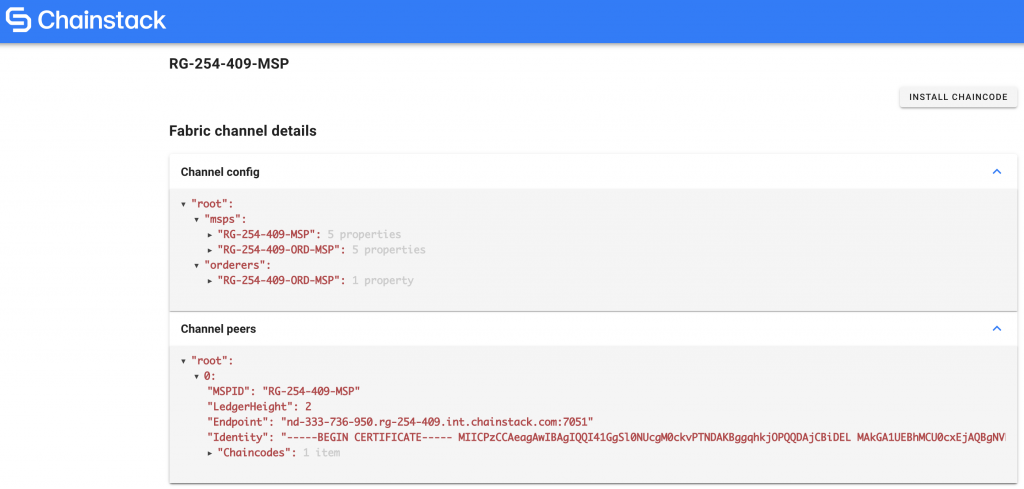
ORDERER_NAME— the orderer name of the network you deployed your peer in. To access the orderer name in Chainstack, from Hyperledger Fabric network, select the Service nodes tab and click on Orderer to access its details page. Here you can copy the Orderer name value.PEER_NAME— the name of the peer that you deployed. To access the peer name in Chainstack, from Hyperledger Fabric network, select the Peer nodes tab, click on your peer name to access its details page. Here you can copy the Peer name value.MSP_ID— the Membership Service Provider identity (MSP ID). To access the MSP ID in Chainstack, from the Hyperledger Fabric network, click the Details link to open the network details modal. Here you can copy the MSP ID value.
Export the required files from Chainstack
In Chainstack, export the following files.
Network connection profile
- Navigate to your Hyperledger Fabric network.
- Click Details.
- Click Export connection profile.
- Move the exported file to the
webapp/certs/directory.
Orderer TLS certificate
- Navigate to the Hyperledger Fabric Service nodes tab from the network.
- Access Orderer.
- Click Export
- Unzip the downloaded folder.
- Move the
-cert.pemfile to thewebapp/certs/directory.
Organization identity ZIP folder
- Navigate to your Hyperledger Fabric network.
- Click Details.
- Access Admin identity.
- Click Export.
- Unzip the downloaded folder.
- Move the
mspsubdirectory to thewebapp/certs/directory.
3. Set up the back end application
In the cloned repository, install the required dependencies:
cd webapp/server
npm i
Start the back end server:
npm run startYou should see the following output in the terminal, which indicates that the wallet and gateway have been successfully initiated using the Hyperledger Fabric v2 SDK library together with the values you set in the .env file:
Setting up fabric wallet and gateway...
Server running at http://localhost:4000/
==========AS_LOCALHOST: false==========
Set up complete!
You should also note that a wallet with the label user01 has been created in the directory webapp/server/fabric/wallets/; this is the wallet identity that Hyperledger Fabric v2 SDK uses to authenticate the user with the network.
4. Set up the front end client
In the cloned repository, install the required dependencies:
cd webapp/client
npm i
Compile and build the front end client:
npm run buildHead on over to http://localhost:4000 in your browser, and you should see the following:
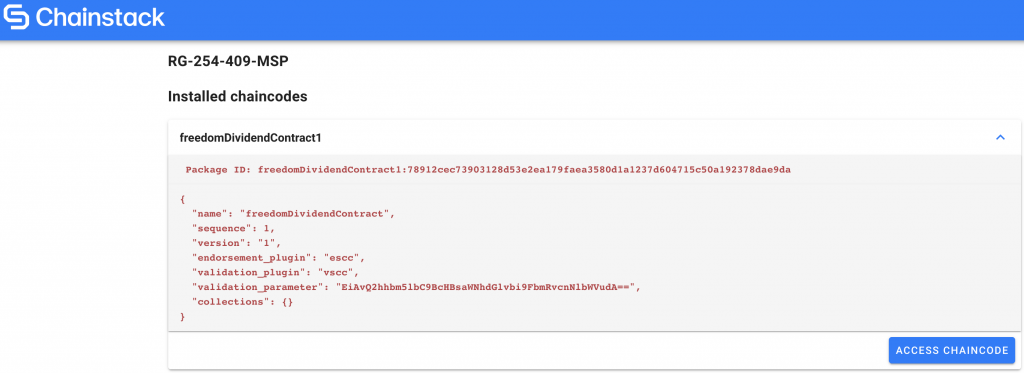
5. Install the chaincode
In the web app at http://localhost:4000, click Install chaincode.
You will now see the chaincode as installed:

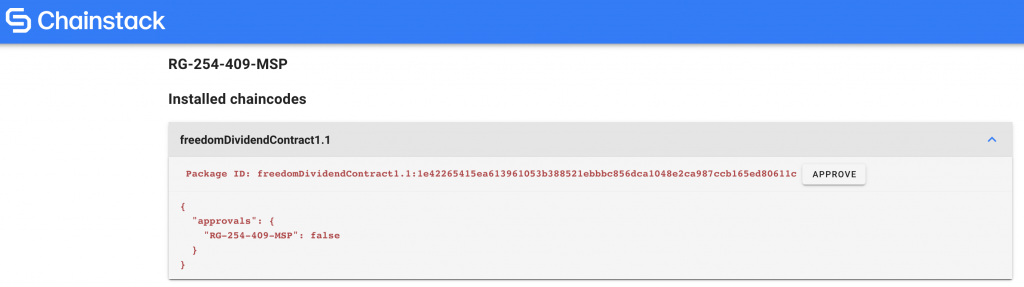
6. Approve the chaincode
In the web app at http://localhost:4000, click Approve.
Note that we are using one organization in this example. If there are multiple parties involved and the endorsement policy requires more than one endorser, the chaincode package will have to be approved by others before it can be committed to the network.
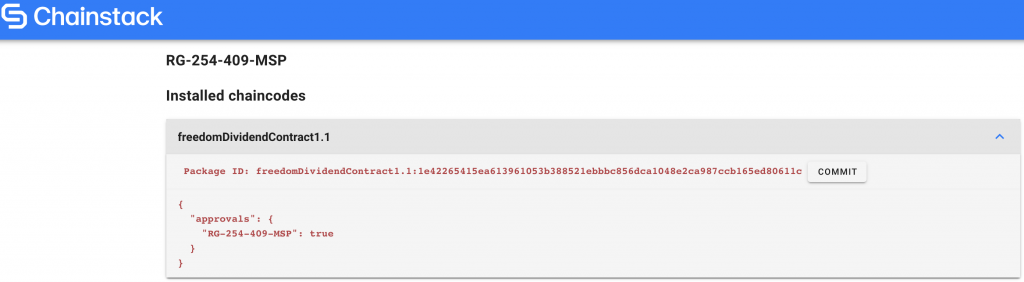
The value of the organization approval will change from false to true:

7. Commit the chaincode
In the web app at http://localhost:4000, click Commit.
You will see the details of the committed chaincode:
8. Interact with the installed chaincode
You can now interact with the installed and committed chaincode.
To read more about the chaincode and the arguments, see the chaincode tutorial at Chainstack Docs.
In the web app at http://localhost:4000, click Access chaincode.
You will see the following:
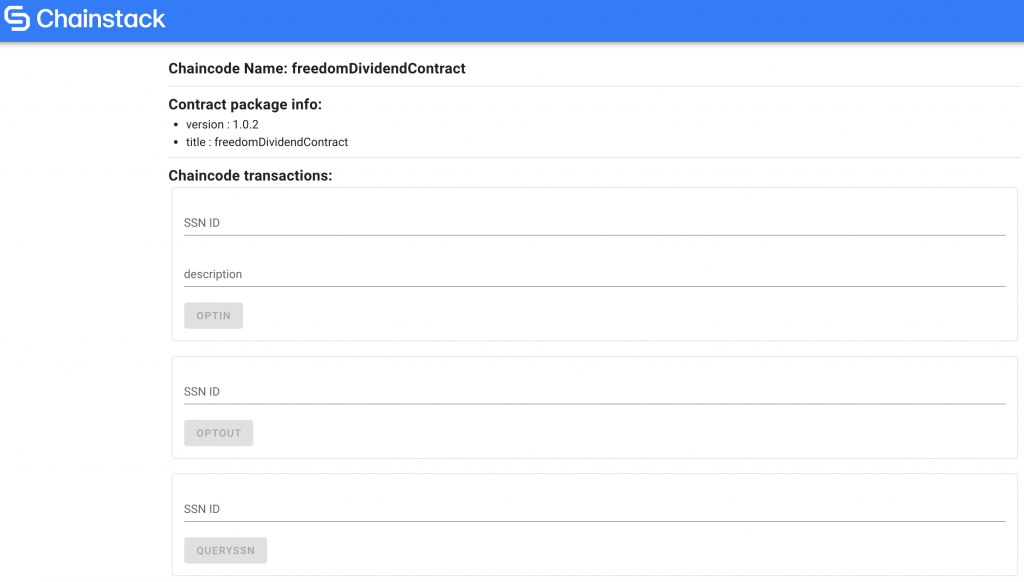
A dynamic set of forms is automatically generated using the contract.evaluateTransaction('org.hyperledger.fabric:GetMetadata') function based on the chaincode you are accessing.
In this example, we are using the Freedom Dividend chaincode which includes three transactions:
OptInOptOutQuerySSN
Note that this will only work if your chaincode uses the fabric-contract-api.
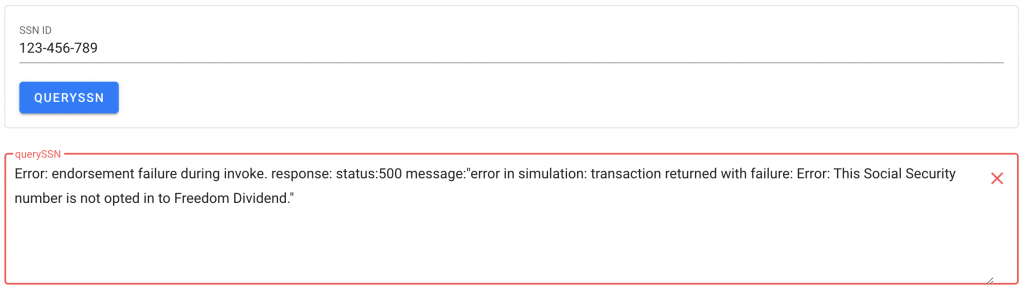
Execute the QuerySSN function with a random value; we will use 123-456-789 as an example. You should see an error as shown below. This error indicates that there is no record on the ledger with SSNID 123-456-789.
Next, execute the OptIn function with a random value. We will use 123-456-789 with a random statement as an example.
Next, execute the QuerySSN function with 123-456-789 again. You should see the following:

9. Upgrade the chaincode
Now create a more descriptive metadata to override the one inferred from the source code to provide more meaningful parameters for the generated forms.
The metadata is in the contract/contract-metadata/metadata.json file:
freedom-dividend-chaincode
|__ contract
| |__ contract-metadata
|    |__ metadata.json
In the metadata.json file, replace:
ssnIdwithsecurityNumberSSN IDwithsecurityNumberIDdescriptionwithstatement
Next, upgrade the Freedom Dividend chaincode with the following command:
node webapp/server/cli/peer upgrade The command will automatically increase CHAINCODE_VERSION in the .env file by 0.1 and CHAINCODE_SEQUENCE by 1.
You should see the following on the terminal to indicate that chaincode has been successfully upgraded on the network:
$ node webapp/server/cli/peer upgrade
executing cli - upgrade command
executing cli - upgrade command
2021-04-23 16:15:45.304 +08 [cli.lifecycle.chaincode] submitInstallProposal -> INFO 001 Installed remotely: response:<status:200 payload:"\n[freedomDividendContract1.1:1e42265415ea613961053b388521ebbbc856dca1048e2ca987ccb165ed80611c\022\032freedomDividendContract1.1" >
2021-04-23 16:15:45.305 +08 [cli.lifecycle.chaincode] submitInstallProposal -> INFO 002 Chaincode code package identifier: freedomDividendContract1.1:1e42265415ea613961053b388521ebbbc856dca1048e2ca987ccb165ed80611c
By using a different CHAINCODE_SEQUENCE and CHAINCODE_VERSION number, the peer lifecycle command initiates an upgrade process to override the existing Freedom Dividend chaincode with the new changes.
10. Interact with the upgraded chaincode through the front end
You now need to approve and commit the upgraded chaincode.
In http://localhost:4000/, approve the new chaincode definition by clicking Approve.
Now commit the approved chaincode by clicking Commit.
Access the upgraded chaincode by clicking Access chaincode.

You should see the changes made previously are reflected in the automatically generated forms.
Conclusion
The concept of integrating CLI commands as a part of the application can be challenging to understand, hopefully this Freedom Dividend application helps you understand the process of building a Hyperledger Fabric v2 application.
Explore Chainstack
- Learn more about managed Hyperledger Fabric v2 services on Chainstack.
- Register for a 7-day trial with Chainstack.
- Build a DApp with Chainstack.
Join our community of innovators
- To learn more about Chainstack, visit our Knowledge Center or join our Discord server and Telegram group.
- Sign up for a free Developer account, or explore the options offered by Growth or Business plans here.
- Take a look at our pricing tiers using a handy calculator to estimate usage and number of nodes.
- Subscribe to our email updates, and be the first one to know about new releases, partnerships and events.