Ethereum
 Hyperliquid
 Solana
 Arbitrum
 BNB Smart Chain
 Base
Base Polygon
 TRON
TRON Sui
Sui MegaETH


Chainlink VRF Tutorial with Foundry – How To Use Chainlink’s VRF
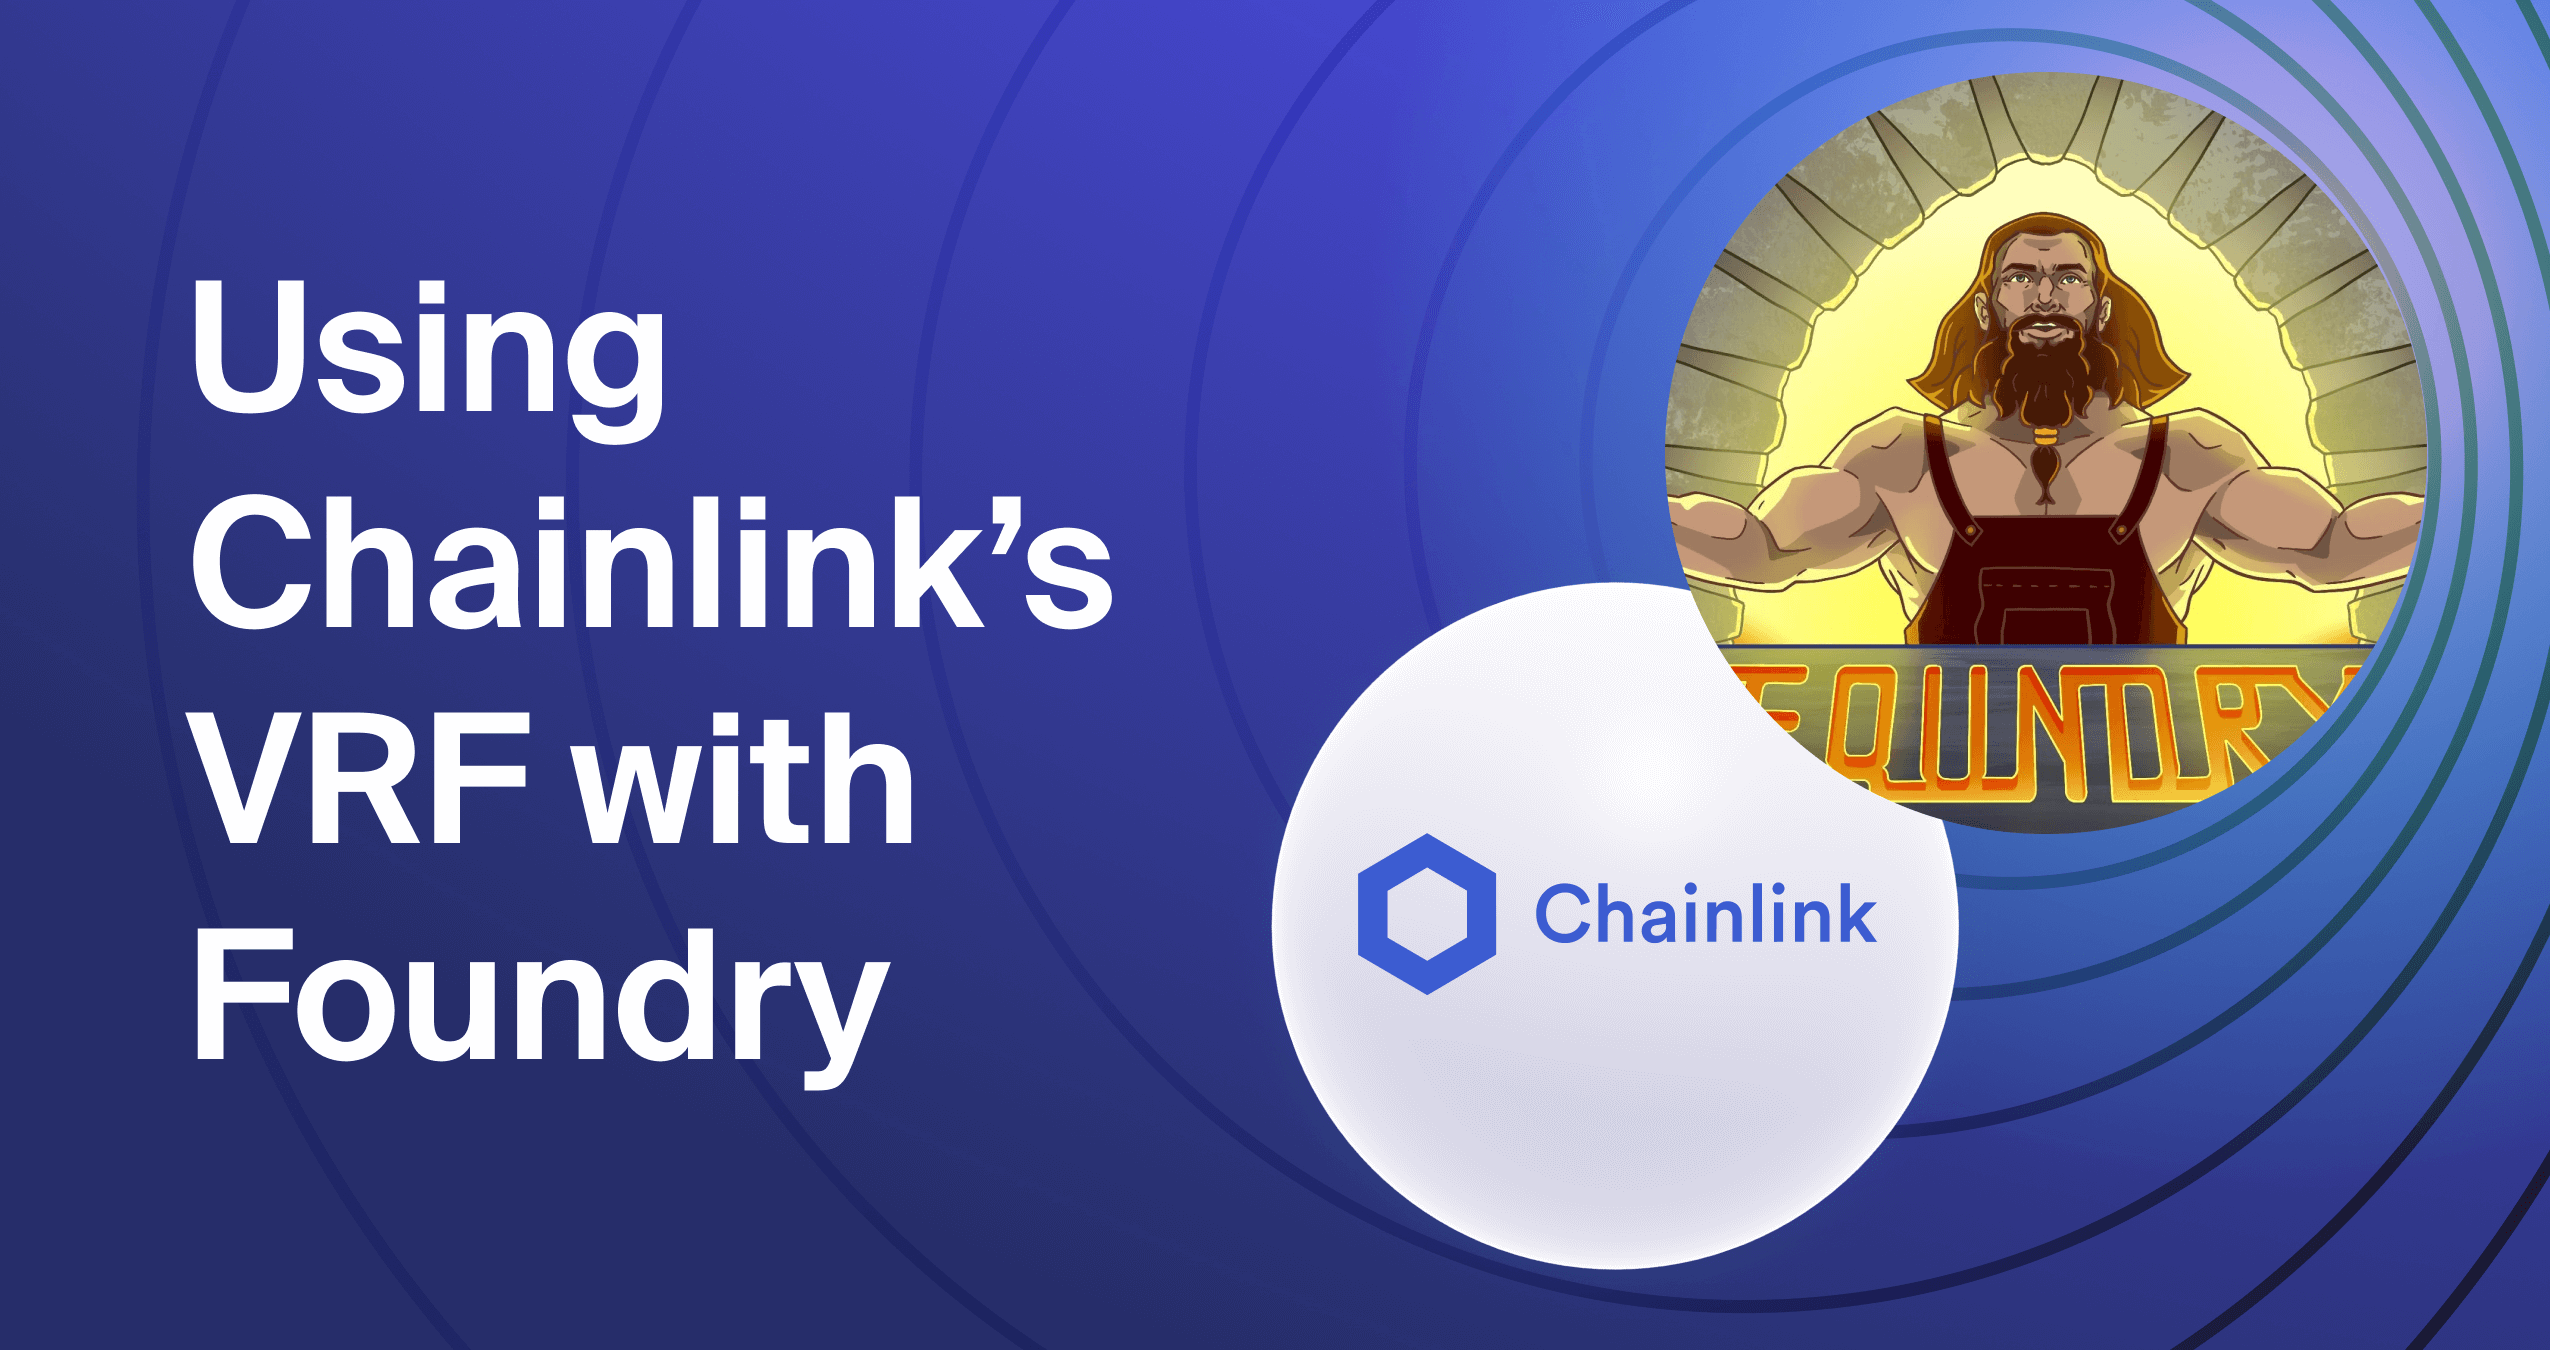
Table Of Contents-
• Introduction
• Installing Foundry
• Installing dependencies with forge
• Setting up Remappings in Foundry
• Creating a VRF Subscription
• Writing the Smart Contract
• Scripting in Foundry
• Setting up our dotenv File
• Deploying the Smart Contract
• Fetching Random Values from VRF
• Conclusion
Introduction
Foundry is one of the latest smart contract development toolchains currently in the market, and it allows users to compile contracts, write tests, deploy contracts, and much more through its command line interface.
Foundry is written in Rust and promises faster compilation times and the convenience of writing tests and deployment scripts in Solidity, rather than JavaScript. Many Solidity developers have been looking forward to this for a long time since this will allow people to write smart contracts and their corresponding tests without having to switch between languages.
Moreover, this would save people time and effort by no longer needing to learn JavaScript and Solidity. If you’re familiar with Hardhat, we have an article covering the main differences between the two in performance and developer experience.
This article will teach you the basics of working with Foundry by building a smart contract that consumes Chainlink’s VRF (Verifiable Random Function). The smart contract will use a pre-paid ‘subscription’ to use Chainlink’s VRF services. We will compile, deploy, and verify our smart contract using Foundry, straight out of the command line. Without any further delays, let us get started.
How To Install Foundry?
To install Foundry, Linux and MacOS users can open their terminal and run-
curl -L https://foundry.paradigm.xyz | bashThis will download Foundryup. To install Foundry, run-
foundryupIf everything is installed correctly, your terminal will look like this-

Windows users may need to download Rust before proceeding with the installation. If you face any issues during installation, you can refer to the official Foundry documentation.
Once this is done, create an empty directory where you would like to set up your Foundry project. Open the directory in VS code, and then open the terminal.
Run the command ‘forge init’ to initialize a Foundry project in the empty directory.
Installing Dependencies with forge
By default, Foundry manages installed dependencies as submodules, which means any GitHub repository can be directly installed as a dependency without having to use a package manager like npm or yarn, even though Foundry supports that too.
So what exactly are we installing?
To fetch random data from Chainlink, our deployed smart contracts need to be structured in a way that is compatible with Chainlink’s on-chain smart contracts. To do that we will need to import a few interfaces and smart contracts into our Solidity code.
To do that we will be installing a repository that contains only Chainlink’s smart contracts. You can check out the repository on Github.
We will install the repo into our project using the forge command. In your terminal, run-
forge install smartcontractkit/chainlink-brownie-contractsThe same command could be run by passing the exact URL of the repo instead of just the Github path. This will result in Foundry cloning the whole repo into our ‘lib’ folder.
Setting up Remappings in Foundry
While working with Foundry in VS Code, it is recommended that we precisely point Foundry towards the path of our installed dependencies. By default, Foundry makes some deductions. To check out those default remappings, run this command in your terminal-
forge remappingsThis should show you the exact paths of the packages that we are using with Foundry, alongside the path of the Chainlink repo we installed.
However, we wish to set up a custom remapping for our Chainlink repo. In your terminal, run-
forge remappings > remappings.txt
This will create a ‘remappings.txt’ file in your root directory and will fill it up with the default remappings that Foundry has. Add this line to your remappings file-
chainlink/=lib/chainlink-brownie-contracts/contracts/src/
All the files that we will need to inherit from Chainlink reside in the ‘src’ folder of our Chainlink library. Remapping our dependencies like this will make it easier to import those files into our Solidity code later.
To verify that Foundry has saved your new remapping, run the ‘forge remappings’ command once more. Your terminal should look something like this-

How To Create a VRF Subscription?
Chainlink’s VRF V2 service charges a small amount of LINK tokens for every randomness request. Chainlink’s subscription manager lets us create a ‘subscription’ and fund it with a set amount of LINK tokens. Only contracts authorized by the owner of that subscription can use that subscription to request randomness. We can authorize multiple contracts on a single subscription, which not only makes this process more convenient but also saves us gas since we are funding a subscription with a significant amount of LINK tokens in one go.
To create a Chainlink VRF subscription on the Goerli testnet, follow these steps-
- Go to faucets.chain.link and connect your wallet to the page. Now you can make a request for some LINK and ETH tokens. Make sure that your Metamask is connected to the Goerli Testnet.
- Go to vrf.chain.link and connect the wallet with some Goerli ETH and LINK tokens to the website. Click on ‘Create Subscription’.
- Make sure that the subscription address is the same wallet address that has the required tokens.
- Now click on ‘Create Subscription’ and approve the Metamask transaction. Once this transaction is confirmed, add a few LINK tokens to the subscription. This is known as ‘funding the subscription.
- Chainlink will then allow you to authorize contract addresses that can consume VRF data through your subscription, but we will add that address later.
This is what your VRF homepage should look like-
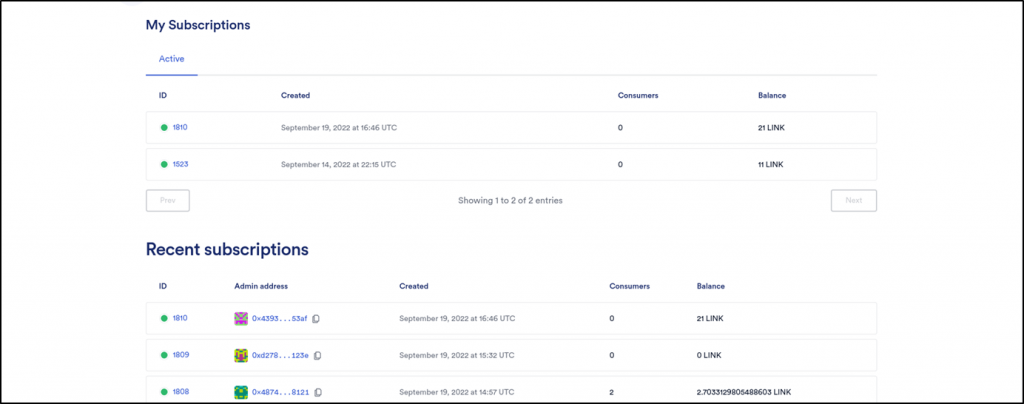
Congrats! You now have your very own VRF subscription that you can use to fund the VRF requests that your smart contracts make.
Writing the Smart Contract
With our VRF subscription ready and our dev environment set up, we are now finally ready to write the smart contract code.
Open the code editor where you set up your dev environment. Inside the src folder, create a new file:
chainlinkVRF.sol
Chainlink VRF example – Paste the following code inside the file
// SPDX-License-Identifier: MIT
pragma solidity ^0.8.0;

import "chainlink/v0.8/interfaces/VRFCoordinatorV2Interface.sol";
import "chainlink/v0.8/VRFConsumerBaseV2.sol";


contract VRFv2Consumer is VRFConsumerBaseV2 {
  VRFCoordinatorV2Interface COORDINATOR;

  // Your subscription ID.
  //hardcoded into the constructor
  uint64 s_subscriptionId;

  // Goerli VRF v2 coordinator address
  address vrfCoordinator = 0x2Ca8E0C643bDe4C2E08ab1fA0da3401AdAD7734D;

  // The gas lane to use, which specifies the maximum gas price to bump to.
  // Higher gas lane means higher price and lower confirmation times,
  // mainnets on chainlink VRF typically have multiple gas lanes,
  // but Goerli only has one gas lane. For more details,
  // see https://docs.chain.link/docs/vrf-contracts/#configurations
  bytes32 keyHash = 0x79d3d8832d904592c0bf9818b621522c988bb8b0c05cdc3b15aea1b6e8db0c15;

  //Goerli has a max gas limit of 2.5 million,
  //we'll cap out at 200000, enough for about 10 words
  uint32 callbackGasLimit = 200000;

  // The default is 3, but you can set this higher.
  uint16 requestConfirmations = 5;

  // Cannot exceed VRFCoordinatorV2.MAX_NUM_WORDS.
  //maximum number of random values is 500 for Goerli Testnet
  uint32 public numWords =  3;

  uint256[] public s_randomWords;
  uint256 public s_requestId;
  address s_owner;

  constructor(uint64 subscriptionId) VRFConsumerBaseV2(vrfCoordinator) {
    COORDINATOR = VRFCoordinatorV2Interface(vrfCoordinator);
    s_owner = msg.sender;
    s_subscriptionId = subscriptionId;
  }

  // Assumes the subscription is funded sufficiently.
  function requestRandomWords() external onlyOwner {
    // Will revert if subscription is not set and funded.
    s_requestId = COORDINATOR.requestRandomWords(
      keyHash,
      s_subscriptionId,
      requestConfirmations,
      callbackGasLimit,
      numWords
    );
  }

  function fulfillRandomWords(
    uint256, /* requestId */
    uint256[] memory randomWords
  ) internal override {
    s_randomWords = randomWords;
  }


  //function to change the number of requested words per VRF request.
  function changeNumOfWords(uint32 _numWords) public onlyOwner {
    numWords = _numWords;
  }


  modifier onlyOwner() {
    require(msg.sender == s_owner);
    _;
  }
}
A few things happened here. Let us quickly go over the important points to note in the code-
Notice the Chainlink imports at the top. We didn’t have to specify the exact path of the files we are importing, since we had already defined it in the ’remappings.txt’ file. This makes importing files into our code cleaner.
The subscription ID is the unique identifier of our subscription and is passed as a parameter in the constructor.
Each VRF-supported chain has a unique contract address representing the main VRF V2 smart contract. This address is passed to both the inherited interface as a reference later.
A key hash address is basically a measure of how much gas you are willing to pay to process your requests. The higher the ‘gas lane’, the quicker will your requests go through. Do note however that not every chain has high-speed gas lanes. Chainlink supports only one gas lane, whereas the Ethereum mainnet supports multiple gas lanes. You can read more about the exact specifications for each network from Chainlink’s official documentation.
To supply random values to your smart contract, Chainlink basically uses a fallback function. We need to supply an adequate amount of gas so that our call does not fail. The exact amount of gas required can vary wildly depending on the instantaneous chain activity, but you can check out some rough estimates in the code’s comments.
As a rule, you will be charged for the work already done if your callback function fails due to a lack of gas.
The ‘requestConfirmations’ variable represents the number of block confirmations we want to wait for before accepting the returned random values from Chainlink. The higher this number, the more secure your data is. However, there are constraints placed upon the value of this variable, and you can read about the exact details in the docs.
‘requestRandomWords()’ sends a request to Chainlink’s V2 coordinator for a supply of random words. Every single one of these requests has a unique ID. The ‘fulfillRandomWords()’ function uses this unique ID to fetch our Random data.
The last function simply manipulates the ‘numWords’ variable so that we can change the number of random values we can ask for in a single call.
Once your contract is ready, save the files and run this command in the terminal-
forge buildThis will compile all your contracts and generate ABIs for them.
Scripting in Foundry
Once our contracts have been successfully compiled, we need to create a simple script to deploy our contract. Under the ‘script’ folder, create a new file by the name of ‘chainlinkVRF.s.sol’. Inside the file, paste the following code-
// SPDX-License-Identifier: UNLICENSED
pragma solidity ^0.8.0;
import "forge-std/Script.sol";
import {VRFv2Consumer} from "src/chainlinkVRF.sol";
contract ChainlinkScript is Script {
    function setUp() public {}
    function run() public {
        vm.startBroadcast();
        VRFv2Consumer VRFv2 = new VRFv2Consumer(1810);
        vm.stopBroadcast();
    }
}
We don’t do a whole lot here. We first import the Script.sol contract from Foundry, which allows us access to all the scripting functionalities supported by Foundry. Secondly, we import our smart contract. Scripts are by default executed within the function run(). The two broadcast functions record any transactions happening between the two calls and record them to a special file.
One thing to note here is the constructor we are passing to our smart contract. If you look carefully at the code, the ID of our Chainlink subscription is passed as a parameter. Copy the subscription ID from the subscriptions page and pass it as the parameter to your contract.
Lastly, we create a new instance of our contract, which serves as the deployment command.
We now have a script ready to run, but we still need to define our environment variables to correctly deploy our smart contract.
Setting up our dotenv File
This is the last thing we need to do before getting started with our smart contract. To deploy our smart contract, we will need to pass a few environment variables to Foundry. We could do this directly in the command line while deploying our contract, but it is recommended that we do so in a dotenv file. This way our sensitive data remains secure.
In your terminal, make sure you are pointing to the root directory, and run the following command-
touch .envThis will create an empty dotenv file in your directory. Now we need to get some credentials to put into our dotenv file. Here’s how to do that-
- RPC URLs are needed to connect to the blockchain. You can either host your own node or connect to the blockchain using the RPC URL for the blockchain network you want to use. In this example, we are going to use Ethereum’s Goerli Testnet. You can either use a public Goerli RPC URL or Chainstack’s dedicated node provider service. That’s what I am doing here. Using Chainstack allows us to deploy our contracts and interact with them much more quickly and reliably. Get started from our signup page.
- A private key is what enables Foundry to access the tokens needed to be used as gas fees to deploy our contract. Pass in the private key for any of your accounts with some Goerli testnet tokens.
- Lastly, you need to go to Etherscan and sign up for an account if you haven’t already done so. Then create an Etherscan API key and paste it here. You will need this to verify the contract.
In the end, your dotenv file should look something like this-
RPC_URL=https://mc-12.p123yippy.com/12ase525c5012
PRIVATE_KEY=dlhj12342kjh4eslkh1pq4h1324kqwrekhwe
ETHERSCAN_API_KEY=SDJKASL232KJ3SQINA11A5KQIUALKJ234G2CAEWYND
Do note however that the keys shown here are fake and are displayed this way for your convenience. After configuring the dotenv file, save it once. Then open the terminal again, and run the command-
source .envThis command allows us to load our environment variables from the dotenv file to the terminal.
Now we are finally ready to deploy our contract.
Deploying the Smart Contract
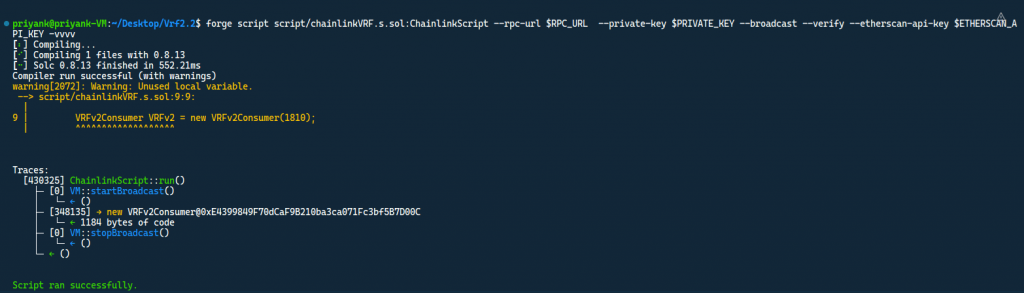
In your terminal, execute the following command-
forge script script/chainlinkVRF.s.sol:ChainlinkScript --rpc-url $RPC_URL --private-key $PRIVATE_KEY --broadcast --verify --etherscan-api-key $ETHERSCAN_API_KEY -vvvvThis command tells forge to run our script on the Goerli Testnet, and to verify our contract immediately after running the script. Please note that it may take a while to complete this transaction if the network is busy. You can mitigate some of that time if you are using a dedicated node.
Also, the ‘-vvvv’ flag represents the amount of verbosity, i.e- the amount of details, you want in your transaction logs. Foundry allows us different levels of verbosity.
Once your transaction is through, your terminal should look something like this-
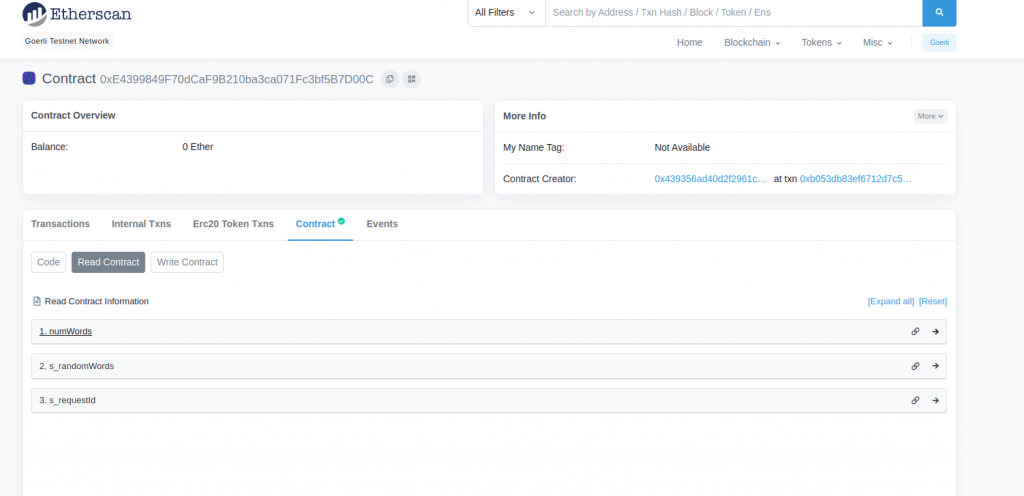
Open the goerli.etherscan URL and open the contracts page. You will see that your contract has already been verified, and that you can call your functions directly from the contract page. Your browser should look something like this-
Fetching Random Values from VRF
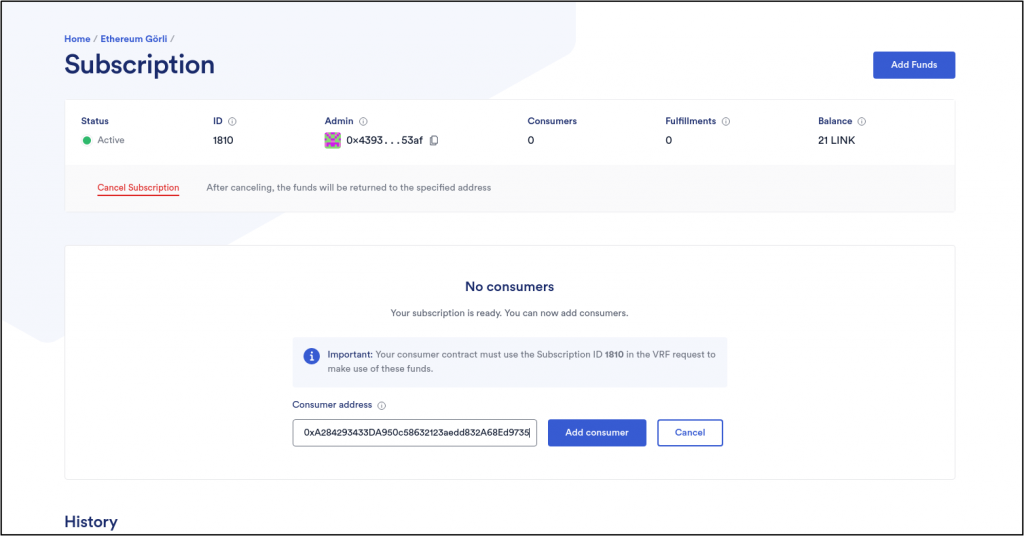
Congratulations on deploying a VRF-compatible smart contract. This smart contract is now capable of requesting provably random values from Chainlink. However, we still need to allow our smart contract access to the subscription we made earlier. Open your browser and go back to vrf.chain.link .
Click on the subscription ID you passed to the contract as the constructor argument at the time of deployment. Copy the address of the deployed smart contract and add it as an authorized consumer of this subscription. This is what your screen should look like.
Once this transaction is done, go to the write section of your verified contract page. Connect your Metamask wallet to Etherscan. Again, make sure it is the same wallet you deployed the contract with.
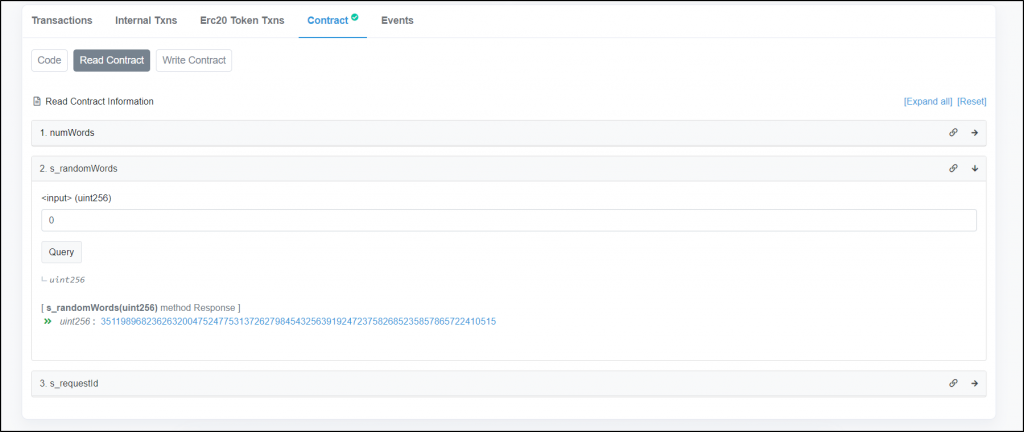
Call the function ‘requestRandomWords’ and approve the transaction. This process takes a while. Chainlink not only generates a random number for us, but it also verifies its authenticity on-chain, and that takes a while to process. After a few minutes, go to the read section of your contract, and call the ‘s_randomWords’ variable by passing 0 as the array index. Note that Chainlink will return an array of random uint256 numbers whose length will be equal to the value of the ‘numWords’ variable.
This is what your screen should look like.
You can now use these random numbers in any of your projects without having to worry about the reliability of these values.
Conclusion
And that’s it. Congratulations if you made it this far. In this tutorial, we used Foundry to compile and deploy a smart contract to the Goerli Testnet. The contract I deployed can be found on etherscan. Feel free to check out Chainstack’s official blog for some other cool tutorials.
Happy coding!
- Discover how you can save thousands in infra costs every month with our unbeatable pricing on the most complete Web3 development platform.
- Input your workload and see how affordable Chainstack is compared to other RPC providers.
- Connect to Ethereum, Solana, BNB Smart Chain, Polygon, Arbitrum, Base, Hyperliquid, Tempo, MegaETH, Monad, Plasma, Avalanche, Optimism, Scroll, Aptos, Cronos, Gnosis Chain, Kaia, Moonbeam, Celo, Aurora, TON, Ronin, and Bitcoin mainnet or testnets through an interface designed to help you get the job done.
- Fast access to blockchain archive data and gRPC streaming on Solana.
- To learn more about Chainstack, visit our Developer Portal or join our Telegram group.
- Connect your AI agent to Chainstack in seconds using Chainstack MCP — give Claude, Cursor, Codex, Gemini, and Windsurf live access to blockchain data, node management, and docs.
- Are you in need of testnet tokens? Request some from our faucets. Sepolia faucet, Base Sepolia faucet, Solana devnet faucet, Hoodi faucet, BNB faucet, zkSync faucet, Scroll faucet, Hyperliquid faucet, Monad faucet, Amoy faucet, Plasma faucet, TON faucet.
Have you already explored what you can achieve with Chainstack? Get started for free today.