Ethereum
 Hyperliquid
 Solana
 Arbitrum
 BNB Smart Chain
 Base
Base Polygon
 TRON
TRON Sui
Sui MegaETH


Solana Python tutorial: Querying and analyzing data from Raydium
This is the second Solana Python tutorial article. You can also have a look at the first one: Solana Python tutorial: Querying and analyzing data for STEPN mints.
In this tutorial, we will look into Raydium—one of the most popular decentralized exchanges on Solana.
DeFi or decentralized finance is usually regarded as an indispensable part of any blockchain. It allows users to exchange tokens not only within its own ecosystem, but also with tokens on other blockchains, even real fiat currencies. This is the fundamental building block of successful blockchains. But a compromised DeFi system may hurt the ecosystem too. DeFi-related incidents usually cause a loss of millions of US dollars from users.
This article equips you with essential knowledge of Solana’s DeFi system with one of the most used decentralized exchanges (DEX)– Raydium.
By completing this tutorial, you will:
- Have a good understanding of how automated market maker (AMM) like Raydium works on Solana.
- Learn about token swap transactions.
- Become a Python magician 🔮 and a visualization wizard 🧙.
Starting from downloading data from a Solana endpoint, to detecting suspicious transactions, you will be guided step-by-step to become a DEX detective.
Prerequisites
Any Solana node can be used for this tutorial. However, some endpoints may give you errors for rate restriction or authentication.
The sample code is developed and tested with a Chainstack Solana node endpoint—it is highly recommended for the following reasons:
- No limits on the request rate.
- Free Solana node endpoint with 3 million free requests.
- Fast node deployment.
Simply follow these steps to deploy a Solana node:
In this tutorial, an HTTPS endpoint is used.

About Raydium
Raydium is an Automated Market Maker (AMM) exchange. In case you are not familiar with this concept: AMM automates the process of token exchange so users can swap their tokens and NFTs solely on-chain, without relying on a real-world clearing house.
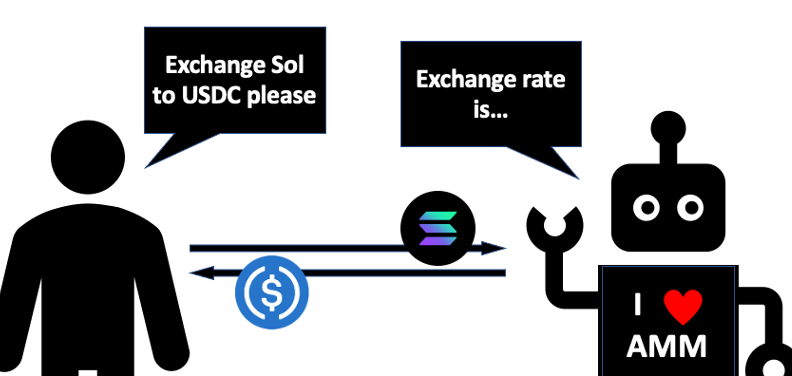
Compared with a centralized crypto exchange, an AMM DEX wins in both transparency and performance.

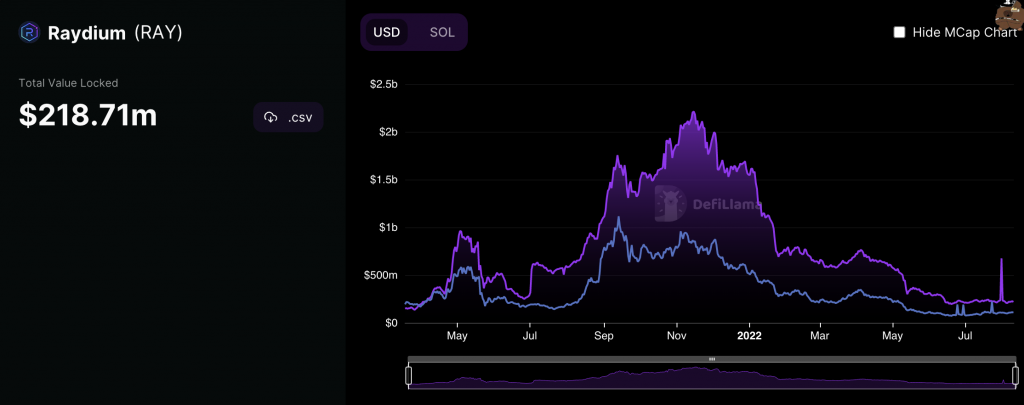
Raydium is one of the largest AMM on Solana. According to DefiLlama, it has $218 M TVL at the time of writing (August 2022).
TL;DR
Here is an online Python script hosted on Google Colab. It is a notebook script—you can either run it in your browser or download the file and run it with a local Jupyter notebook.
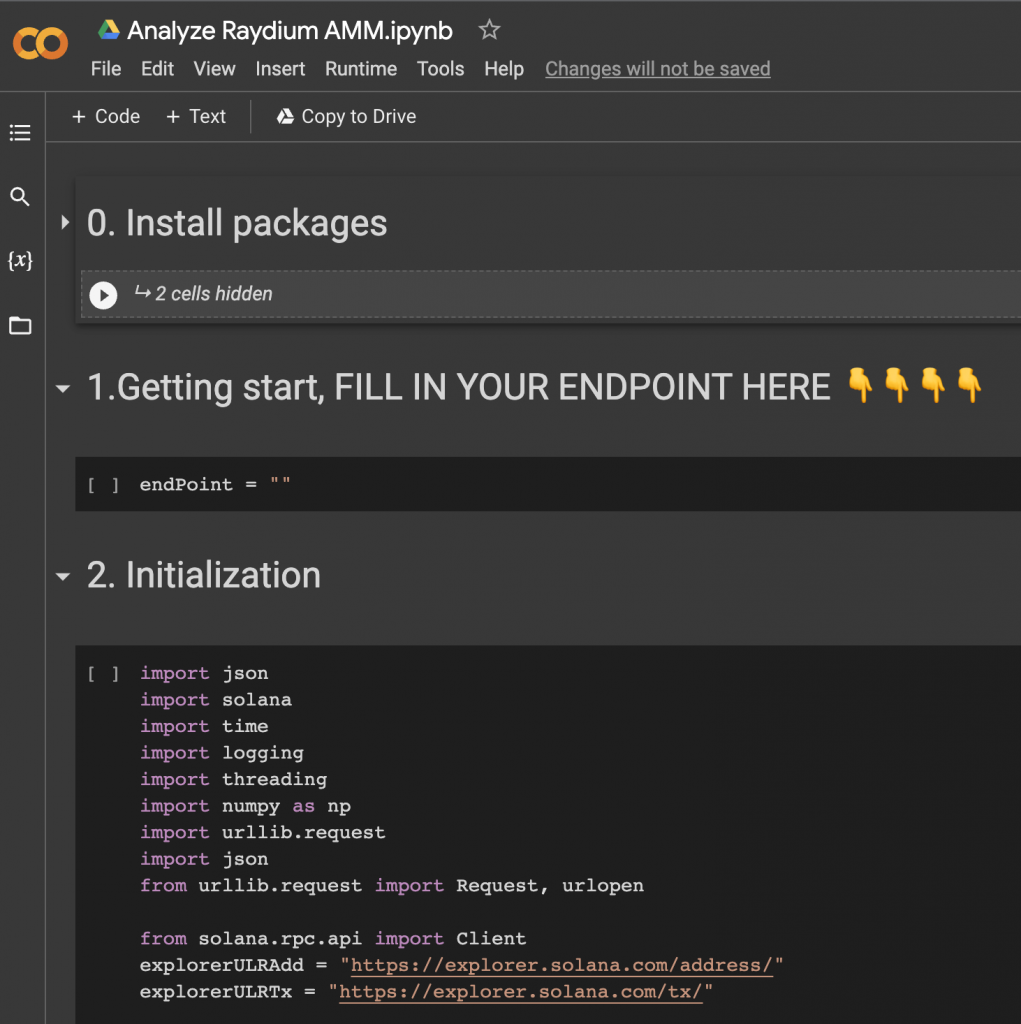
The first thing you need to do is to install Solana.py and Plotly.py. Also fill in your HTTPS endpoint.
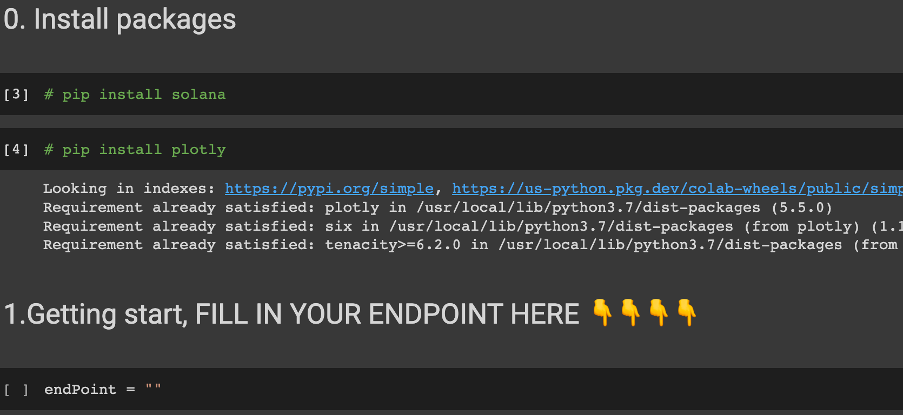
To install the package, you need to uncomment the text and press the run button.

You can either run the script cell by cell or just simply run all the code at once:

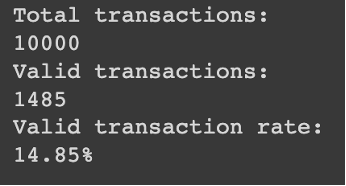
The script takes approximately 15 mins to complete. It downloads the most recent 10K transactions on Raydium, filters the failing transactions or the transactions that invoke 0 token exchange, and keeps only the successful ones.
Which is about 14% of the total transactions. (This is not a constant number, it changes all the time).
The analysis part shows some basic descriptive analysis. For example the most transacted tokens:
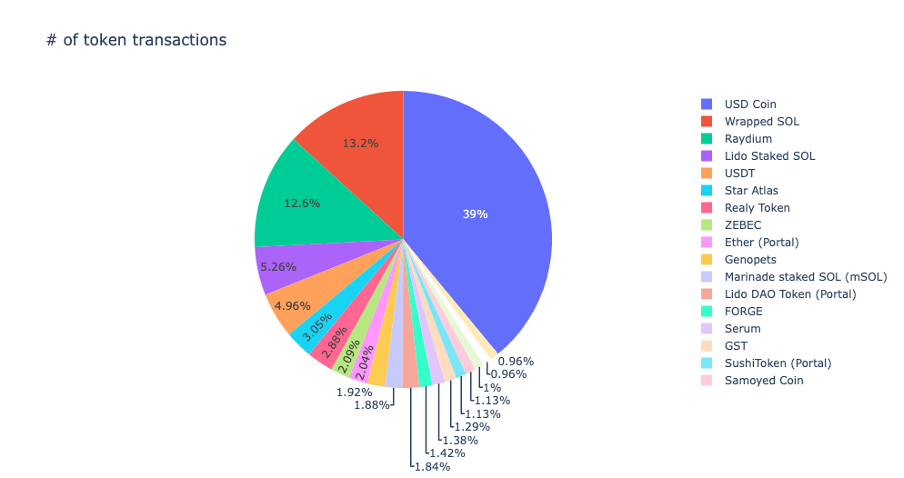
It is USDC, of course.
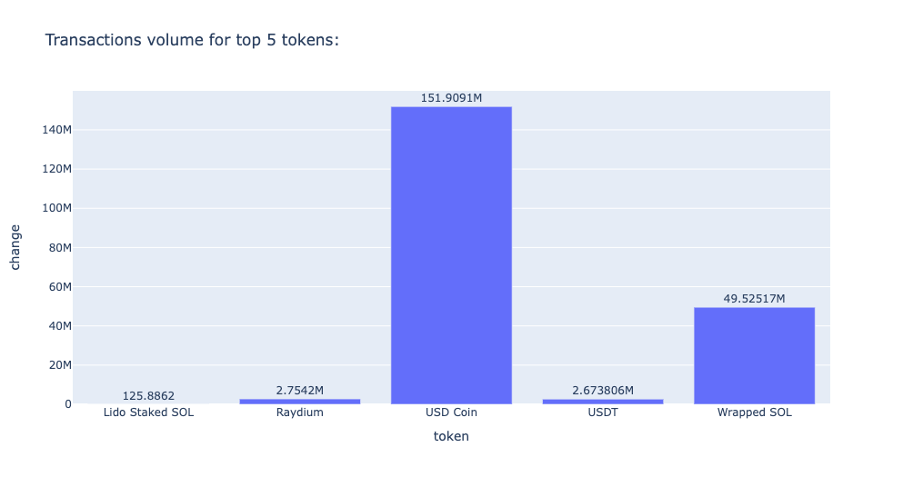
The top 5 tokens’ transaction volume.
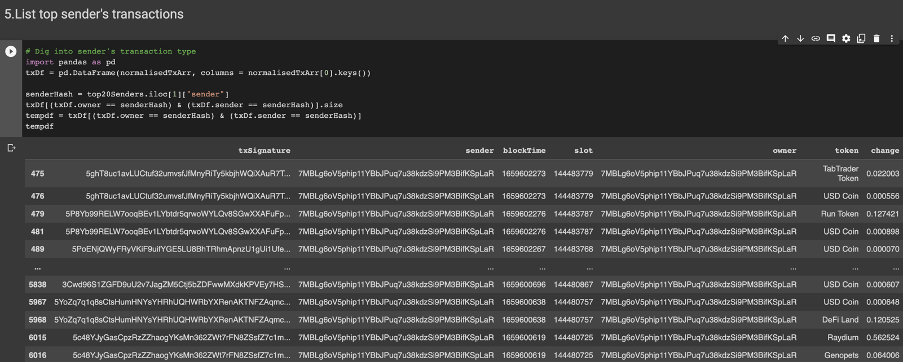
And the most active address on Raydium.

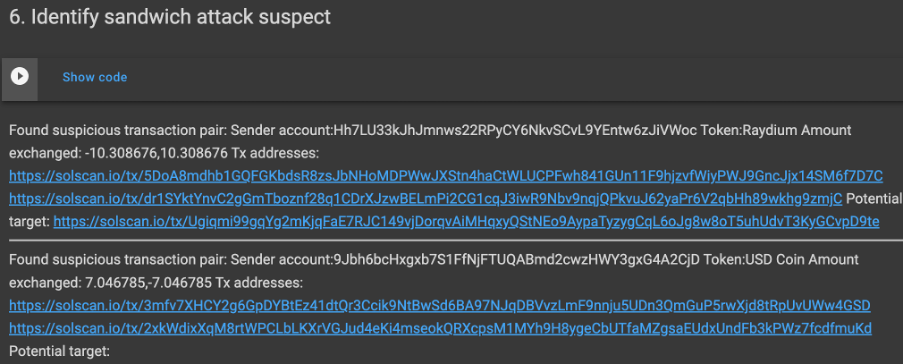
20% of transactions are sent from CXT9Kvn6VdhrmzviNfE5dForbA6PGMQK4HtF3NTGaozT? Isn’t that suspicious?
Take a closer look at the numbers, even though this address sent the most transactions, it actually has never exchanged any token for itself.

It is probably a DEX integrator, or another market maker leveraging on Raydium’s transaction pool.
Do a quick search on GitHub, it seems to be an address from sol-farm.

You can also list all transactions from suspicious senders:
Or identify if suspicious attacks are happening.
Have fun with it.
That is everything about the Python script. If you are keen to learn how it works or wants to take a step further:
- To learn how Raydium works.
- Customizing the script and analyze further with it.
- Reusing the code in other projects.
Keep reading.
The ultimate developer’s guide
So how does Raydium work (or AMM in general)?
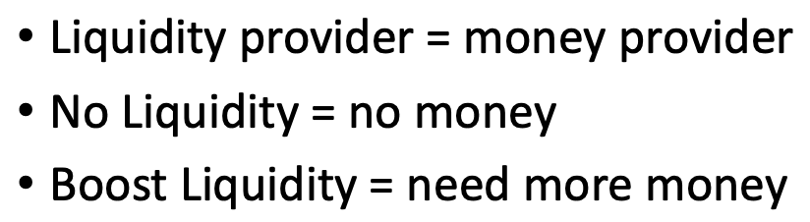
Market makers are essentially liquidity providers. Liquidity is a measurement of how fast and easy an asset can be bought or sold. If you find that difficult to understand, just replace the word liquidity with money.
An especially important part of AMM is the liquidity pool. Raydium used several liquidity pools since the start. Right now, Raydium uses Liquidity Pool V4 for token swaps:
Take a look into that account:
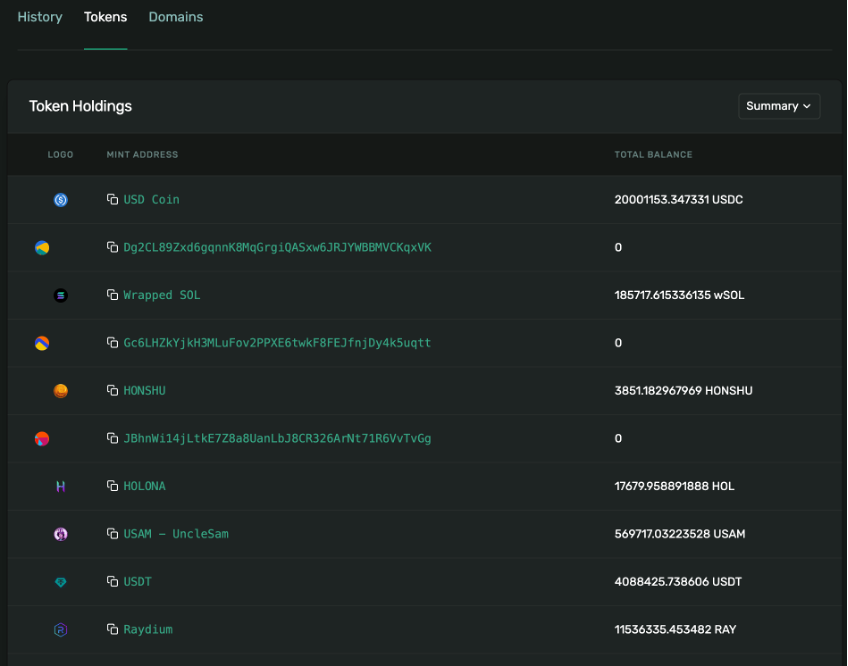
You can easily see that a liquidity pool is essential for an account that holds multiple tokens.
When a user swap tokens on Raydium, the original tokens are actually deposited into the liquidity pool, and the counter token is withdrawn from the liquidity pool.
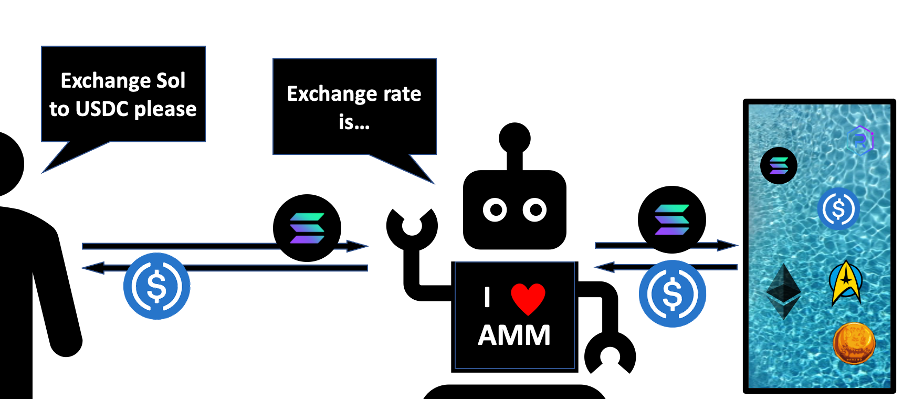
An AMM automatically fixes the exchange rate after each transaction, the exchange rate is calculated based on the number of tokens, and it is always measured in pairs.
About a swap transaction
Several types of transactions happen around AMM.
Includes but is not limited to:
- Token swap.
- Liquidity deposit.
- Yield distribution.
In this tutorial, we focus only on token swap transactions.
A successful transaction usually involves a token swap between multiple accounts. In Solana, even the same user’s tokens are kept in different accounts.
For example, picking a random transaction, the tokens are exchanged between the following accounts:
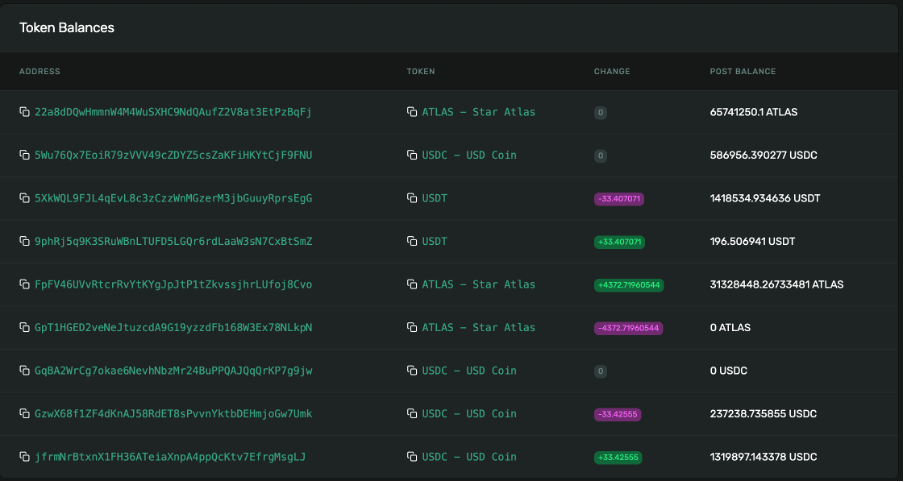
It may seem complicated, but the transaction actually happens between only two parties.
Using solana.fm to look at the same transaction:
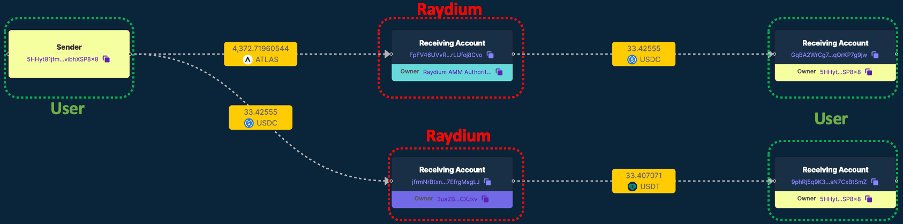
All token swap happens between only Raydium and the user.
The user is basically swapping ATLAS from their own account to USDT. The transaction happened in two steps: changing from ATLAS to USDC and then from USDC to USDT.
A high-level schema on the code
The script takes 6 steps to process data.
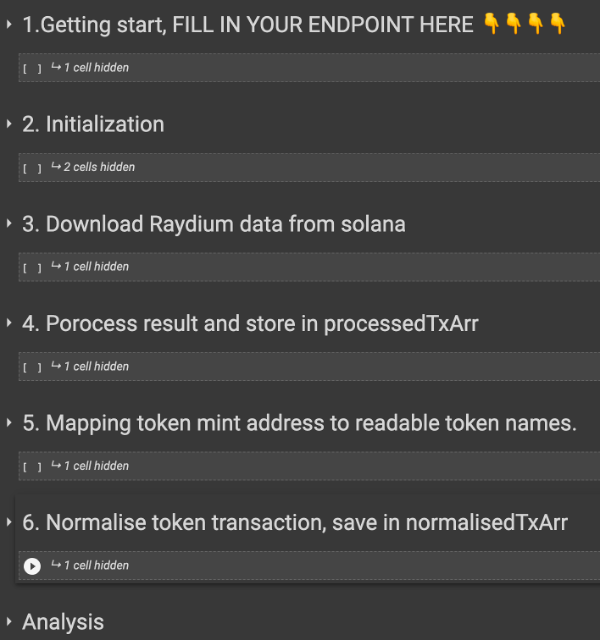
After step 6, two arrays are obtained. One of them contains simplified transaction—processedTxArr; the other is a normalized array—normalisedTxArr. Their differences will be explained in a later part.
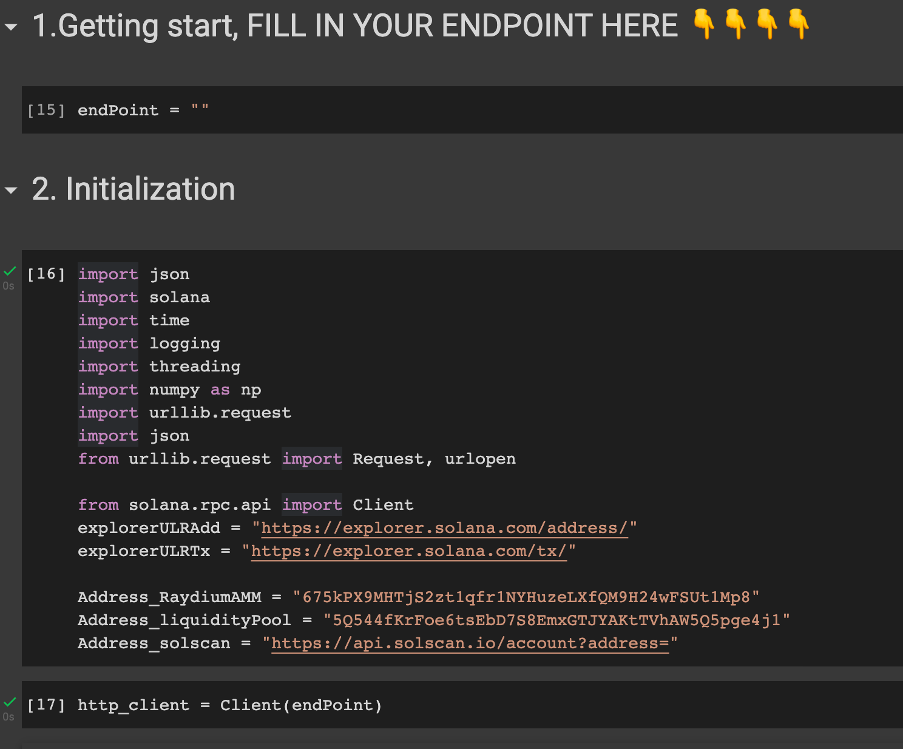
Steps 1 and 2
First of all, fill in your RPC endpoint address and import the libraries.
Step 3
Step 3 downloads the Raydium data from a Solana node.
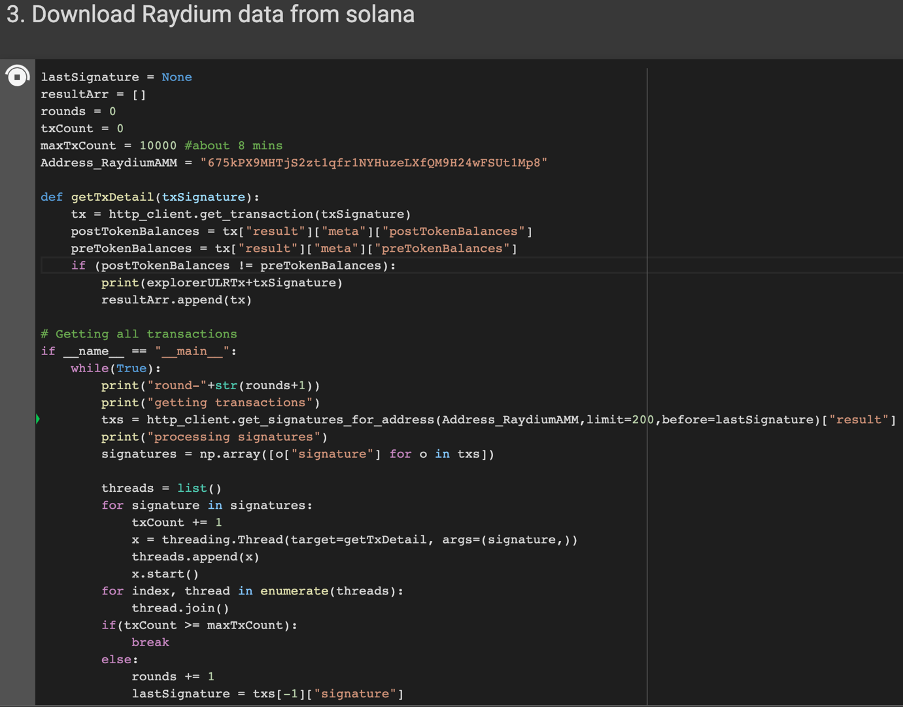
The sample script downloads 10k transactions, the process takes about 8 mins to complete. A few things to take note of here:
- The script pulls data from the Raydium AMM program address, not the liquidity pool.
- The script filters out invalid transactions, and keeps only valid transactions, meaning the transactions with actual token change.
- Any transactions that fail or with no token exchange are discarded. It is decided by comparing: tx[“result”][“meta”][“preTokenBalances”] and tx[“result”][“meta”][“postTokenBalances”].
- This program sends requests in parallel. To avoid congesting the endpoint, it sleeps for 3 seconds for every 200 requests. You may need to modify these numbers if you want to get more transaction data.
- One request is consumed for every transaction—valid or invalid. So please keep that in mind to avoid going over the limit.
However, with a Chainstack free account, you get 3 million requests. Which shall be sufficient in most cases. It takes 40 hours to use up all 3 million free requests.
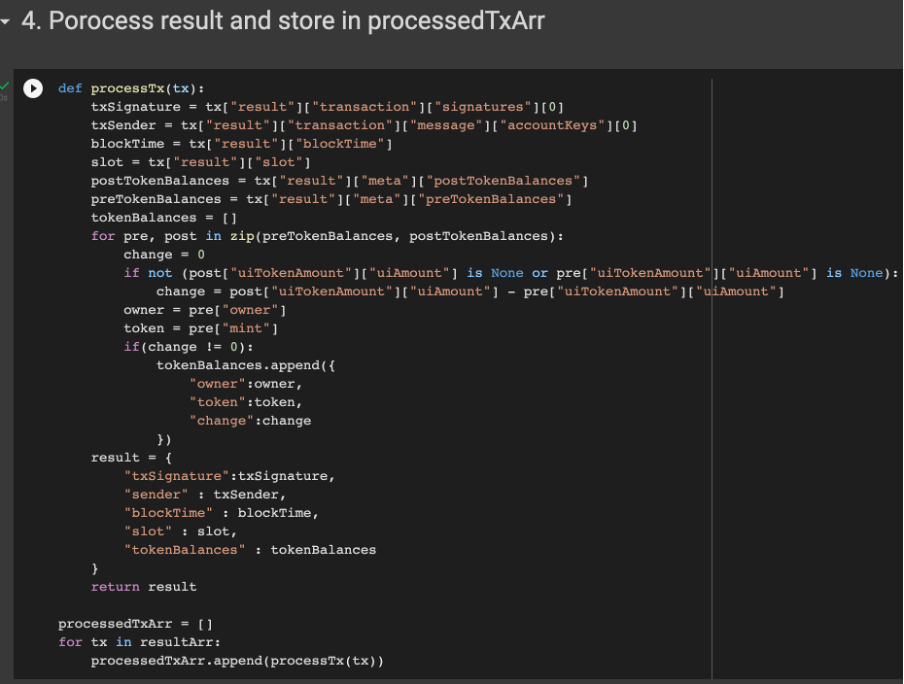
Step 4
Step 4 is the data “massaging” phase—stripping the unnecessary information, keeping only the essential information.
Step 5
Before stage 5, the tokens are labeled as their mint addresses, making them impossible to interpret. Therefore in this step, the tokens are translated from their mint address to the actual token name.
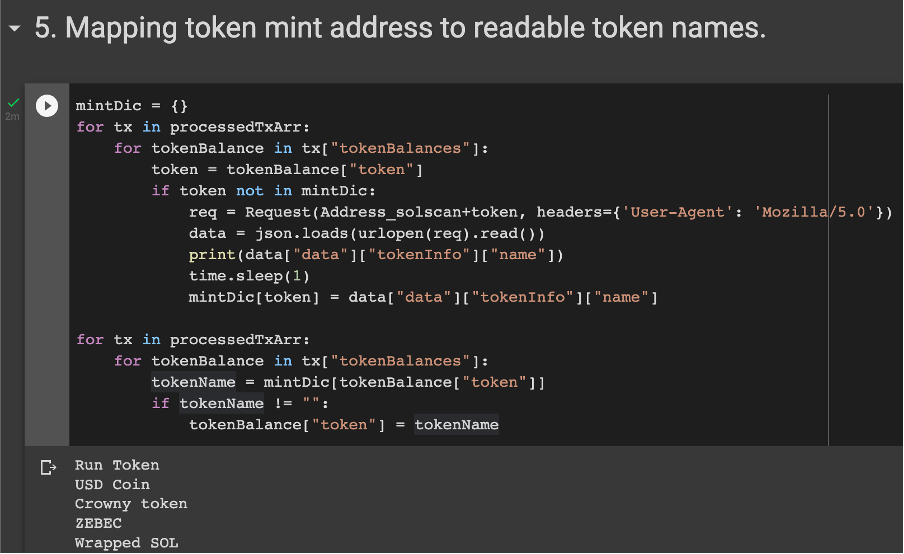
The information is pulled from solscan.com.
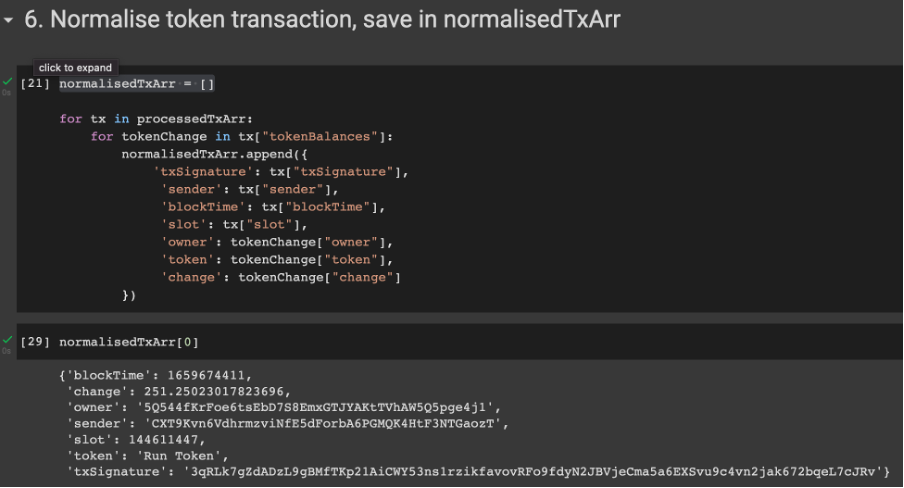
Step 6
In step 6, we normalize the transaction data.
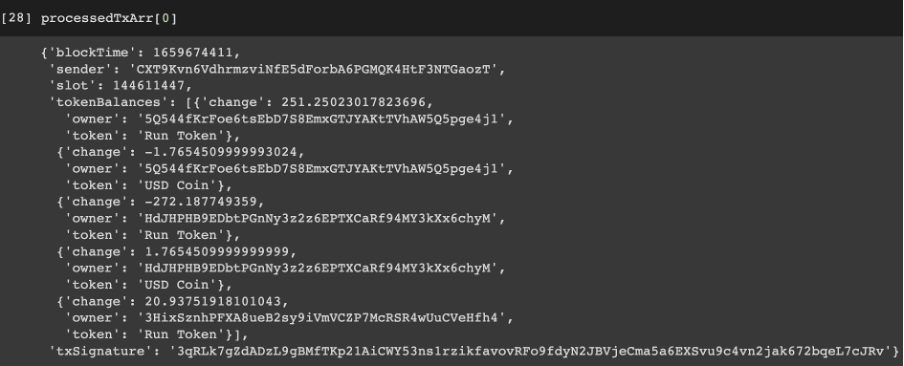
The data format in processedTxArr keeps every token swap. It is useful for some analysis, for example detecting suspicious transactions; but it is not efficient in some cases.
To leverage Python’s powerful data analysis toolkits, the data needs to be normalized. This means every entry contains only one token swap pair, instead of multiple.
Some other tips
- Solana network has a very high transaction throughput. The overall request count can be quite significant. Please be mindful of overhead charges.
- Solana nodes discard older transaction data to maintain scalability. The older transactions may not be retrievable on a regular Solana node.
- This sample code is developed based on the current version of Raydium. Since the app is going through continuous development, this program may need modification in the future to make it compatible with a newer version of Raydium.
If you need help during the process, feel free to ping me on Twitter/Telegram/Discord.
Conclusion
This is the end of this tutorial. Hope you will find it useful.
Thanks for reading.
Happy coding.
- Discover how you can save thousands in infra costs every month with our unbeatable pricing on the most complete Web3 development platform.
- Input your workload and see how affordable Chainstack is compared to other RPC providers.
- Connect to Ethereum, Solana, BNB Smart Chain, Polygon, Arbitrum, Base, Hyperliquid, Tempo, MegaETH, Monad, Plasma, Avalanche, Optimism, Scroll, Aptos, Cronos, Gnosis Chain, Kaia, Moonbeam, Celo, Aurora, TON, Ronin, and Bitcoin mainnet or testnets through an interface designed to help you get the job done.
- Fast access to blockchain archive data and gRPC streaming on Solana.
- To learn more about Chainstack, visit our Developer Portal or join our Telegram group.
- Connect your AI agent to Chainstack in seconds using Chainstack MCP — give Claude, Cursor, Codex, Gemini, and Windsurf live access to blockchain data, node management, and docs.
- Are you in need of testnet tokens? Request some from our faucets. Sepolia faucet, Base Sepolia faucet, Solana devnet faucet, Hoodi faucet, BNB faucet, zkSync faucet, Scroll faucet, Hyperliquid faucet, Monad faucet, Amoy faucet, Plasma faucet, TON faucet.
Have you already explored what you can achieve with Chainstack? Get started for free today.