Ethereum
 Hyperliquid
 Solana
 Arbitrum
 BNB Smart Chain
 Base
Base Polygon
 TRON
TRON Sui
Sui Robinhood


Picking an enterprise blockchain protocol to develop on: Hyperledger Fabric, Go & Java & JavaScript
Chainstack stopped supporting Hyperledger Fabric nodes in July 2024. Contact our support team at [email protected] if you have any questions, or visit our Help Center.
As a Go developer;
As a Java developer;
As a JavaScript developer.
In brief
This post is a part of the multipart series aimed at developers looking to try their hand out at and get a taste of the enterprise blockchain world.
This post focuses on running a “Hello, Block!” chaincode on Hyperledger Fabric for developers primarily comfortable with Go, Java, or JavaScript.
Architecture
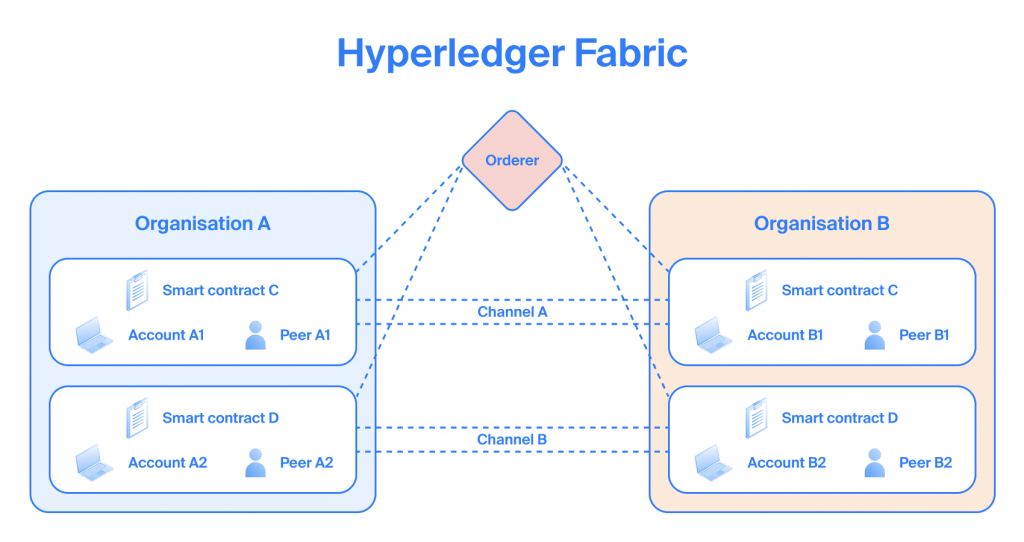
On Hyperledger Fabric, a smart contract is called a chaincode.
A chaincode must be installed on each of the nodes—called endorsing peers—involved in an exchange. Unlike in public blockchain protocols, the smart contracts are not propagated to all nodes in the network.
Each exchange is done in a channel. Channels are established between organizations. Organizations that are not part of a channel have no access to the exchange in the channel.
Transaction ordering is done by a separate node called the orderer.
See also a brief Hyperledger Fabric introduction.
Ecosystem
Hyperledger Fabric is mainly driven by the Linux Foundation.
The Hyperledger Fabric is also one of the largest and most active open-source communities when it comes to the enterprise blockchain protocols. See Comparing leading enterprise blockchains’ developer activity.
Prerequisites
- A Chainstack account.
- A Hyperledger Fabric network. See Deploy a consortium network.
- Docker. See Get Started with Docker.
Hyperledger Fabric “Hello, Block!” in Go
Chaincode
Hyperledger Fabric “Hello, Block!” in Java
Chaincode
Hyperledger Fabric “Hello, Block!” in JavaScript
Chaincode
Connect to your peer
At this point you should have a Hyperledger Fabric network deployed and Docker installed as specified in the Prerequisites section.
Export the organization identity of your network and the peer
- In the platform UI, navigate to your deployed peer.
- Next to Organization identity, click Export.
- This will export the peer and the organization certificates and the user in a ZIP archive. Unarchive the exported file.
Unarchiving the exported file will create a directory named after your organization’s MSP ID. For example, RG-123-456-MSP.
Export the orderer certificate of your network
- In the platform UI, navigate to your network.
- Select Service nodes > Orderer.
- Click Export TLS certificate.
This will export the orderer certificate. Place the certificate in the directory that was created at the previous step when you unarchived the exported organization identity file.
Place the chaincode in the organization directory
In the organization directory on your local machine, create a directory named chaincode.
In the chaincode directory, place the three chaincode directories with the chaincodes from the GitHub repository.
These are the chaincode files that you will build and deploy to your Hyperledger Fabric network.
At this point, you should have on your local machine the directory structure similar to the following one:
RG-123-456-MSP
|__ ca
|__ chaincode
|      |__ go
|      |__ java
|      |__ javascript
|__ msp
|__ peers
|__ tlsca
|__ users
|__ nd-123-456-789-cert.pem
Run the Docker container
docker run -v /host/path/to/IDENTITY_DIRECTORY/:/MOUNT_DIRECTORY -it hyperledger/fabric-tools:2.2.0 /bin/ash where
- /host/path/to/IDENTITY_DIRECTORY/ — path to the directory with the organization identity that you exported at the previous step.
- MOUNT_DIRECTORY — any name to mount a directory.
Example:
docker run -v /home/user/RG-123-456-MSP/:/data -it hyperledger/fabric-tools:2.2.0 /bin/ashProvide connection details and certificate paths
In the running Docker container, provide the following:
export CORE_PEER_ADDRESS=PEER_RPC_ENDPOINT
export CORE_PEER_MSPCONFIGPATH=/MOUNT_DIRECTORY/users/ADMIN_USER_DIRECTORY/msp/
export CORE_PEER_LOCALMSPID="MSP_ID"
export CORE_PEER_TLS_ENABLED=true
export CORE_PEER_TLS_ROOTCERT_FILE=/MOUNT_DIRECTORY/peers/PEER_DIRECTORY/tls/ca.crt
export ORDERER_CA=/MOUNT_DIRECTORY/ORDERER_CERTIFICATE
export ORDERER_ADDRESS=ORDERER_RPC_ENDPOINT
where
- PEER_RPC_ENDPOINT — the RPC endpoint of your peer. In the platform UI, navigate to your peer; click Access and credentials > RPC endpoint.
- MOUNT_DIRECTORY — the name of the directory that you mounted at the previous step.
- ADMIN_USER_DIRECTORY — the directory of your admin user that has the certificates. Exported at a previous step.
- MSP_ID — the ID of your organization. In the platform UI, navigate to your peer; click Organization identity > MSP ID.
- PEER_DIRECTORY — the directory of your peer that has the certificates. Exported at a previous step.
- ORDERER_CERTIFICATE — name and path of the certificate file that you exported at a previous step.
- ORDERER_RPC_ENDPOINT — the RPC endpoint of your orderer. In the platform UI, navigate to your network; click Service nodes > Orderer > RPC endpoint.
Example:
export CORE_PEER_ADDRESS=nd-123-456-789.rg-123-456.p2pify.com:7051
export CORE_PEER_MSPCONFIGPATH=/data/users/[email protected]/msp/
export CORE_PEER_LOCALMSPID="RG-123-456-MSP"
export CORE_PEER_TLS_ENABLED=true
export CORE_PEER_TLS_ROOTCERT_FILE=/data/peers/nd-123-456-789.rg-123-456.p2pify.com/tls/ca.crt
export ORDERER_CA=/data/nd-123-456-789-cert.pem
export ORDERER_ADDRESS=nd-123-456-789.rg-123-456.p2pify.com:7050
Check your connection
peer channel listExample:
$ peer channel list
2020-11-09 09:46:00.631 UTC [channelCmd] InitCmdFactory -> INFO 001 Endorser and orderer connections initialized
Channels peers has joined:
defaultchannel
Deploy the chaincode
Package chaincode
peer lifecycle chaincode package CHAINCODE_NAME.tar.gz --lang LANGUAGE --path CHAINCODE_SOURCE_PATH --label CHAINCODE_LABELwhere
- CHAINCODE_NAME — name of your chaincode.
- LANGUAGE — the programming language of your chaincode:
nodefor JavaScript,golangfor Go,javafor Java. - CHAINCODE_SOURCE_PATH — path to your chaincode source files. The files must be in the directory you mounted earlier.
- CHAINCODE_LABEL — any label you want to give to your chaincode; can be the same as the chaincode name.
This will package the chaincode and place it in the root of your mounted directory. Check that the packaged chaincode is created by doing ls.
Example for Go:
$ peer lifecycle chaincode package helloBlock_go.tar.gz --lang golang --path /data/chaincode/go/ --label helloBlock_go
$ ls
bin  helloBlock_go.tar.gz  src
Example for Java:
$ peer lifecycle chaincode package helloBlock_java.tar.gz --lang java --path /data/chaincode/java/ --label helloBlock_java
$ ls
bin  helloBlock_java.tar.gz  src
Example for JavaScript:
$ peer lifecycle chaincode package helloBlock_javascript.tar.gz --lang node --path /data/chaincode/javascript/ --label helloBlock_javascript
$ ls

bin  helloBlock_javascript.tar.gz  src
Install the chaincode on the peer you are connected to
peer lifecycle chaincode install CHAINCODE_NAME.tar.gzwhere
- CHAINCODE_NAME — name of your chaincode.
Example:
$ peer lifecycle chaincode install helloBlock.tar.gz
2020-11-09 07:44:36.291 UTC [cli.lifecycle.chaincode] submitInstallProposal -> INFO 001 Installed remotely: response:<status:200 payload:"\nG helloBlock:6ab145685b4602cf429f93536981ea3eab802369e6359fb841fb0a9bcd4a51fb\022\006fabcar" >
2020-11-09 07:44:36.291 UTC [cli.lifecycle.chaincode] submitInstallProposal -> INFO 002 Chaincode code package identifier: helloBlock:6ab145685b4602cf429f93536981ea3eab802369e6359fb841fb0a9bcd4a51fb
Check the chaincode installation
peer lifecycle chaincode queryinstalledExample:
$ peer lifecycle chaincode queryinstalled
Installed chaincodes on peer:
Package ID: helloBlock:6ab145685b4602cf429f93536981ea3eab802369e6359fb841fb0a9bcd4a51fb, Label: helloBlock
Approve the chaincode for your organization
The majority of organizations in the channel must agree to the parameters of the chaincode.
peer lifecycle chaincode approveformyorg --name CHAINCODE_NAME --package-id PACKAGE_ID -o $ORDERER_ADDRESS --tls --tlsRootCertFiles $CORE_PEER_TLS_ROOTCERT_FILE --cafile $ORDERER_CA --version CHAINCODE_VERSION --channelID CHANNEL_ID --sequence SEQUENCE_NUMBER --init-required --waitForEventwhere
- CHAINCODE_NAME — name of your chaincode.
- PACKAGE_ID — the ID of your chaincode installed on the peer. You can get the ID by running
peer lifecycle chaincode queryinstalled. - CHAINCODE_VERSION — the version of your chaincode as specified in the source files of the chaincode.
- CHANNEL_ID — use
defaultchannel. - SEQUENCE_NUMBER — the number of times your chaincode has been defined. Use
1for your first installation. If you later upgrade your chaincode, use2and so on. --init-required— indicates that the chaincode requires initialization.--waitForEvent— indicates to wait for the event from each peer that signifies that the transaction has been committed successfully.
Example:
$ peer lifecycle chaincode approveformyorg --name helloBlock --package-id helloBlock:e4dcc0b3052e228f77f290a8aae60e7963026ad46f59dbdb45a563a2e36dc628 -o $ORDERER_ADDRESS --tls --tlsRootCertFiles $CORE_PEER_TLS_ROOTCERT_FILE --cafile $ORDERER_CA --version 1.0.0 --channelID defaultchannel --sequence 1 --init-required --waitForEvent
2020-11-09 07:45:27.742 UTC [chaincodeCmd] ClientWait -> INFO 001 txid [817547cebd7dd66084e7ff852ca8cac35d0c505416a7787ddd81947558280dc7] committed with status (VALID)
Commit the chaincode
peer lifecycle chaincode commit -o $ORDERER_ADDRESS --channelID CHANNEL_ID --name CHAINCODE_NAME --version CHAINCODE_VERSION --sequence SEQUENCE_NUMBER --init-required --tls --tlsRootCertFiles $CORE_PEER_TLS_ROOTCERT_FILE --cafile $ORDERER_CA --peerAddresses $CORE_PEER_ADDRESSwhere
- CHANNEL_ID — use
defaultchannel. - CHAINCODE_NAME — name of your chaincode.
- CHAINCODE_VERSION — the version of your chaincode as specified in the source files of the chaincode.
- SEQUENCE_NUMBER — the number of times your chaincode has been defined. Use
1for your first installation. If you later upgrade your chaincode, use2and so on. --init-required— indicates that the chaincode requires initialization.
Example:
$ peer lifecycle chaincode commit -o $ORDERER_ADDRESS --channelID defaultchannel --name helloBlock --version 1.0.0 --sequence 1 --init-required --tls --tlsRootCertFiles $CORE_PEER_TLS_ROOTCERT_FILE --cafile $ORDERER_CA --peerAddresses $CORE_PEER_ADDRESS
2020-11-09 07:48:29.579 UTC [chaincodeCmd] ClientWait -> INFO 001 txid [df2ce4feadf60dea1d7969a59ef6c512e71334b2d56bd208e0c5980b7a19ee42] committed with status (VALID)
Congratulations, you now have a working chaincode on your Hyperledger Fabric network.
Interact with the chaincode
At this point, there is no difference what chaincode version you installed—Go, Java, or JavaScript. The interaction commands are the same for all of them.
Just make sure you use the correct name of your installed chaincode as identified by -n.
Write “Hello, Block!” to ledger
# peer chaincode invoke -o $ORDERER_ADDRESS --isInit --tls true --cafile $ORDERER_CA -C defaultchannel -n helloBlock --peerAddresses $CORE_PEER_ADDRESS --tlsRootCertFiles $CORE_PEER_TLS_ROOTCERT_FILE -c '{"Args":["Init","Hello, Block!"]}' --waitForEvent
2020-11-09 07:58:10.249 UTC [chaincodeCmd] ClientWait -> INFO 001 txid [7a5173dcf90d4af184dcb04e7bce35abc238e6c0d4a6f05941bed15a6484aecc] committed with status (VALID) at nd-123-456-789.rg-123-456.p2pify.com:7051
2020-11-09 07:58:10.250 UTC [chaincodeCmd] chaincodeInvokeOrQuery -> INFO 002 Chaincode invoke successful. result: status:200
Retrieve “Hello, Block!” from the ledger
# peer chaincode query -C defaultchannel -n helloBlock -c '{"Args":["query","Hello, Block!"]}'
Hello, Block!
Congratulations! You have just had a complete Hyperledger Fabric walkthrough from zero to interacting with a chaincode, and you did so using all the three programming languages that Hyperledger Fabric supports.
To reiterate what you did:
- You deployed a Hyperledger Fabric network in a few clicks and minutes.
- You created three chaincodes: in Go, in Java, in JavaScript.
- You connected to a peer on your Hyperledger Fabric network.
- You installed your chaincode on your peer.
- You approved the chaincode for use on the channel that your peer is a part of.
- You committed the chaincode to the channel.
- You used the chaincode to write “Hello, Block!” to the ledger.
- You retrieved “Hello, Block!” from the ledger.
For more sophisticated and real-world scenarios, explore Chainstack tutorials.
Join our community of innovators
- To learn more about Chainstack, visit our Knowledge Center or join our Discord server and Telegram group
- Sign up for a free Developer account, or explore the options offered by Growth or Business plans.
- Take a look at our pricing tiers using a handy calculator to estimate usage and number of nodes.
Have you already explored what you can achieve with Chainstack? Get started for free today.