Ethereum
 Solana
 Hyperliquid
 Arbitrum
 Base
Base BNB Smart Chain
 Tempo
Tempo Monad
Monad Avalanche
 Aptos
Aptos TRON
TRON Ronin
Ronin zkSync Era
 Optimism
 Sonic
Sonic Polygon
 Unichain
 Fantom
 Gnosis Chain
 Sui
Sui Avalanche Subnets
 Polygon CDK
 Starknet Appchains
 zkSync Hyperchains


How to secure your RPC endpoints with access rules on Chainstack
Unsecured RPC endpoints face unauthorized traffic that inflates costs and triggers rate-limiting. Access rules solve this by filtering requests based on domain or IP address keeping your RPC node healthy.
Learn how to configure access rules on Chainstack, implement domain and IP-based filtering, and combine them with other security measures for comprehensive RPC endpoint protection.
Potentially your RPC endpoints are likely serving more than just your own traffic – if you’re running a DApp on Ethereum, Solana, Base, or any major chain, your unsecured RPC API endpoints may be exposed and used by someone else. It’s not uncommon for bots, browser extensions, or even other developers to piggyback off your infrastructure, using up bandwidth, inflating costs, and putting your API keys at risk. This is the cost of leaving your RPCs unprotected.
While good as a start, API keys are less secure than access rules that perform checks on every individual request before it even reaches your node. If you want to restrict RPC access at the network level, Chainstack lets you set access rules by domain or IP address. Whether you’re deploying a production dApp or simply running backend analytics, you can lock down your endpoints to only accept requests from the frontends or servers you trust.
Here’s how access rules work and how you can easily set them up on Chainstack.
Why You Need to Secure Your RPC Endpoints
RPC endpoints fail under pressure, and unsecured ones fail faster. When your endpoints are public or only protected by API keys, you’re essentially running an open server that anyone can hit.
While many factors affect RPC reliability, setting up access rules is one of the first steps we recommend in our RPC setup guide. API keys can authenticate requests, but they don’t filter out where those requests come from. If you want to keep your infrastructure safe, you need a way to block unwanted traffic before it reaches your node.
And that’s what access rules do: they determine the origin of each request, whether by domain or IP, even before anything is processed.
What are access rules?
Access rules are security filters that validate incoming traffic before it reaches your RPC endpoints. They verify that the source of the request — either the HTTP Origin header or IP address — matches your configured allowlist and rejects ones that don’t.
There are two types of access rules you can configure:
- Allowed origins — Limit access based on the HTTP
Originheader, so it’s only possible to make requests from a set list of domains or subdomains.
- IP addresses — Limits access to a defined set of IP addresses, blocking traffic from all others.
How access rules work
When a request is made to your node endpoint, Chainstack compares it against your set access rules. Its logic of filtering goes like the following:
- If you have access rules configured, the request only gets processed if it matches at least one of your rules.
- If no access rules are configured, all requests pass through and get processed normally, subject to your standard API key authentication.
- If a request doesn’t match any rule, the request gets rejected immediately with an error response and never reaches your node.
This filtering happens at the network edge before any node resources are consumed. Rejected requests don’t count toward your usage or billing. The system uses an allowlist approach, as only explicitly permitted sources can connect, making it the most effective RPC access control mechanism available.
How to set up access rules on Chainstack
Getting access rules configured takes a few minutes, and once they’re active, your endpoints start rejecting unauthorized traffic right away. The process involves creating rules for specific domains or IP addresses, then turning them on when you’re ready to start filtering.
Prerequisites
You’ll need a few things before getting started:
- A Chainstack Global Node – Access rules are only available for Global Nodes, not dedicated nodes.
- Admin access to your Chainstack project.
- Know what to whitelist – Figure out which domains (like
myapp.com) or IP addresses (like203.0.113.50) need access before you start adding rules.
Step-by-step RPC access control setup on Chainstack
You can add access rules directly from the Security tab of your node details page in the Chainstack console. Here’s how:
- Open your Chainstack project.
- Click on your network
- Click on your node name
- Switch to the Security tab

- Hit the + Add button to create a new access rule
- Find your new rule, hover over it, click the pencil icon, then click Activate


That’s it. Your RPC node protection method is now live and filtering requests. You can turn rules on and off whenever you need to without affecting your node.
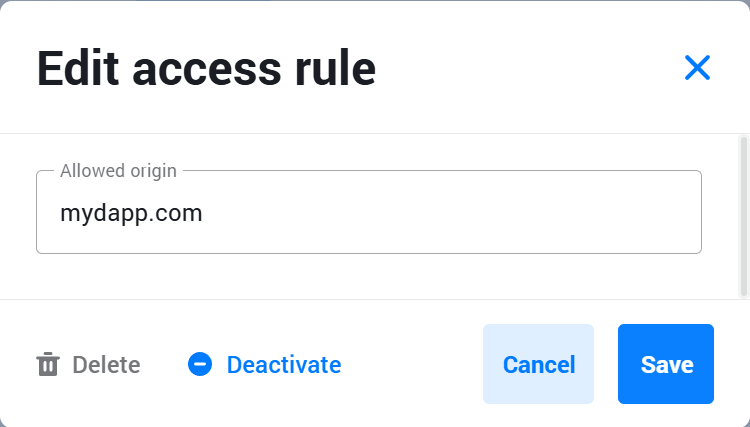
Adding an allowed origin rule
Use this rule type to restrict RPC access based on the HTTP Origin header, typically for frontend apps.
- In the Add access rule modal, choose Allowed origin.
- Type the domain in the input field (examples:
myapp.com,myapp.example.com, or*.myapp.com) - Click Create to save your configuration.
- Hover over the newly created rule, click the pencil icon, and click Activate.
The rule will start working immediately. Turn rules on/off as needed without downtime.
Supported origin formats:
- Exact domains:
myapp.com,app.example.com - Wildcards: e.g.
*.example.com(matches any subdomain)
Wildcard rules use the * character to match any subdomain. For example, *.example.com will match app.example.com, api.example.com, and staging.example.com.
Adding an IP address rule
IP rules lock down access to specific servers or infrastructure that always connects from the same address.
Setup:
- Pick IP address in the Add access rule modal
- Enter your IP address
- Hit Create to save the rule

Supported IP formats:
- IPv4:
192.168.1.100 - IPv6:
2001:db8::1
Limitations: One IP per rule. CIDR notation is not supported.
Managing access rules on Chainstack
Once created, all your rules will show up in the Security tab under Access rules. From there you can turn them on or off, or delete ones you don’t need anymore.
Check the full documentation for more detailed options.
Best practices for RPC access security
While access rules offer essential filtering at the network level, pairing them up with other security controls creates layers of protection that are harder to breach. Here are our top RPC node protection methods:
- Enable strict access rules – Allow only the domains or IPs you trust. Avoid wildcards like
*.myapp.comunless strictly necessary. - Don’t rely on a single control – Access rules are just one layer. Use them alongside API keys, method allowlists, and rate limits.
- Apply per-IP rate limiting – Most providers, including Chainstack, enforce this. If your rules are too open, you’ll hit provider limits fast.
- Block high-cost methods – Calls like
eth_getLogsoreth_trace*can be resource-intensive. If your app doesn’t rely on them, block or limit them at the access layer. - Add WAF rules upstream – A Web Application Firewall helps drop junk traffic before it even hits your node.
- Use HTTPS and check CORS headers – Always encrypt RPC traffic. For frontend apps, make sure the Origin header is present and correct, browsers handle this by default.
- Combine origin and IP filters – Use origin-based rules for frontend access, IP-based for backend services. Stacking both gives you tighter control.
Conclusion
Access rules let you control who can call your RPC endpoints, before any traffic hits them. That means fewer surprise spikes, tighter security, and more predictable billing.
The setup process is the same for all networks, whether you’re running Ethereum RPC nodes for DeFi protocols, Solana endpoints for trading bot, or using Base RPC API for Web3 apps.
Access rules work best combined with API keys and rate limiting. They solve the specific problem of traffic source control, but they’re part of a broader security strategy.
Get started with access rules on Chainstack Global Nodes – they’re available for Ethereum, Solana, Base, Polygon, Arbitrum, and 70+ other chains.
Further reading
- How to store your Web3 dApp secrets: Guide to environment variables: Learn how to properly store private keys, access tokens, and other secrets in your Web3 dApp.
- 5 essential factors for setting up RPC node endpoints: Access rules are just one layer; this guide helps you implement the rest.
Power-boost your project on Chainstack
- Discover how you can save thousands in infra costs every month with our unbeatable pricing on the most complete Web3 development platform.
- Input your workload and see how affordable Chainstack is compared to other RPC providers.
- Connect to Ethereum, Solana, BNB Smart Chain, Polygon, Arbitrum, Base, Optimism, Avalanche, TON, Ronin, zkSync Era, Starknet, Scroll, Aptos, Fantom, Cronos, Gnosis Chain, Klaytn, Moonbeam, Celo, Aurora, Oasis Sapphire, Polygon zkEVM, Bitcoin and Harmony mainnet or testnets through an interface designed to help you get the job done.
- To learn more about Chainstack, visit our Developer Portal or join our Discord server and Telegram group.
- Are you in need of testnet tokens? Request some from our faucets. Multi-chain faucet, Sepolia faucet, Holesky faucet, BNB faucet, zkSync faucet, Scroll faucet.
Have you already explored what you can achieve with Chainstack? Get started for free today.