Ethereum
 Hyperliquid
 Solana
 Arbitrum
 BNB Smart Chain
 Base
Base Polygon
 TRON
TRON Sui
Sui Robinhood


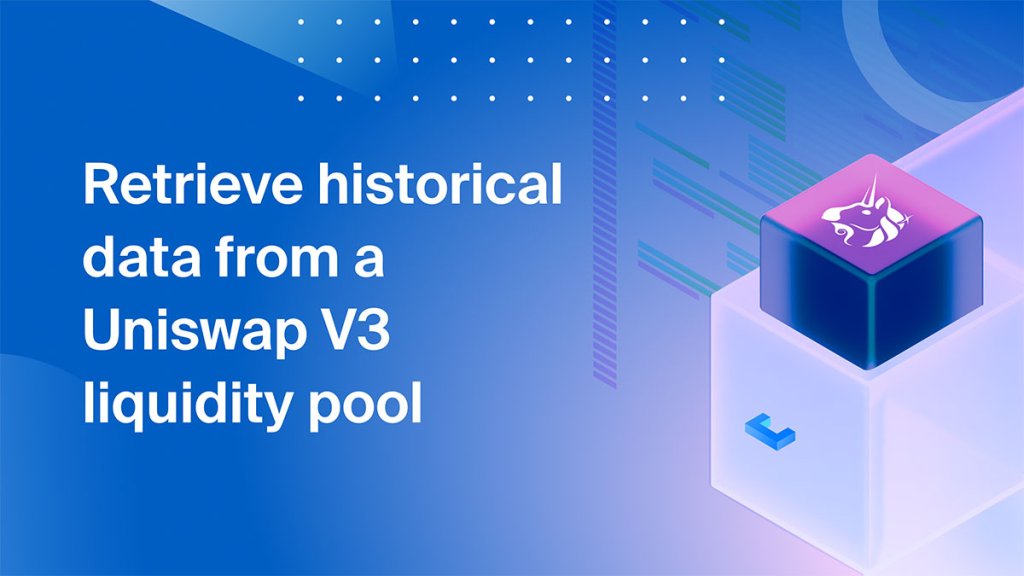
How to retrieve historical data from a Uniswap V3 liquidity pool
We received a question from one of our community members, and we decided to make a tutorial in order to answer it. The question was “Is there a special function in a smart contract that allows you to view, and query the historical data of a contract?”.
In order to answer this question we need 3 things:
- A function that we will use to query the state of the blockchain.
- An access point to the blockchain that we will retrieve the data from, aka a blockchain node.
- A way of actually retrieving the data.
Uniswap V3 pool example
For this tutorial, we will take the wrapped ETH (WETH) – USDC pool from Uniswap V3 as an example 0x88e6A0c2dDD26FEEb64F039a2c41296FcB3f5640 and we will use a Chainstack node to interact with the blockchain.
Before retrieving the historical state of this pool, let’s first try to retrieve the data for the current state of the network, as of the latest block.
For this purpose, we will use etherscan.io. You can do this in multiple ways, but let’s keep things very simple. In case you don’t know, Etherscan is a great tool for interacting with the data on the Ethereum blockchain.
Let’s retrieve the exchange rate for the WETH-USDC Uniswap V3 liquidity pool. Open up this link in a new tab. This is the contract address of the WETH-USDC pool on UniswapV3, and call the slot0 function at #11.
Just click on the name of the function and then click the “Query” button—check the image below.
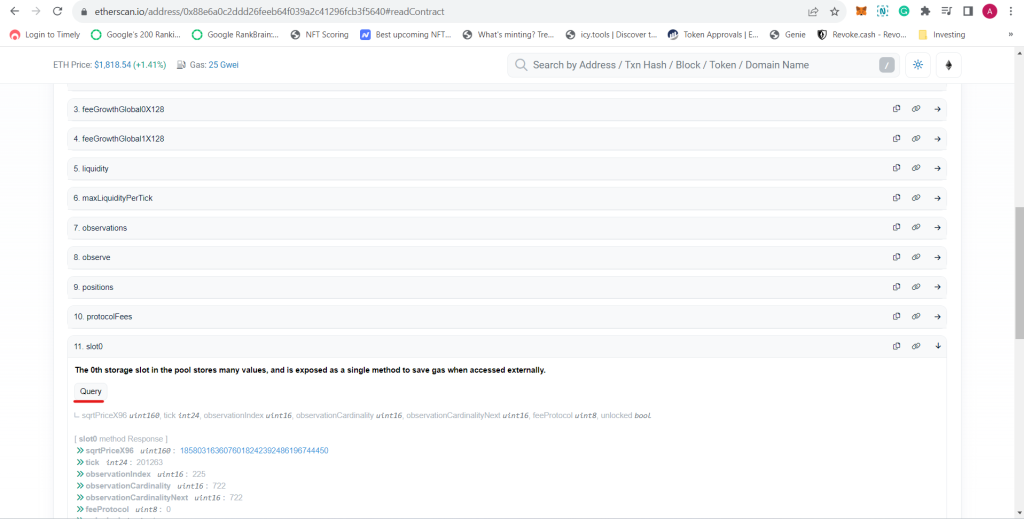
slot0 method in the Uniswap V3 smart contract on Etherscan; Source: EtherscanThis is a read-only operation and you do not need to pay gas fees because it is not changing the state of the blockchain. This function will read the changes of the latest block and it returns the square root price of the exchange rate of the WETH-USDC tokens.
How to query the historical state of a blockchain
Depending on how far back you want to query the state of the blockchain you may need an archive node or a full node. An Ethereum archive node, as opposed to a full node, allows developers to access the historical state of the blockchain at any point in the past, up to the genesis block, whereas a full node, allows you to query the historical state only up to the latest 128 blocks. If you want to query the state of the blockchain beyond the latest 128 blocks, then you will need an archive node instead of a full node.
Deploy your own node
If you do not have a Chainstack account yet, you can sign up for free in order to follow along with this tutorial.
After you have your account, you can go ahead and deploy a node by following the steps in the video below. We offer both full nodes and archive nodes for Ethereum, but please note that for archive nodes you will need to subscribe to one of our paid plans. The full nodes can be deployed for free.
For the purpose of this tutorial, we will deploy a full node and query the data from a block that’s within the latest 128 blocks, so that we do not need an archive node, and you can follow along for free.
Once your node is running, you can click on it to see its details.
Scroll to the bottom of the page and grab the HTTPS endpoint, you will need it in the following steps.
Using eth_call to retrieve historical data from the blockchain
Next, we are going to use the eth_call method with curl. This is a read-only call. We will send a query call to the chain using the slot0 function at a specific block in the past.
You can find a code sample in our documentation here. Starting from the sample that we provide in our docs, we will fill in the different fields in the code.
curl --request POST \
     --url {paste HTTPS endpoint here and delete curly braces} \
     --header 'accept: application/json' \
     --header 'content-type: application/json' \
     --data '
{
  "jsonrpc": "2.0",
  "method": "eth_call",
  "id": 1,
  "params": [
    {
      "to": "0x88e6A0c2dDD26FEEb64F039a2c41296FcB3f5640",
      "data": "0x3850c7bd"
    },
    "latest"
  ]
}
'
In the code above, you must replace the -- url with your HTTPS endpoint from the Chainstack node that was deployed earlier.
We are now querying the node with the eth_call method which does a simulation call. In our case, it will just query the chain to the WETH-USDC Uniswap V3 liquidity pool.
In the to field, you can input the address of the smart contract that you want to query.
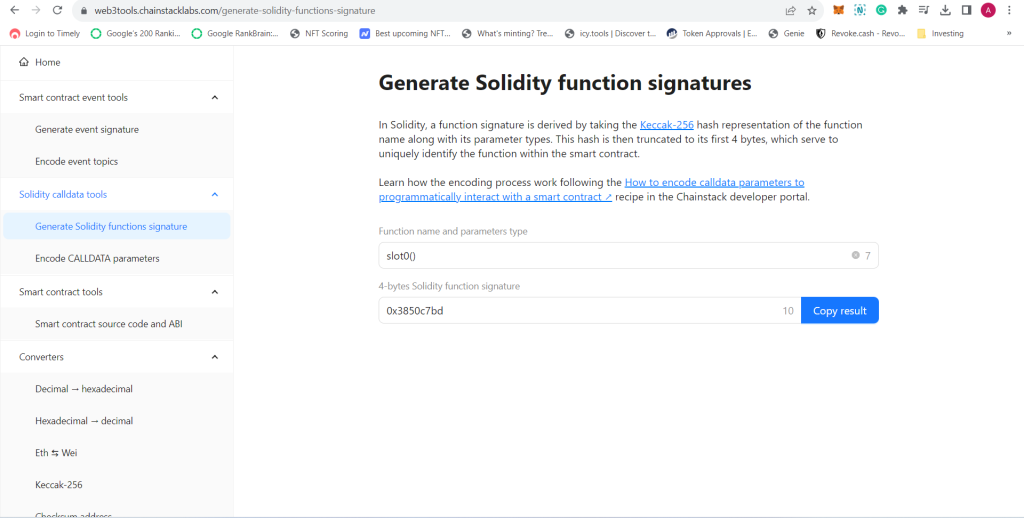
In the “data” field we need to provide the signature of the slot0 function from the smart contract. In Solidity, if you want to find out a function’s signature, you need to take the function, do a Keccak256 encoding of it, and then take the first four bytes out of it, and that’s your function signature.
If it sounds too complicated, don’t worry, we have you covered. You can use what we like to call the EVM Swiss Army Knife. Just open up the Solidity function signature generator and input slot0() in the first field and then copy the signature.
For the block number, you can either leave “latest” or you can provide any other block number as long as it is in the last 128 blocks. If you want to query the blockchain beyond the latest 128 blocks, then you need an archive node, the rest of the process being the same.
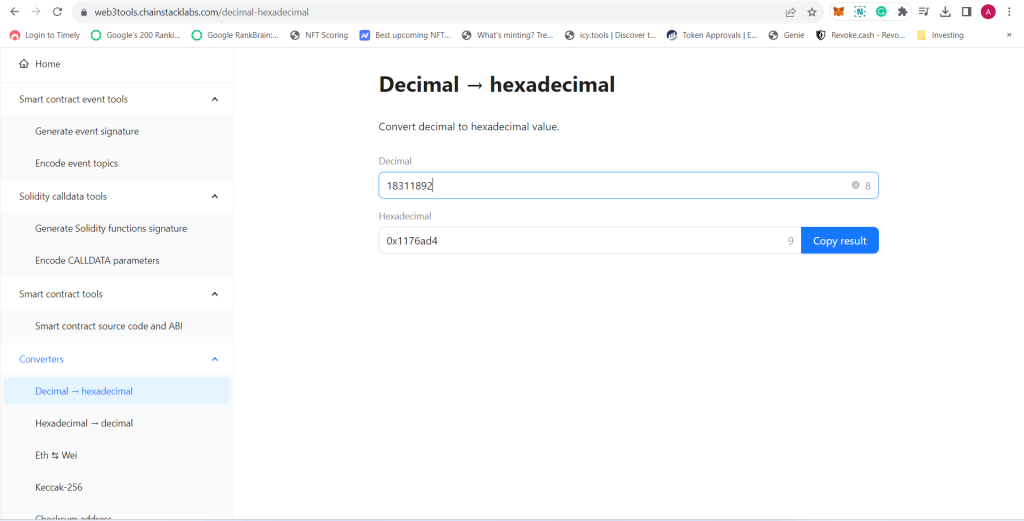
The block number needs to be provided in Hex format. If you need to convert a Decimal to Hexadecimal format, you can use our EVM Swiss Army Knife again. Just input the block number in the Decimal field, and then copy the Hexadecimal value at the bottom.
Recap of what we did
- You deployed your own node and got access to your HTTPS endpoint.
- We are doing an eth_call to the contract.
- We added the WETH-USDC Uniswap V3 contract address in the code above. This is the smart contract that we will call.
- We are sending the method which is the function signature of the
slot0function. - We added the block number in Hex format.
Now you can send the call, and see the results. The result will be returned in Hexadecimal format.
If you liked this tutorial, make sure to check out our blog for more.
Power-boost your project with Chainstack
- Discover how you can save thousands in infra costs every month with our unbeatable pricing on the most complete Web3 development platform.
- Input your workload and see how affordable Chainstack is compared to other RPC providers.
- Connect to Ethereum, Solana, BNB Smart Chain, Polygon, Arbitrum, Base, Hyperliquid, Robinhood Chain, Tempo, MegaETH, Monad, Plasma, Avalanche, Optimism, Scroll, Aptos, Cronos, Gnosis Chain, Kaia, Moonbeam, Celo, Aurora, TON, Ronin, and Bitcoin mainnet or testnets through an interface designed to help you get the job done.
- Fast access to blockchain archive data and gRPC streaming on Solana.
- To learn more about Chainstack, visit our Developer Portal or join our Telegram group.
- Connect your AI agent to Chainstack in seconds using Chainstack MCP — give Claude, Cursor, Codex, Gemini, and Windsurf live access to blockchain data, node management, and docs.
- Are you in need of testnet tokens? Request some from our faucets. Sepolia faucet, Base Sepolia faucet, Solana devnet faucet, Hoodi faucet, BNB faucet, zkSync faucet, Scroll faucet, Hyperliquid faucet, Monad faucet, Amoy faucet, Plasma faucet, TON faucet.
Have you already explored what you can achieve with Chainstack? Get started for free today.