Ethereum
 Hyperliquid
 Solana
 Arbitrum
 BNB Smart Chain
 Base
Base Polygon
 TRON
TRON Sui
Sui MegaETH


Fault-tolerant transactions with MetaMask and Chainstack nodes
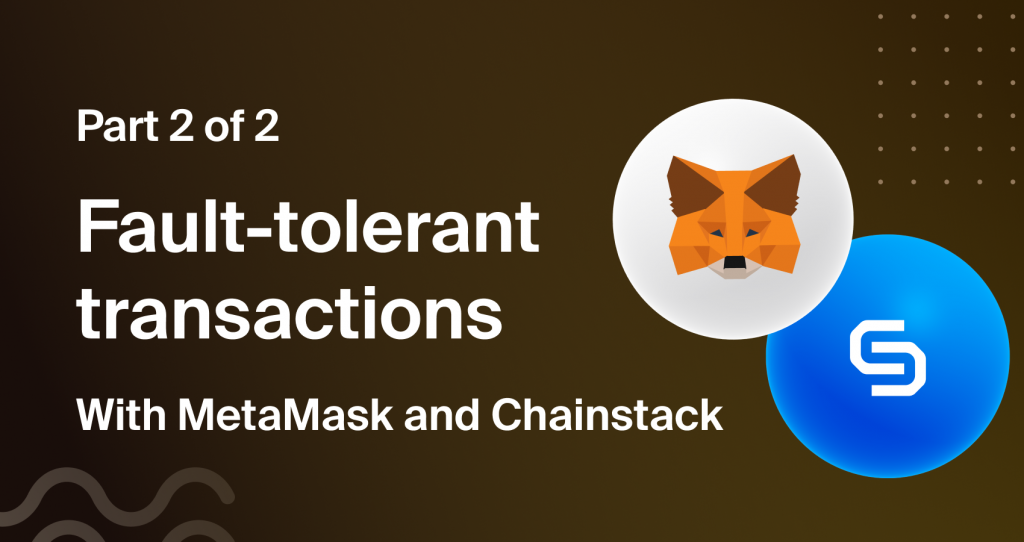
This is the second article in the two-part series about MetaMask and transactions:
- MetaMask under the hood.
- Fault-tolerant transactions with MetaMask and Chainstack. <- You are here.
Introduction
MetaMask is by far the most common accounts manager used to interact with the Web3 world. In the previous article in this series, we saw how MetaMask works under the hood—what happens when you create a new account, when you interact with a DApp (decentralized application), and when you send transactions. Now, let us see how it connects to the blockchain and how you can make your MetaMask connection faster and more reliable using Chainstack.
Fault-proof your MetaMask
As we discussed in the full and archive nodes article, we need to communicate with a node to access the blockchain; and while MetaMask is not a node, it connects to one and functions as a nice and intuitive user interface.
MetaMask exchanges a lot of information about the state changes that your account makes on the blockchain, such as account balance, transactions count (nonce), and more. It does so by connecting to an Ethereum node using a default provider.
The default node provider is automatically set up and initially is the same across all the users; this makes it really easy to get up and running. At the same time, such a system can cause a few issues as it spreads the resources between many people. Currently, MetaMask has more than 30 million monthly users.
Because so many users use the same endpoints, you could experience the following obstacles in you Web3 journey.
Slower transaction propagation
Transactions could take longer to propagate through the network. In a distributed network like EVM blockchains, the node that picks up and validates a transaction first, will share it (propagate) with the rest of the network so that all the nodes can verify it and keep up to date. Propagation speed is very important to keep the network efficient.
Higher gas fees
The gas fee estimate made by MetaMask is based on the network load, and it could be out of date. You might end up paying more than necessary if you don’t realize it.
Rejected transactions
In case of a sudden spike in network usage, outdated gas estimates might also lead to rejected transactions since you might send a one with not enough gas.
Network instability
Because of the shared resources, the network might become temporarily unusable, and your transactions might get stuck.
We are mentioning the Ethereum network specifically because it comes standard with MetaMask, but this applies to any other Ethereum Virtual Machine (EVM) compatible network that you connect to using MetaMask and one of the public endpoints, including Avalanche, BNB Smart Chain, Fantom, and all the others. With Chainstack, you can rely on a fast and secure node connection for all these chains.
Why should you use Chainstack endpoints on MetaMask?
MetaMask is your access point to the blockchain, and it is especially important to make it fault-proof. If something happens to the public endpoints, you might find yourself unable to interact with the network, your transactions can get stuck, and you might not be able to complete important operations.
Imagine trying to mint a new NFT with limited availability—the network endpoint stops working while you send the transaction and comes back online only once everything is sold out. What a disaster it would be. Luckily, Chainstack’s technology solves scalability and instability issues and provides fast and reliable node endpoints for many different networks.
To get a Chainstack node:
Protocols supported by Chainstack
Chainstack supports many EVM compatible protocols, including Avalanche C-Chains, where you can create your subnet.
Chainstack allows you to keep your MetaMask efficient and secure on all the supported networks from the same place. I recommend referring to the Chainstack website for an updated list of supported protocols.
How do I update my MetaMask endpoints?
Now we can finally show you how to update your MetaMask endpoints. First, sign up on Chainstack and get your node up and running.
1. Sign up on Chainstack and spin up your node:
2. Open your MetaMask instance:
- Click on the network selection button.
- Click Add Network.
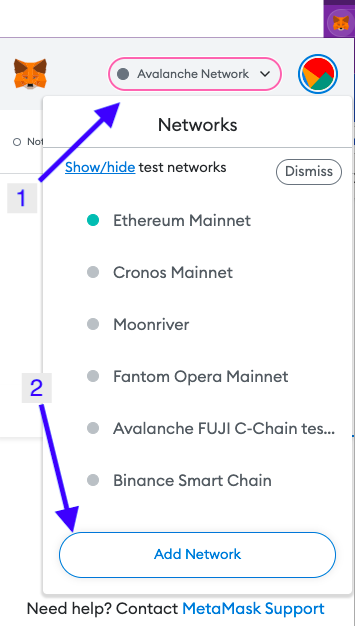
A new page will open where we are going to insert the new endpoint details. In this example, we will add a Chainstack Avalanche endpoint but the process is the same for every network.
3. Let’s find the custom endpoint information.
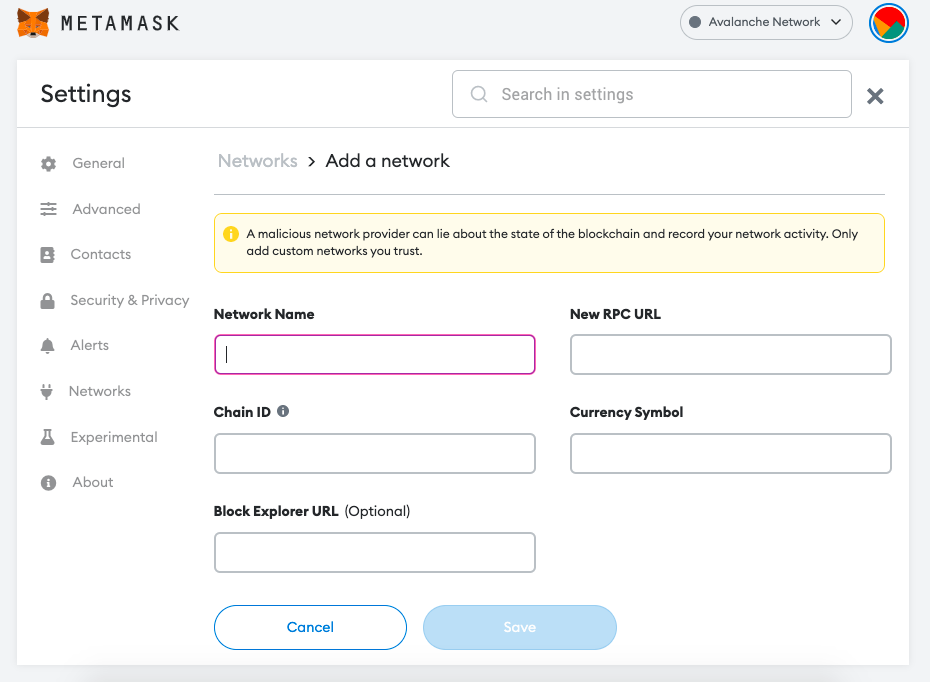
Network Name
The Network Name field can be any name that will remind you what that specific network is for. In this case, let us call it Avalanche – Chainstack.
New RPC URL
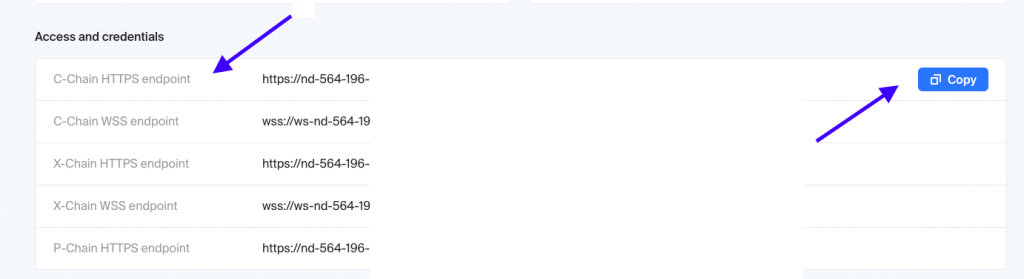
RPC stands for Remote Procedure Call, and it is a set of rules that allow a program to run instructions remotely as if they were running on the machine directly. Here is where we will define the connection to the node, go to the dashboard of your Chainstack node, copy the endpoint’s URL, and paste it into the New RPC URL input field.
We are using an Avalanche C-Chain endpoint in this case.
Note that Chainstack offers WebSocket endpoints as well, but MetaMask requires the use of an HTTP/HTTPS endpoint.
Chain ID
The Chain ID is a number used when transactions are signed and verified (different from the private key). It distinguishes the different chains and avoids replay attacks, effectively protecting the transactions from being duplicated on another chain. It must match the Chain ID that the node returns, and it is important that you get it right.
For this example, the Avalanche C-chain Chain ID is 43114. I recommend referring to the Chainstack docs to get the Chain IDs for all supported protocols. In the documentation, you can find the Chain ID and other MetaMask instructions under the Tools section of every protocol.
Currency Symbol
This is the symbol that MetaMask uses to identify the base currency for the network.
Block Explorer URL
The block explorer is optional, but I recommend filling it up as it gives additional utility to your wallet. A block explorer allows you to look up details about smart contracts, wallets, and transactions. It is a powerful tool that will help you check details more easily.
Luckily for you, Chainstack provides its users with a block explorer for every node deployed.
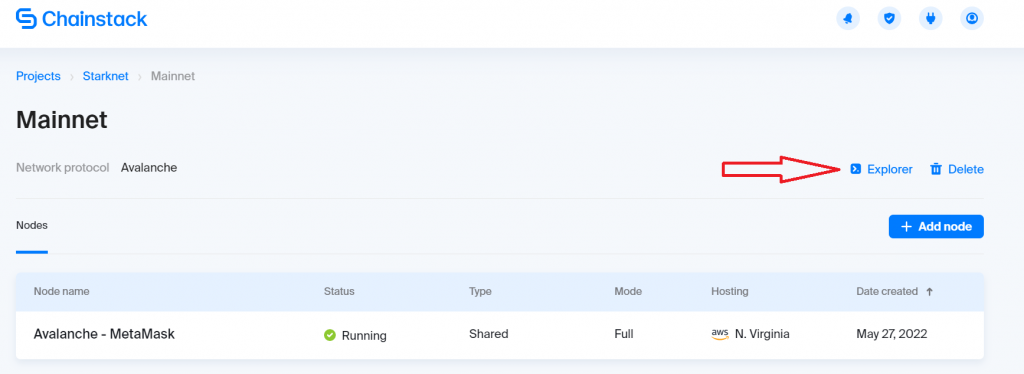
To access the block explorer from Chainstack:
- Go in your project.
- Choose a network in the project.
- Click Explorer.
4. Now that we have all the information that we need, we can fill the fields and save.
Note the message that I get:
This Chain ID is currently used by the Avalanche Network network.
This happens because I already have an Avalanche network set up on my MetaMask using that Chain ID; this is just MetaMask reminding me that I already have a network using that Chain ID, and it is okay. It will not impact the use of the node in any way.
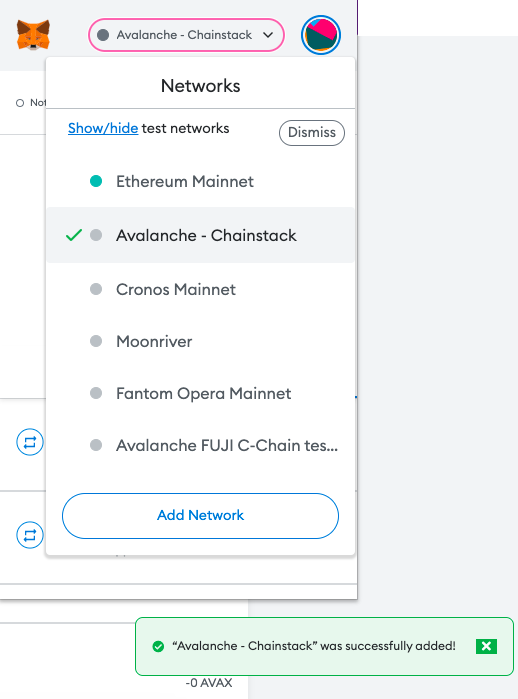
After you save it, the new endpoint shows up in the Networks list, and all you need to do is click on it to switch.
Conclusion
At this point, you successfully added Chainstack as your custom RPC provider for the Avalanche network, and the process is the same with all the other EVM compatible protocols that Chainstack supports.
Setting up custom endpoints using Chainstack is the best way to protect yourself against network instability on the Ethereum network and the public RPC endpoints for the other protocols, as well as make your transactions and interactions with DApps faster, fault-tolerant, and more enjoyable.
- Discover how you can save thousands in infra costs every month with our unbeatable pricing on the most complete Web3 development platform.
- Input your workload and see how affordable Chainstack is compared to other RPC providers.
- Connect to Ethereum, Solana, BNB Smart Chain, Polygon, Arbitrum, Base, Hyperliquid, Tempo, MegaETH, Monad, Plasma, Avalanche, Optimism, Scroll, Aptos, Cronos, Gnosis Chain, Kaia, Moonbeam, Celo, Aurora, TON, Ronin, and Bitcoin mainnet or testnets through an interface designed to help you get the job done.
- Fast access to blockchain archive data and gRPC streaming on Solana.
- To learn more about Chainstack, visit our Developer Portal or join our Telegram group.
- Connect your AI agent to Chainstack in seconds using Chainstack MCP — give Claude, Cursor, Codex, Gemini, and Windsurf live access to blockchain data, node management, and docs.
- Are you in need of testnet tokens? Request some from our faucets. Sepolia faucet, Base Sepolia faucet, Solana devnet faucet, Hoodi faucet, BNB faucet, zkSync faucet, Scroll faucet, Hyperliquid faucet, Monad faucet, Amoy faucet, Plasma faucet, TON faucet.
Have you already explored what you can achieve with Chainstack? Get started for free today.