Ethereum
 Hyperliquid
 Solana
 Arbitrum
 BNB Smart Chain
 Base
Base Polygon
 TRON
TRON Sui
Sui MegaETH


Using Chainlink data feeds with Foundry

Introduction
Foundry is one of the latest smart contract development toolchains currently in the market, and it allows users to compile contracts, write tests, deploy contracts, and much more through its command line interface.
Foundry is written in Rust and promises faster compilation times and the convenience of writing tests and deployment scripts in solidity, rather than in JavaScript. This is something a lot of Solidity developers have been looking forward to for a long time since this will allow people to write smart contracts as well as their corresponding tests without having to switch between languages.
Moreover, this would save people time and effort by them no longer needing to learn JavaScript as well as Solidity. If you’re familiar with Hardhat, we have an article that covers the main differences between the two in both performance and developer experience. You can give that a read over here.

Installing Foundry
To install Foundry, Linux and MacOS users can open their terminal and run:
curl -L https://foundry.paradigm.xyz | bashThis will download Foundryup. To install Foundry, run:
foundryupIf everything is installed correctly, your terminal will look like this:

Windows users may need to download Rust before proceeding with the installation. If you face any issues during installation, you can refer to the official Foundry documentation from here.
Once this is done, create an empty directory where you would like to set up your foundry project. Open the directory in VS Code, and then open the terminal.
Run the command forge init to initialize a Foundry project in the empty directory.
Setting up remappings
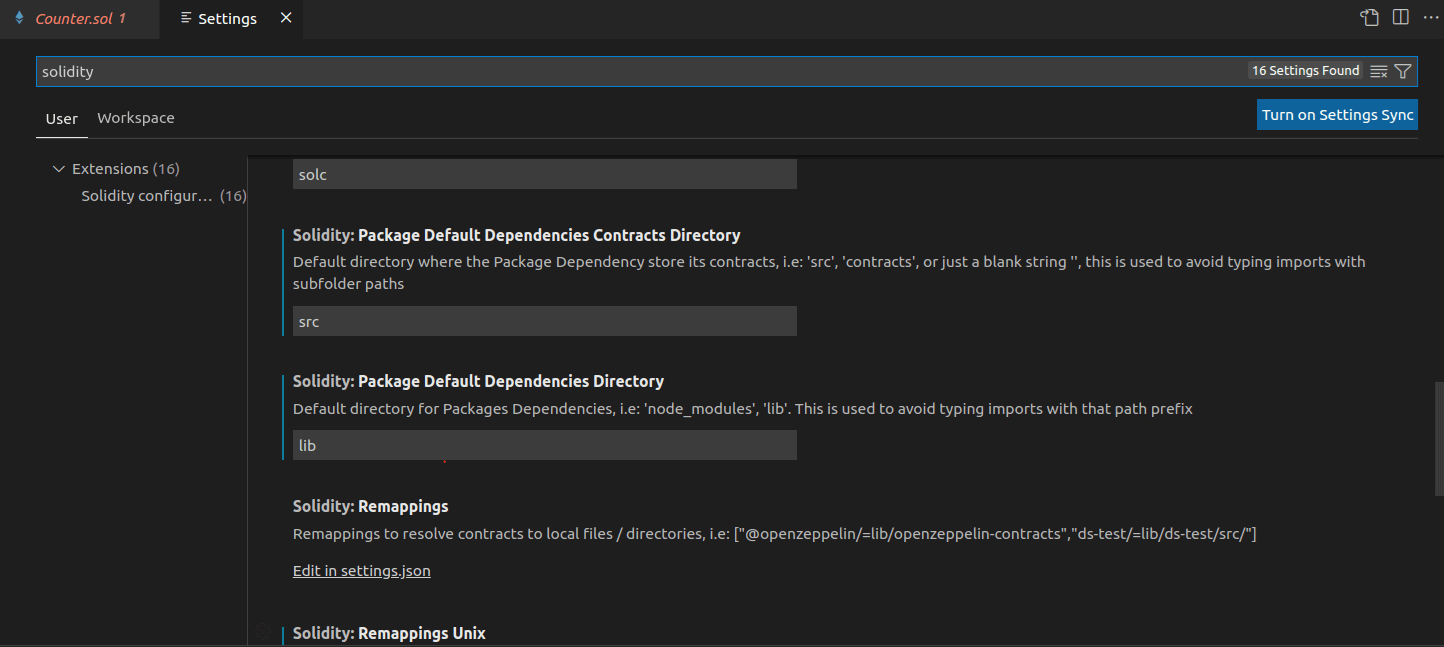
To make it easier to work with Solidity files within VS Code, you need to install an extension that supports solidity within the workspace. Go to extensions in VS Code and install any Solidity extension. I am using the one by ‘Juan Blanco’.
Next, go to settings and search for ‘solidity’. Scroll down to where you define the local path where your contracts and dependencies are stored. Foundry by default stores them under ‘src’ and ‘lib’ respectively. That is what you need to enter, and then save the settings and close the tab. This will tell VS Code exactly where to look for our contracts and dependencies.
Overview of Chainlink’s data feeds
Chainlink is often described as a decentralized oracle network. What that means in practice is that a lot of independent node operators come together and inject data from the real world into blockchain smart contracts.
We can use Chainlink’s data feeds to connect our smart contracts to the prices of real-world assets.
We could theoretically use centralized data feeds just as well, but with that comes a risk of the single data source being compromised. Many DeFi protocols in the past have been attacked because of their oracle network being manipulated. This is much more difficult to do in the case of a decentralized oracle network where no single malicious node operator could impact the price of an asset in a major way.
Latest price vs historical price
Chainlink is most commonly used to retrieve the latest prices for cryptocurrencies, but the V3 interface also allows us to query older prices of supported tokens by using a previous roundID. So what is a roundID?
Data in Chainlink’s data feeds are updated in terms of rounds. This means that every time the price of a token is updated, the round ID associated with the value also updates. We can use this unique value to allow our smart contract to fetch older prices of supported tokens from Chainlink. This older data is referred to as a ‘historical price’. Please note that not all numbers are valid round IDs, and the round IDs don’t necessarily increase linearly. They are a mathematical combination of two underlying values and can change dramatically when either of those values changes.
In the next section, we will learn how to incorporate Chainlink’s data feeds into our smart contracts.
Most popular Chainlink data feeds
ETH / USD | Network: Ethereum Mainnet | Contract address: 0x5f4ec3df9cbd43714fe2740f5e3616155c5b8419
BTC / USD | Network: Ethereum Mainnet | Contract address: 0xf4030086522a5beea4988f8ca5b36dbc97bee88c
ETH / USD | Network: Polygon Mainnet | Contract address: 0xf9680d99d6c9589e2a93a78a04a279e509205945
AVAX / USD | Network: Avalanche Mainnet | Contract address: 0x0a77230d17318075983913bc2145db16c7366156
BNB / USD | Network: BNB Chain Mainnet | Contract address: 0x0567f2323251f0aab15c8dfb1967e4e8a7d42aee
Check all Chainlink data feeds available at https://data.chain.link/
Writing the Smart Contract
Inside the src folder, create two new files:
chainlinkInterface.solpriceFeeds.sol
Inside chainlinkInterface.sol, paste the following code:
// SPDX-License-Identifier: MIT
pragma solidity ^0.8.0;

interface AggregatorV3Interface {

  function decimals() external view returns (uint8);
  function description() external view returns (string memory);
  function version() external view returns (uint256);

  function getRoundData(uint80 _roundId)
    external
    view
    returns (
      uint80 roundId,
      int256 answer,
      uint256 startedAt,
      uint256 updatedAt,
      uint80 answeredInRound
    );

  function latestRoundData()
    external
    view
    returns (
      uint80 roundId,
      int256 answer,
      uint256 startedAt,
      uint256 updatedAt,
      uint80 answeredInRound
    );
}
If you look carefully, this code is slightly unusual. We haven’t declared any of the variables we are using in our function declarations, nor are we actually defining our functions. They are just function declarations containing no code. Moreover, we have declared an ‘interface’ at the top of the code, instead of a ‘contract’. So what’s happening here?
Interfaces in Solidity are different from contracts. An interface in Solidity is basically a list of functions with no definition. They are all of type external, meant to be inherited by a child contract. To use Chainlink’s data feed services, one must reference the AggregatorV3Interface. We will be using v-0.8 of the AggregatorV3Interface, which is the latest at the time of writing. This will help us know which functions to call in the actual contract.
Speaking of the actual contract, open the newly created ‘priceFeeds.sol’ file. Inside, paste the following code-
// SPDX-License-Identifier: MIT
pragma solidity ^0.8.0;

import "./chainlinkInterface.sol";

contract PriceConsumerV3 {

    AggregatorV3Interface internal BTCpriceFeed;
    AggregatorV3Interface internal ETHpriceFeed;
    AggregatorV3Interface internal LinkpriceFeed;

    /**
     * Network: Goerli Testnet

     * BTC/USD Address: 0xA39434A63A52E749F02807ae27335515BA4b07F7
     * ETH/USD Address: 0xD4a33860578De61DBAbDc8BFdb98FD742fA7028e
     * LINK/USD Address:0x48731cF7e84dc94C5f84577882c14Be11a5B7456
     */

    constructor() {
        BTCpriceFeed = AggregatorV3Interface(0xA39434A63A52E749F02807ae27335515BA4b07F7);
        ETHpriceFeed = AggregatorV3Interface(0xD4a33860578De61DBAbDc8BFdb98FD742fA7028e);
        LinkpriceFeed = AggregatorV3Interface(0x48731cF7e84dc94C5f84577882c14Be11a5B7456);
    }

    /**
     * Returns the latest prices
     */
    function LatestBTCprice() public view returns (uint80,int) {
        (
            uint80 roundID,
            int price,
            uint startedAt,
            uint timeStamp,
            uint80 answeredInRound
        ) = BTCpriceFeed.latestRoundData();
        return (roundID,price);
    }

    function LatestETHprice() public view returns (uint80,int) {
        (
            uint80 roundID,
            int price,
            uint startedAt,
            uint timeStamp,
            uint80 answeredInRound
        ) = ETHpriceFeed.latestRoundData();
        return (roundID,price);
}

 function LatestLinkprice() public view returns (uint80,int) {
        (
            uint80 roundID,
            int price,
            uint startedAt,
            uint timeStamp,
            uint80 answeredInRound
        ) = LinkpriceFeed.latestRoundData();
        return (roundID,price);
}

    /**
     * roundId is NOT incremental. A random number is not guaranteed to be a valid round ID.
     * You must know a valid roundId before consuming historical data.
     *
     * Two valid Round values:        18446744073709554683, 18446744073709555477
     */

 function ETHHistoricalPrice(uint80 roundId) public view returns (int256) {
        (
            uint80 id,
            int price,
            uint startedAt,
            uint timeStamp,
            uint80 answeredInRound
        ) = ETHpriceFeed.getRoundData(roundId);
        require(timeStamp > 0, "Round not complete");
        return price;
}

}
Chainlink consists of multiple independent node operators that regularly update the real-world prices of assets like BTC and ETH. Each of the various data feeds have their own on-chain address. Any contract deployed on the blockchain can read the latest prices from these addresses. Same data feeds existing on different blockchains will have different addresses. Hence, it is important to note down the correct address of the data feed you want to use, according to the blockchain network on which the contract will be deployed.
In our case, we will be fetching the latest price of BTC, ETH, and LINK in terms of US Dollars from Chainlink’s data feeds on the Goerli Testnet. To get the correct contract addresses, we need to go to Chainlink’s Ethereum data feeds page, and scroll down to the Goerli Testnet section.
This is what it should look like:

All the blockchain networks, mainnets, or testnets have their own sections in Chainlink’s documentation. You can use that to incorporate the prices of any of the assets from those networks by referencing the correct proxy address on the correct chains.
Here are some key concepts to understand-
- Heartbeat—The heartbeat of a data feed tells us how frequently the feed is updated. The lower the heartbeat, the more frequently it is updated.
- Deviation—Deviation percentage refers to the percentage shift in the price of the listed asset since the last time it was updated. For feeds that have a non-zero value listed as their deviation threshold, Chainlink will update the data feed as soon as the price shifts more than the listed percentage from its last updated value, even if it means updating the feed at a higher frequency than its heartbeat.
- Decimals—It is not very safe to directly work with decimals in solidity, for reasons that are beyond the scope of this article. Chainlink, therefore, returns to us an integer value for each of the data feeds. The decimal number tells us by how many numbers to the left must we shift the decimal point to get the correct result.
Now that we understand the key concepts, let us quickly go over the ‘priceConsumerV3’ contract. We first import the all-important ‘AggregatorV3Interface’, which we stored in ‘chainlinkInterface.sol’. It is very important to import this file correctly since this is what enables us to conveniently use all the external functions implemented by data feeds. We then initialize three new objects of the AggregatorV3Interface, each of them specifically connecting to an already deployed aggregator contract. We get these addresses from Chainlink’s official documentation as explained above. We then create three functions to fetch three different prices from Chainlink, and we return two of the five values that are given to us by Chainlink. The ‘roundId’ is a unique value that changes every time a price feed is updated. We need the roundId of a particular price update to fetch the historical price from a price feed.
Once your contract is ready, save the files and run this command in the terminal-
forge buildThis will compile all your contracts and generate ABIs for them. You will probably receive a bunch of warning from Foundry since we don’t return most of the values in our LatestPrice functions.
Foundry sometimes takes a while to resolve the chainlinkInterface import into the priceFeeds file. Hence, the forge build command may give an error the first couple of times.
If that happens, wait for a couple of minutes, and run the command again.
Scripting in Foundry
Once our contracts have been successfully compiled, we need to create a simple script to deploy our contract. Under the scripts folder, create a new file by the name of ‘priceFeedsScript.s.sol’.
Inside the file, paste the following code-
// SPDX-License-Identifier: UNLICENSED
pragma solidity ^0.8.0;

import "forge-std/Script.sol";
import {PriceConsumerV3} from "src/priceFeeds.sol";

contract ChainlinkScript is Script {
    function setUp() public {}

    function run() public {
        vm.startBroadcast();
        PriceConsumerV3 prices = new PriceConsumerV3();
        vm.stopBroadcast();

    }
}
We don’t do a whole lot here. We first import the Script.sol contract from Foundry, which allows us access to all the scripting functionalities supported by Foundy. Secondly, we import our smart contract. Scripts are by default executed within the function run(). The broadcast functions record any transactions happening between the two calls and record them to a special file.
Lastly, we create a new instance of our contract, which serves as the deployment command.
We now have a script ready to run, but we still need to define our environment variables to correctly deploy our smart contract.
Setting up the dotenv File
To correctly deploy our smart contract on the blockchain, we need to pass some environment variables to Foundry. This can be done directly through the command line while deploying the actual contract, but it is better to do so through a dotenv file.
In your terminal, make sure you are pointing to the root directory, and run the following command-
touch .envThis will create an empty dotenv file in your directory. Now we need to get some credentials to put into our dotenv file. Here’s how to do that-
- RPC URLS are needed to connect to the blockchain. You can either host your own node or connect to the blockchain using the RPC URL for the blockchain network you want to use. In this example, we are going to use Ethereum’s Goerli Testnet. You can either use a public Goerli RPC URL, or you can use Chainstack’s dedicated node provider service. That’s what I am doing here. Using Chainstack allows us to deploy our contracts and interact with them much more quickly and reliably. You can get started for free here.
- A private key is what enables Foundry to access the tokens needed to be used as gas fees to deploy our contract. Pass in the private key for any one of your accounts that have some Goerli testnet tokens.
- Lastly, you need to go to Etherscan and sign up for an account if you haven’t already done so. Then create an Etherscan API key and paste it here. You will need this to verify the contract.
In the end your dotenv file should look like this-
GOERLI_RPC_URL=https://mc-12.p123yippy.com/12ase525c5012
PRIVATE_KEY=dlhj12342kjh4eslkh1pq4h1324kqwrekhwe
ETHERSCAN_KEY=SDJKASL232KJ3SLKJDSALKJ234G2CAEWYND
Do note however that the keys shown here are fake, and are displayed this way for your convenience. After configuring the dotenv file, save it once. Then open the terminal again, and run the command-
source .envThis command allows us to load our environment variables from the dotenv file to the terminal.
Now we are finally ready to deploy our contract.
Deploying the Smart Contract
In your terminal, execute the following command-
forge script script/priceFeedsScript.s.sol:ChainlinkScript --rpc-url $GOERLI_RPC_URL --private-key $PRIVATE_KEY --broadcast --verify --etherscan-api-key $ETHERSCAN_KEY -vvvvThis command tells forge to run our script on the Goerli Testnet, and to verify our contract immediately after running the script. Please note that it may take a while to complete this transaction if the network is busy. You can mitigate some of that time if you are using a dedicated node.
Also, the ‘-vvvv’ flag represents the amount of verbosity, i.e- the amount of details, you want in your transaction logs. Foundry allows us different levels of verbosity.
Once your transaction is through, your terminal should look something like this-

Open the goerli.etherscan URL, and open the contracts page. You will see that your contract has been already verified, and that you can call your functions directly from the contracts page. Your browser should look something like this-

Conclusion
In this tutorial, we used Foundry to compile and deploy a smart contract to the Goerli Testnet. The contract I deployed can be found here. Feel free to check out Chainstack’s official blog for some other cool tutorials.
Happy coding!
- Discover how you can save thousands in infra costs every month with our unbeatable pricing on the most complete Web3 development platform.
- Input your workload and see how affordable Chainstack is compared to other RPC providers.
- Connect to Ethereum, Solana, BNB Smart Chain, Polygon, Arbitrum, Base, Hyperliquid, Tempo, MegaETH, Monad, Plasma, Avalanche, Optimism, Scroll, Aptos, Cronos, Gnosis Chain, Kaia, Moonbeam, Celo, Aurora, TON, Ronin, and Bitcoin mainnet or testnets through an interface designed to help you get the job done.
- Fast access to blockchain archive data and gRPC streaming on Solana.
- To learn more about Chainstack, visit our Developer Portal or join our Telegram group.
- Connect your AI agent to Chainstack in seconds using Chainstack MCP — give Claude, Cursor, Codex, Gemini, and Windsurf live access to blockchain data, node management, and docs.
- Are you in need of testnet tokens? Request some from our faucets. Sepolia faucet, Base Sepolia faucet, Solana devnet faucet, Hoodi faucet, BNB faucet, zkSync faucet, Scroll faucet, Hyperliquid faucet, Monad faucet, Amoy faucet, Plasma faucet, TON faucet.
Have you already explored what you can achieve with Chainstack? Get started for free today.