


Introduction
Cronos is an EVM-compatible blockchain that uses Proof-Of-Authority (POA) to deliver a faster and cheaper finality to its users. As an open-source Layer 1 blockchain, Cronos aims to combine its EVM-compatible infrastructure with other blockchains built on top of the Cronos SDK to enable fast and cheap transfers of assets.
In this tutorial, we will learn how to build a lottery smart contract using Solidity, and how to deploy and verify smart contracts on the Cronos blockchain using Hardhat.
Setting up a Hardhat project
Before writing our smart contract, we need to set up our dev environment. To create a Hardhat project:
- Create a folder named
cronosHardhat(or any other name you like).
- Open the new folder in the terminal and run the command:
npm install --save-dev hardhat
This command downloads the latest version of Hardhat into your directory.
- To create a sample Hardhat project, run
npx hardhat.
- This will open up a UI interface in your terminal.

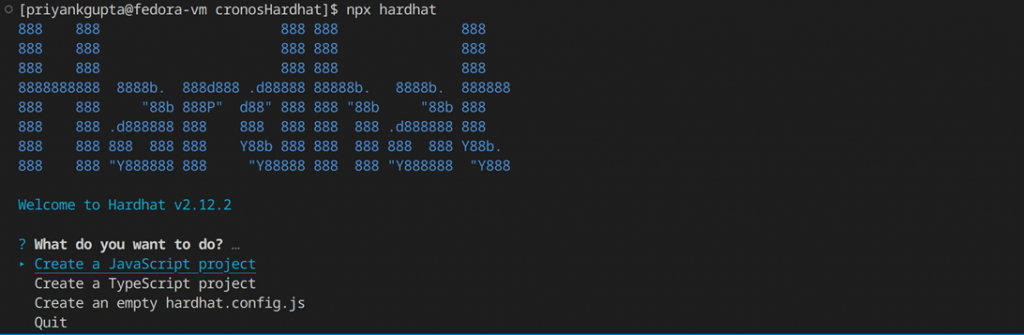
Select ‘Create a JavaScript project’, and press enter through all the options. This will create a sample Hardhat project in your terminal, and Hardhat will automatically download all the additional dependencies for this sample project using ‘hardhat-toolbox’.
Taking a look at Hardhat’s project structure
You should now have a basic Hardhat project set up in your directory. Let us take a brief look at some folders and files within the project layout:
- Contracts: this folder contains all of your smart contracts.
- Scripts: this folder contains JavaScript files that are used to deploy already compiled smart contracts onto the blockchain. You will typically have to write at least a basic deployment script to deploy your smart contracts.
- Test: you should ideally test your smart contracts before deploying them to the blockchain. The test folder is where you write those tests. Hardhat uses Mocha and Chai, two very powerful JavaScript libraries to enable testing within its framework.
- hardhat.config: as the name suggests, this file contains all of the configuration parameters to deploy your smart contracts. Hardhat supports gas optimization, defining multiple networks amongst many other features which can be tweaked via the hardhat.config file.
Writing a smart contract in Hardhat
Inside the contracts folder, create a new file named Lottery.sol.
Inside the file, paste the following code:
//SPDX-License-Identifier: MIT
pragma solidity ^0.8.17;

contract Lottery {
    address public owner;
    address payable[] public players;
    bool public lotteryInProgress;
    uint public lotteryId;
    mapping (uint => address payable) public lotteryHistory;

    constructor() {
        owner = msg.sender;
        lotteryId = 1;
    }

    function startLottery() public onlyowner{
        lotteryInProgress=true;
    }

    function alreadyEntered() private view returns(bool){
        for(uint i=0; i< players.length; i++){
            if(players[i]==msg.sender)
            return true;
        }
        return false;
    }

    function enterLottery() public payable {
        require(lotteryInProgress,"No lottery event is currently in progress");
        require(msg.value > 0.5 ether, "Please deposit at least 0.5 Ether");
        require(msg.sender!=owner, "As owner, you can't enter the lottery");
        require(alreadyEntered()==false, "You have already entered in the Lottery");
        require(players.length<=10, "This lottery has maximum participation. Please wait for the next event");

        players.push(payable(msg.sender));
    }
    function getRandomNumber() private view returns (uint) {
        return uint(keccak256(abi.encodePacked( block.timestamp, block.difficulty, block.gaslimit)));
    }

    function pickWinner() public onlyowner {
        require(lotteryInProgress,"No lottery event is currently in progress");
        require(players.length>0, "can't pick winners without participants");
        uint index = getRandomNumber()%players.length;
        players[index].transfer(address(this).balance - 0.1 ether);

        lotteryHistory[lotteryId] = players[index];
        lotteryId++;
        lotteryInProgress=false;
        players = new address payable[](0);
    }

    modifier onlyowner() {
      require(msg.sender == owner, "Only owner can call this function");
      _;
    }

    function getWinnerByLottery(uint lottery) public view returns (address payable) {
        return lotteryHistory[lottery];
    }

    function getBalance() public view returns (uint) {
        return address(this).balance/(10**18);
    }

    function numOfPlayers() public view returns (uint) {
        return players.length;
    }

    function getPlayers() public view returns (address payable[] memory) {
        return players;
    }
}
Let us go over the code quickly:
- The constructor does two things. First, it sets our wallet address as the ‘owner’ of the address. Since the constructor is called only once in the life cycle of a contract, this value cannot change. Secondly, it sets the lottery ID as 1, which we will increment every time we end a lottery contest.
- The
startLottery()function simply initiates a bool variable. This variable is basically a flag that tells us if a lottery event is currently in progress or not.
- The
enterLottery()function allows new players to enter the contest if their contribution to the lottery pool is greater than 0.5 Ether.
It also uses thealreadyEntered()function to check if someone is trying to participate again. If all the other conditions are also satisfied, the participant is added to the list of players eligible to win the lottery.
- The function
getRandomNumber()is our main driver. A lottery should randomly decide a winner. However, solidity does not have a native randomizer function. Moreover, Chainlink VRF, a popular decentralized random-number-generating service, does not yet support Cronos. Hence, our best option is to hash together some varying properties of the blockchain network to generate a pseudo-random number. We use the following global variables as part of our hashing algorithm:- block.timestamp
- block.difficulty
- block.gaslimit
- All of these global variables vary in value as per the existing conditions on the blockchain while we are deploying/calling our contract. This makes our number quite random, but not totally so.
- The hash generated will be pseudo-random, but will work for most cases.
pickWinner()is a function that can only be called by the owner of the contract. It uses thegetRandomNumber()to select a random index. The address at that index gets transferred all of the Ether in the lottery at that point, minus a 0.1 Ether fee that we keep as a service charge.
- The last few functions are some simple view functions that we use to keep track of the current parameters of our contract.
After pasting in the code, save the file and go to your terminal. Inside there, run the command:
npx hardhat compileThis will compile all the smart contracts in your contracts folder and generate ABIs for them in the artifacts folder. We now have a smart contract ready to deploy.
Setting up our env variables
To deploy our smart contracts, we basically need two things:
- A private key to an EVM-based wallet that has a sufficient number of TCRO tokens, the native cryptocurrency of the Cronos Testnet. If you don’t have TCRO tokens, you can get some from the official faucet.
- We also need an RPC URL to connect to a blockchain. You can use a public RPC URL;
OR you could sign up to Chainstack and use a dedicated URL that will give you a faster and more reliable service.
- If you don’t know how to set up an endpoint with Chainstack, you can check out this tutorial on our blog.
- In addition, we will be verifying our smart contract after deploying it on the Cronos testnet. We can do so directly from the command line by using the
hardhat-cronoscanplugin. To use the plugin, we need to get an API key from Cronoscan. Login to Cronoscan and get an API key.
While it’s possible to directly put your keys into your hardhat.config file, we do not recommend doing this since you could end up pushing this data to online repositories, which can lead to your private keys being compromised. We will use the dotenv package to export our keys securely.
To install the dotenv package in your directory, open your terminal, and run:
npm i dotenv: To install the dotenv package into your directory.
touch .env: To create a new .env file in your directory. Go to your newly created dotenv file and put in your private keys. This is what your dotenv file should look like right now:
RPC_URL=https://nd-XXXXXXXXX
PRIVATE_KEY=0x2fqXXXXXXXXXXXXXXXXXXXXXu7
API_KEY=XW10AXXXXXXXXXXXXXXXXXG5
Save the dotenv file and run this command in your terminal:
source .envThis command will load your sensitive data onto your command line. You can run echo $RPC_URL in your terminal to verify if the data is accessible by Hardhat.
Configuring hardhat.config
As explained before, this file contains all of your configuration for your hardhat project. Go to hardhat.config in your root directory, and paste this code after deleting its contents:
require("@nomicfoundation/hardhat-toolbox");
require('dotenv').config();
require("@nomiclabs/hardhat-etherscan");
require("@cronos-labs/hardhat-cronoscan");


module.exports = {
  solidity: "0.8.17",
  defaultNetwork: "Cronos_testnet",
  networks: {
    Cronos_testnet: {
        url: `${process.env.RPC_URL}`,
        accounts: [process.env.PRIVATE_KEY]
    },
},
    etherscan: {
        apiKey: {
         cronosTestnet: `${process.env.API_KEY}`,
  },
},
};
A few things happen here:
• hardhat-toolbox is a recent addition to Hardhat that bundles together a variety of commonly used Hardhat packages and plugins into one import.
• The hardhat-cronoscan plugin is used in conjunction with the hardhat-etherscan plugin in order to verify contracts deployed on Cronos mainnet or testnet.
• We can define multiple blockchain connections inside the networks object. We can also define a default network that Hardhat will fall back to in case we don’t specify a particular network in the command line. This helps in case we have multiple networks defined within the config file, but mostly only use a particular network.
• We define the Cronoscan API key inside the etherscan object.
hardhat.config supports a lot more configuration parameters, but this is all we need for now.
You might notice, however, that we haven’t installed the hardhat-cronoscan plugin yet. To install the plugin, go to the terminal in your root directory, and run:
npm i --save-dev @nomiclabs/hardhat-etherscan@^3.1.0 @cronos-labs/hardhat-cronoscanNow save your config file, and run the npx hardhat compile command in your terminal once again. This will make sure that all your contracts are compiled according to the latest configurations of our Hardhat project.
Testing in Hardhat
- Smart contracts are meant to handle money. Thus it is highly recommended that one tests their smart contracts before deploying them to a live blockchain network.
- For testing, we will connect to the Hardhat network, which is basically a mock blockchain created on your system by Hardhat, and we will test our smart contract using Mocha and Chai libraries through an automated testing script.
- To begin, open a new terminal in the same directory, and run the command:
npx hardhat node
This will give us a simulated blockchain in our command line with a list of accounts filled with a bunch of fake ETH.
How convenient!
- We need to install one final plugin to that allows us to leverage the full power of the Chai library. Open your original terminal, and run:
npm install --save-dev @nomicfoundation/hardhat-chai-matchers
- This will add some Ethereum specific capabilites to the Chai library. We will look into this in more detail below. Finally, open
hardhat-config.jsand add this line to the top of the file:
require("@nomicfoundation/hardhat-chai-matchers");
- We are now ready to test our Solidity code.
- Open the test folder, and delete any files present inside. Create a new file by the name of
Lottery.jsand add the following code inside:
const { expect } = require("chai");
const hre = require("hardhat");

describe("Lottery", function () {

    let owner, player1, player2, lottery;

    before(async () => {

        [owner, player1, player2] = await ethers.getSigners();
        provider = await ethers.getDefaultProvider();
        const Lottery = await hre.ethers.getContractFactory("Lottery");
        console.log("Deploying Contract for testing.......")
        lottery = await Lottery.deploy();
        await lottery.deployed();
    });

    it("Should set owner correctly", async function () {

        const ownerAddress = await lottery.owner();
        console.log("owner from contract is : ", ownerAddress);
        expect(await ownerAddress).to.equal(owner.address);
    });

    it("Non-owner shouldn't be able to start lottery", async function () {

        await expect(lottery.connect(player1).startLottery()).to.be.revertedWith("Only owner can call this function");
    });

    it("Should start lottery event", async function () {

        let lotteryInProgress = await lottery.lotteryInProgress();
        console.log("Current value of lotteryInProgress is : ", lotteryInProgress);
        await lottery.startLottery();
        console.log("New value of lotteryInProgress is : ", await lottery.lotteryInProgress());
        expect(await lottery.lotteryInProgress()).to.equal(true);
    });

    it("Player 1 should be 1st participant", async function () {

        await lottery.connect(player1).enterLottery({ value: ethers.utils.parseEther("2.0") });
        let participant1 = await lottery.players(0);

        player1Balance = await ethers.provider.getBalance(player1.address);
        console.log("Remaining ETH with player1: ", player1Balance / (10 ** 18));
        expect(participant1).to.equal(player1.address);
    });

    it("Player 2 should be 2nd participant", async function () {

        await lottery.connect(player2).enterLottery({ value: ethers.utils.parseEther("3.0") });
        let participant2 = await lottery.players(1);
        player2Balance = await ethers.provider.getBalance(player2.address);
        console.log("Remaining ETH with player2: ", player2Balance / (10 ** 18));
        expect(participant2).to.equal(player2.address);
    });
    it("pickWinner() function should not be called by non-owner", async function () {

        await expect(lottery.connect(player1).pickWinner()).to.be.revertedWith("Only owner can call this function");
    });

    it("pickWinner() function should work correctly", async function () {

        lottery.pickWinner();
        LotteryId = lottery.lotteryId();
        let Winner = await lottery.lotteryHistory(LotteryId);
        let WinnerBalance = await ethers.provider.getBalance(Winner);
        console.log("Winner is: ", Winner);
        console.log("Winner address is:", WinnerBalance / (10 ** 18));
        expect(await Winner).to.satisfy(function (anyWinner) {
            if ((anyWinner == player1.address) || (anyWinner == player2.address)) {
                return true;
            } else {
                return false;
            }
        });

    });

});
This is a lot. Let us go over this code and what it does carefully:
- The
describe()function comes to us via the mocha library. The describe function is basically used to group multiple tests together.
It typically contains multipleit()tests, which is also the case here.
- The
before()function is also provided by the mocha library. This function is executed once before the first test in any mocha script. Using this function, we deploy our smart contract to the blockchain, and use the lottery object from the function in the rest of the code.
it()functions are singular unit tests with a description to express their indiviual use. we have multipleit()tests in our code.
- At the end of each
it()test, we typically ‘assert’ something. An assertion is basically where you check whether or not your actual results match with your expected outcomes. The Chai library offers us many different kinds of assertions. You can read more about them from their official docs.
- You must have noticed that our smart contract uses a modifier named
onlyOwner(). The role of a modifier is to revert a function with a custom error whenever a require condition fails. Thechai-matchersplugin allows us to test these specific reverts, which wouldn’t be possible with only the default Chai library.
- Our last
it()function uses the.to.satisfyassertion to invoke a custom matcher function that ensures that the lottery winner is choosen only from amongst the two participants.
- Testing a smart contract is a thorough affair that must be conducted carefully. Feel free to tweak this code to add or remove tests as you see fit. The idea behind this section was to get you started with testing in Hardhat.
Once you are ready, save the file. In your main terminal, run:
npx hardhat test --network localhostThis command will run your test scripts on the Hardhat network, provided you actually have the network running on your system. We did that when we ran the npx hardhat node command.
This is what your terminal should look like now:

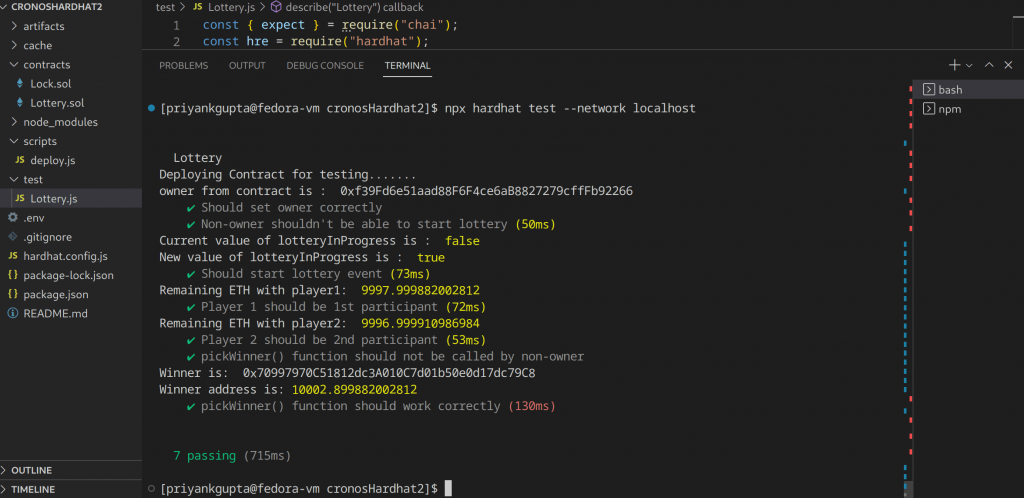
All our tests are passing, we are now ready to deploy our smart contract to a live network.
Deploying our smart contract
We now have our private keys ready to go and have tweaked the config file as per our requirements. We also just tested our smart contract that is now ready to go.
This is good stuff already. However, to actually deploy a smart contract through Hardhat, we need to create a deployment script.
Inside the scripts folder, go to deploy.js and delete everything inside it.
Now paste the following code inside the same file:
const hre = require("hardhat");

async function main() {
  const CronosLottery = await hre.ethers.getContractFactory("Lottery");
  console.log("Deploying your contract, please Wait.....");
  const cronosLottery = await CronosLottery.deploy();
  await cronosLottery.deployed();

  console.log("CronosToken deployed to:", cronosLottery.address);
}

main()
  .then(() => process.exit(0))
  .catch((error) => {
    console.error(error);
    process.exit(1);
  });
This is a simple deploy script. We access the deploy function through Hardhat’s runtime environment.
To run the deploy script, open your terminal and run:
npx hardhat run --network Cronos_testnet scripts/deploy.jsWe log the address of the contract we just deployed in our console.
Go to Cronos testnet explorer and search for your contract address. You will notice that the contract code is not yet visible. That is because we haven’t verified our contract. Let us move on to that.
Verifying our smart contract
To verify our contract through Hardhat’s command line, we need to use Hardhat’s verify command. We will pass the address of the deployed contract along with the RPC URL of the blockchain network.
If you recall, we have already defined a Cronos testnet inside our config file.
Open your terminal, and run:
npx hardhat verify --network Cronos_testnet {Contract Address}This might take a while, but Hardhat will return a link to your verified contract in the terminal if the verification is successful. Open the link and you should now be able to interact with the contract right from the Cronos testnet explorer itself.
Conclusion
In this article, we learned how to set up a Hardhat project and how to deploy and verify a smart contract on Cronos testnet.
Please note that you can tweak the parameters inside Hardhat’s config file to deploy and verify the same contract on Cronos mainnet with a few minor changes. The Cronoscan API key works for both the mainnet and the testnet.
If you are interested in exploring Cronos further, you can deploy your own Cronos node with Chainstack and work with that, or you may just head over to our blog for some more cool web3 tutorials.
Happy coding!
- Discover how you can save thousands in infra costs every month with our unbeatable pricing on the most complete Web3 development platform.
- Input your workload and see how affordable Chainstack is compared to other RPC providers.
- Connect to Ethereum, Solana, BNB Smart Chain, Polygon, Arbitrum, Base, Hyperliquid, Tempo, MegaETH, Monad, Plasma, Avalanche, Optimism, Scroll, Aptos, Cronos, Gnosis Chain, Kaia, Moonbeam, Celo, Aurora, TON, Ronin, and Bitcoin mainnet or testnets through an interface designed to help you get the job done.
- Fast access to blockchain archive data and gRPC streaming on Solana.
- To learn more about Chainstack, visit our Developer Portal or join our Telegram group.
- Connect your AI agent to Chainstack in seconds using Chainstack MCP — give Claude, Cursor, Codex, Gemini, and Windsurf live access to blockchain data, node management, and docs.
- Are you in need of testnet tokens? Request some from our faucets. Sepolia faucet, Base Sepolia faucet, Solana devnet faucet, Hoodi faucet, BNB faucet, zkSync faucet, Scroll faucet, Hyperliquid faucet, Monad faucet, Amoy faucet, Plasma faucet, TON faucet.
Have you already explored what you can achieve with Chainstack? Get started for free today.