Ethereum
 Solana
 Hyperliquid
 Arbitrum
 Base
Base BNB Smart Chain
 Tempo
Tempo Monad
Monad Avalanche
 Aptos
Aptos TRON
TRON Ronin
Ronin zkSync Era
 Optimism
 Sonic
Sonic Polygon
 Unichain
 Fantom
 Gnosis Chain
 Sui
Sui Avalanche Subnets
 Polygon CDK
 Starknet Appchains
 zkSync Hyperchains


How to deploy a self-hosted Ethereum node with Chainstack
Running your own Ethereum node gives you full control over infrastructure, data locality, and performance. With Chainstack Self-Hosted, you can deploy and manage Ethereum nodes on your own environment using the same control plane experience as Chainstack’s managed offering—without handing over your infrastructure.
This guide walks you through deploying a self-hosted Ethereum Hoodi node using Chainstack Self-Hosted, from prerequisites to a running node.
Node deployment options
There are several common ways to run a self-hosted Ethereum node:
| Running a node via DIY tooling | Running nodes with Chainstack Self-Hosted |
|---|---|
| Managed using self-managed tools and scripts | Managed through a centralized web-based control panel |
| Requires manual configuration, monitoring, and ongoing maintenance | Supports running and operating multiple nodes from a single interface |
| Typically used for individual nodes or custom, small-scale setups | Provides centralized visibility and easier operational control |
The DIY approach works well for custom or small-scale setups, while Chainstack Self-Hosted is better suited for teams that need centralized control, scalability, and consistent node operations.
What is Chainstack Self-Hosted?
Chainstack Self-Hosted is a control plane for deploying and managing blockchain infrastructure on your own hardware or cloud environment. It lets you run blockchain nodes on premises or in private infrastructure while keeping operational workflows simple and consistent.
Key capabilities include:
- Full infrastructure control over where and how nodes run.
- Simplified deployment through a web-based control panel.
- Enterprise-grade architecture built on Kubernetes.
- Ethereum Mainnet and Testnet support using the Reth execution and Prysm consensus client.
At the moment, Chainstack Self-Hosted supports the following Ethereum configurations:
- Protocol: Ethereum
- Network: Mainnet, Sepolia, Hoodi
- Client: Reth + Prysm
- Node type: Full node
Additional protocols and networks are planned for future releases.
Ethereum Hoodi node requirements
Before starting the deployment, make sure your infrastructure meets the minimum requirements for an Ethereum Hoodi full node. For detailed system requirements, see the full list in the documentation here.
| Resource | Minimum | Recommended |
|---|---|---|
| CPU | 4 cores | 6+ cores |
| RAM | 16 GB | 32 GB |
| Storage | 250 GB NVMe SSD | 500 GB NVMe SSD |
Insufficient resources will significantly increase sync time and may lead to instability during operation.
How to run an Ethereum Hoodi node — step-by-step
First, install Chainstack Self-Hosted following our installation guide.
Step 1: Access the deployment wizard
- Log in to the Chainstack Self-Hosted Control Panel.
- Navigate to the Nodes section.
- Click Add node to start the deployment wizard.
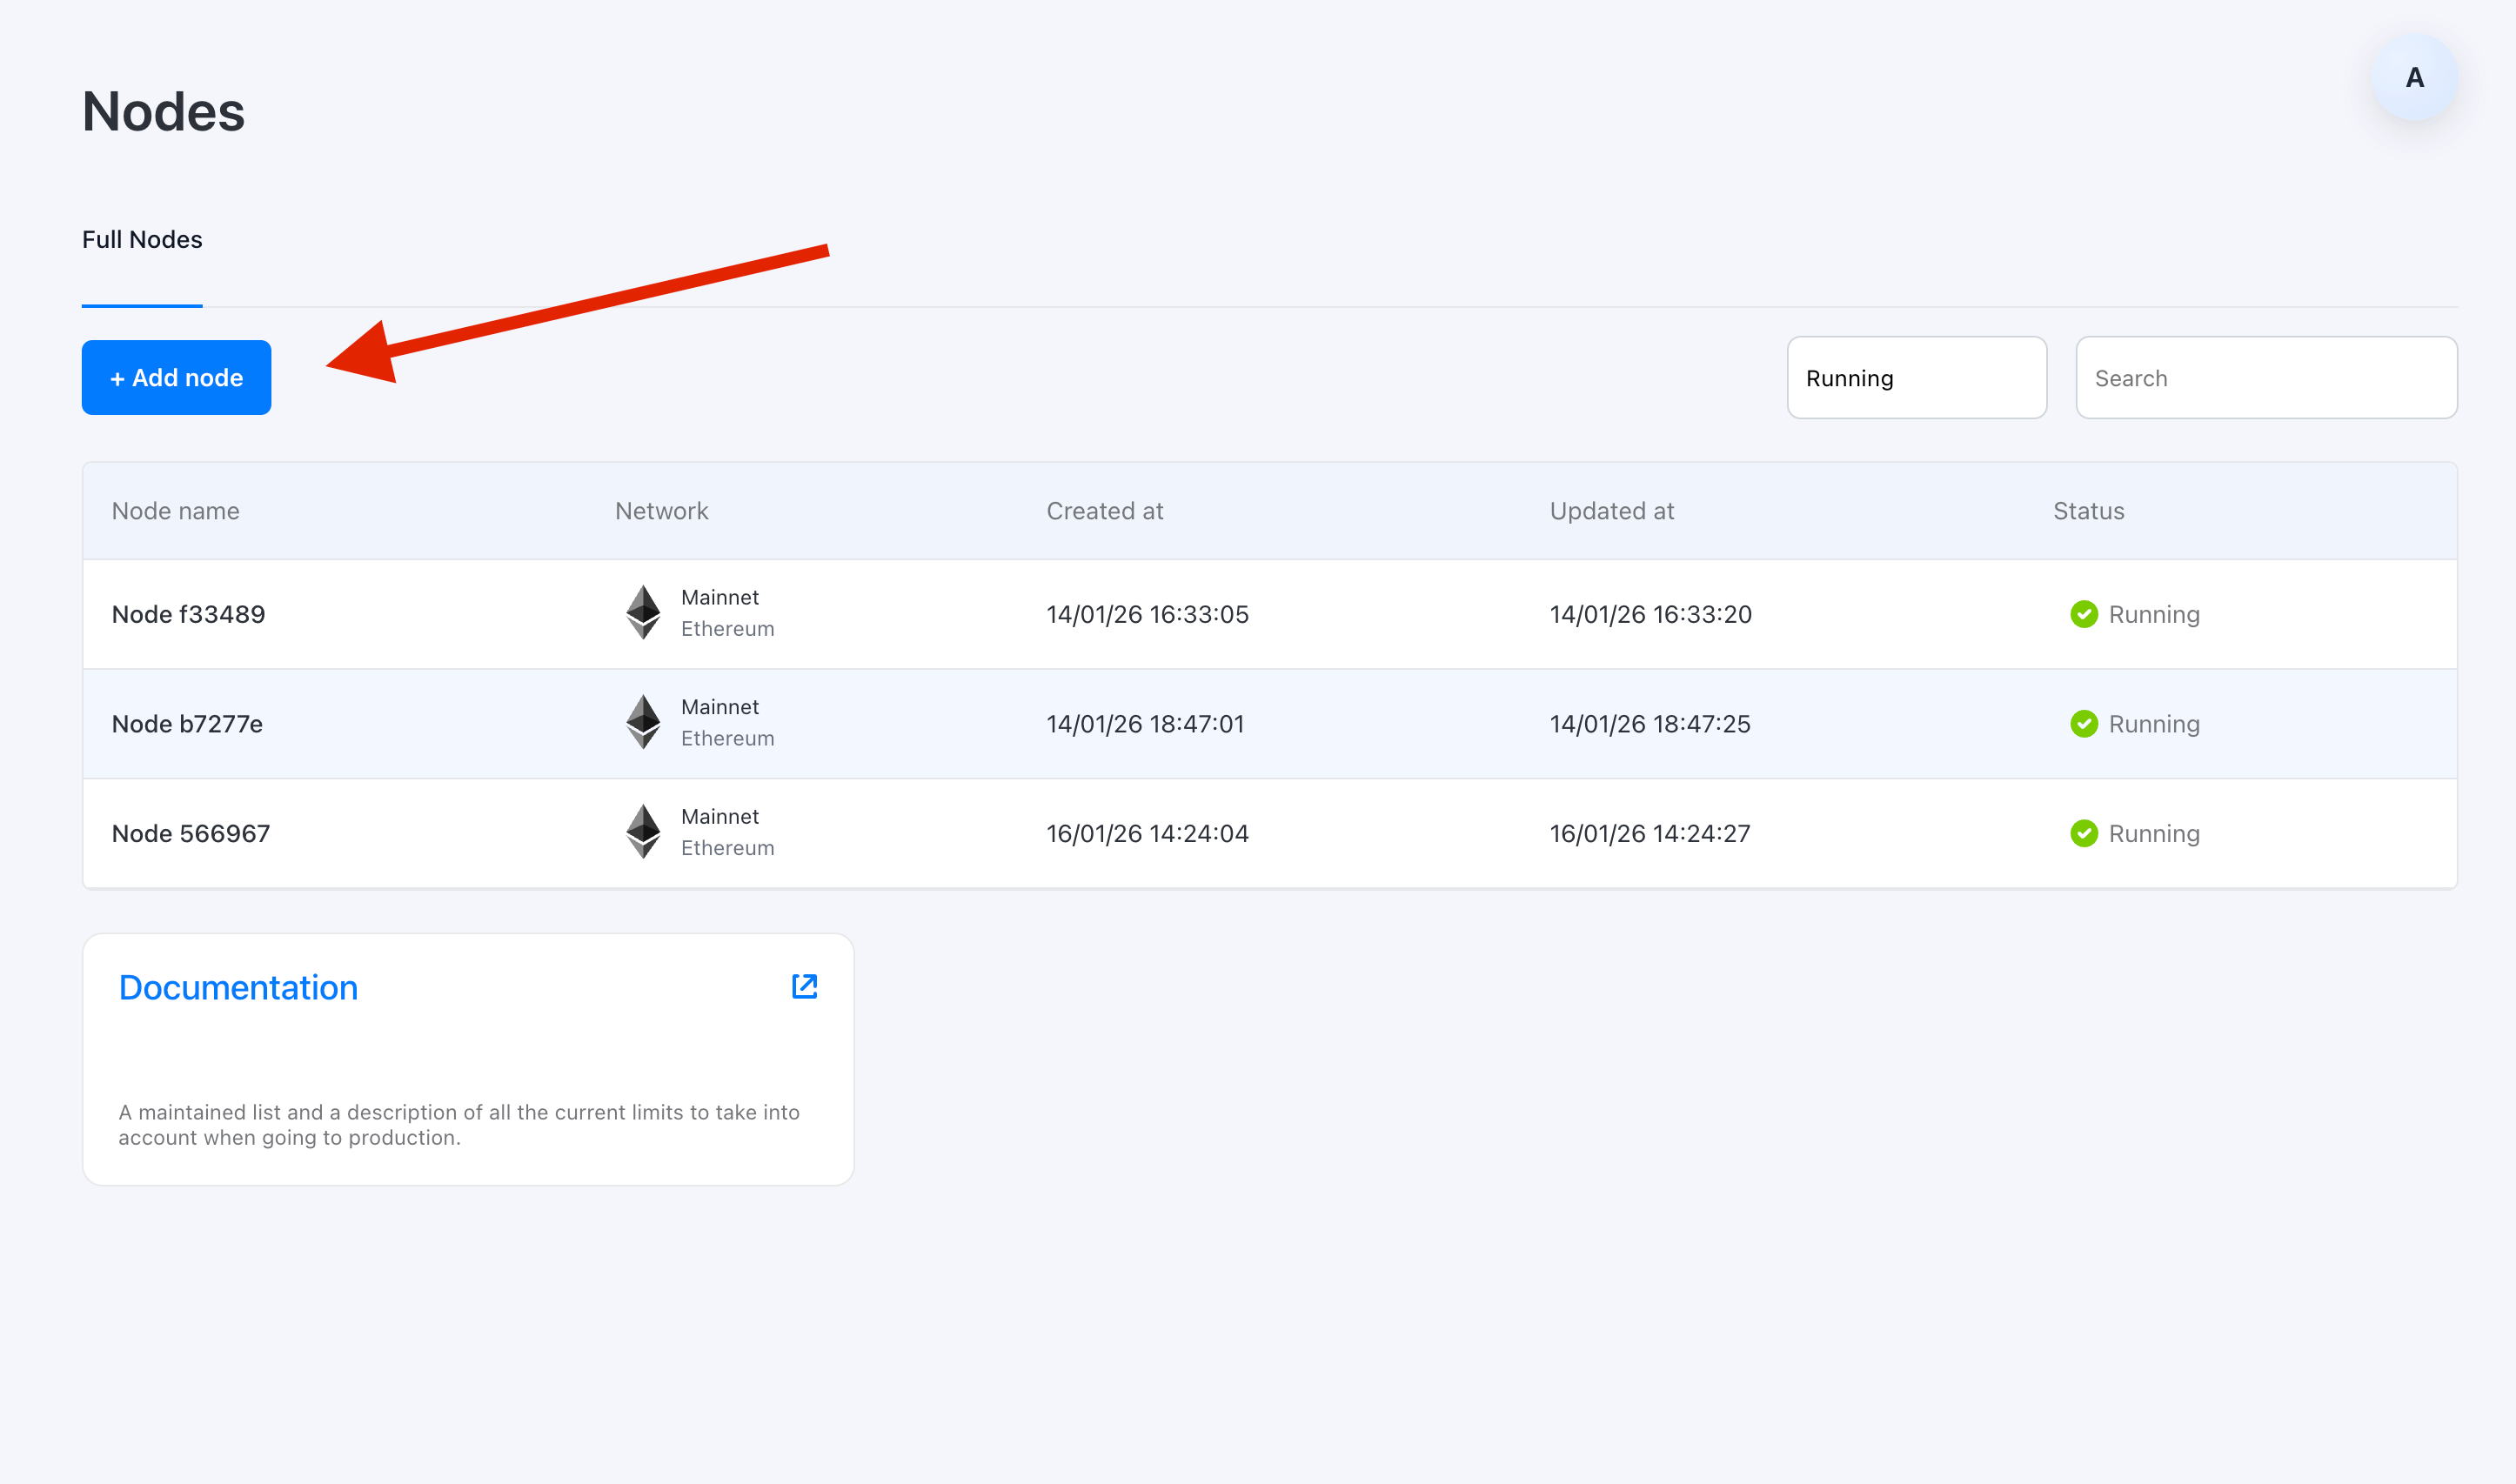
This wizard guides you through protocol selection, configuration, and deployment review.
Step 2: Select protocol and network
- Choose Ethereum as the protocol.
- Select Hoodi as the network.
⚠️ Chainstack Self-Hosted currently supports Ethereum Mainnet, Sepolia and Hoodi Testnets.

Step 3: Configure node settings
Select the available deployment configuration preset:
- Ethereum Hoodi Reth + Prysm
This preset defines both the execution and consensus clients and applies recommended defaults optimized for performance and stability.

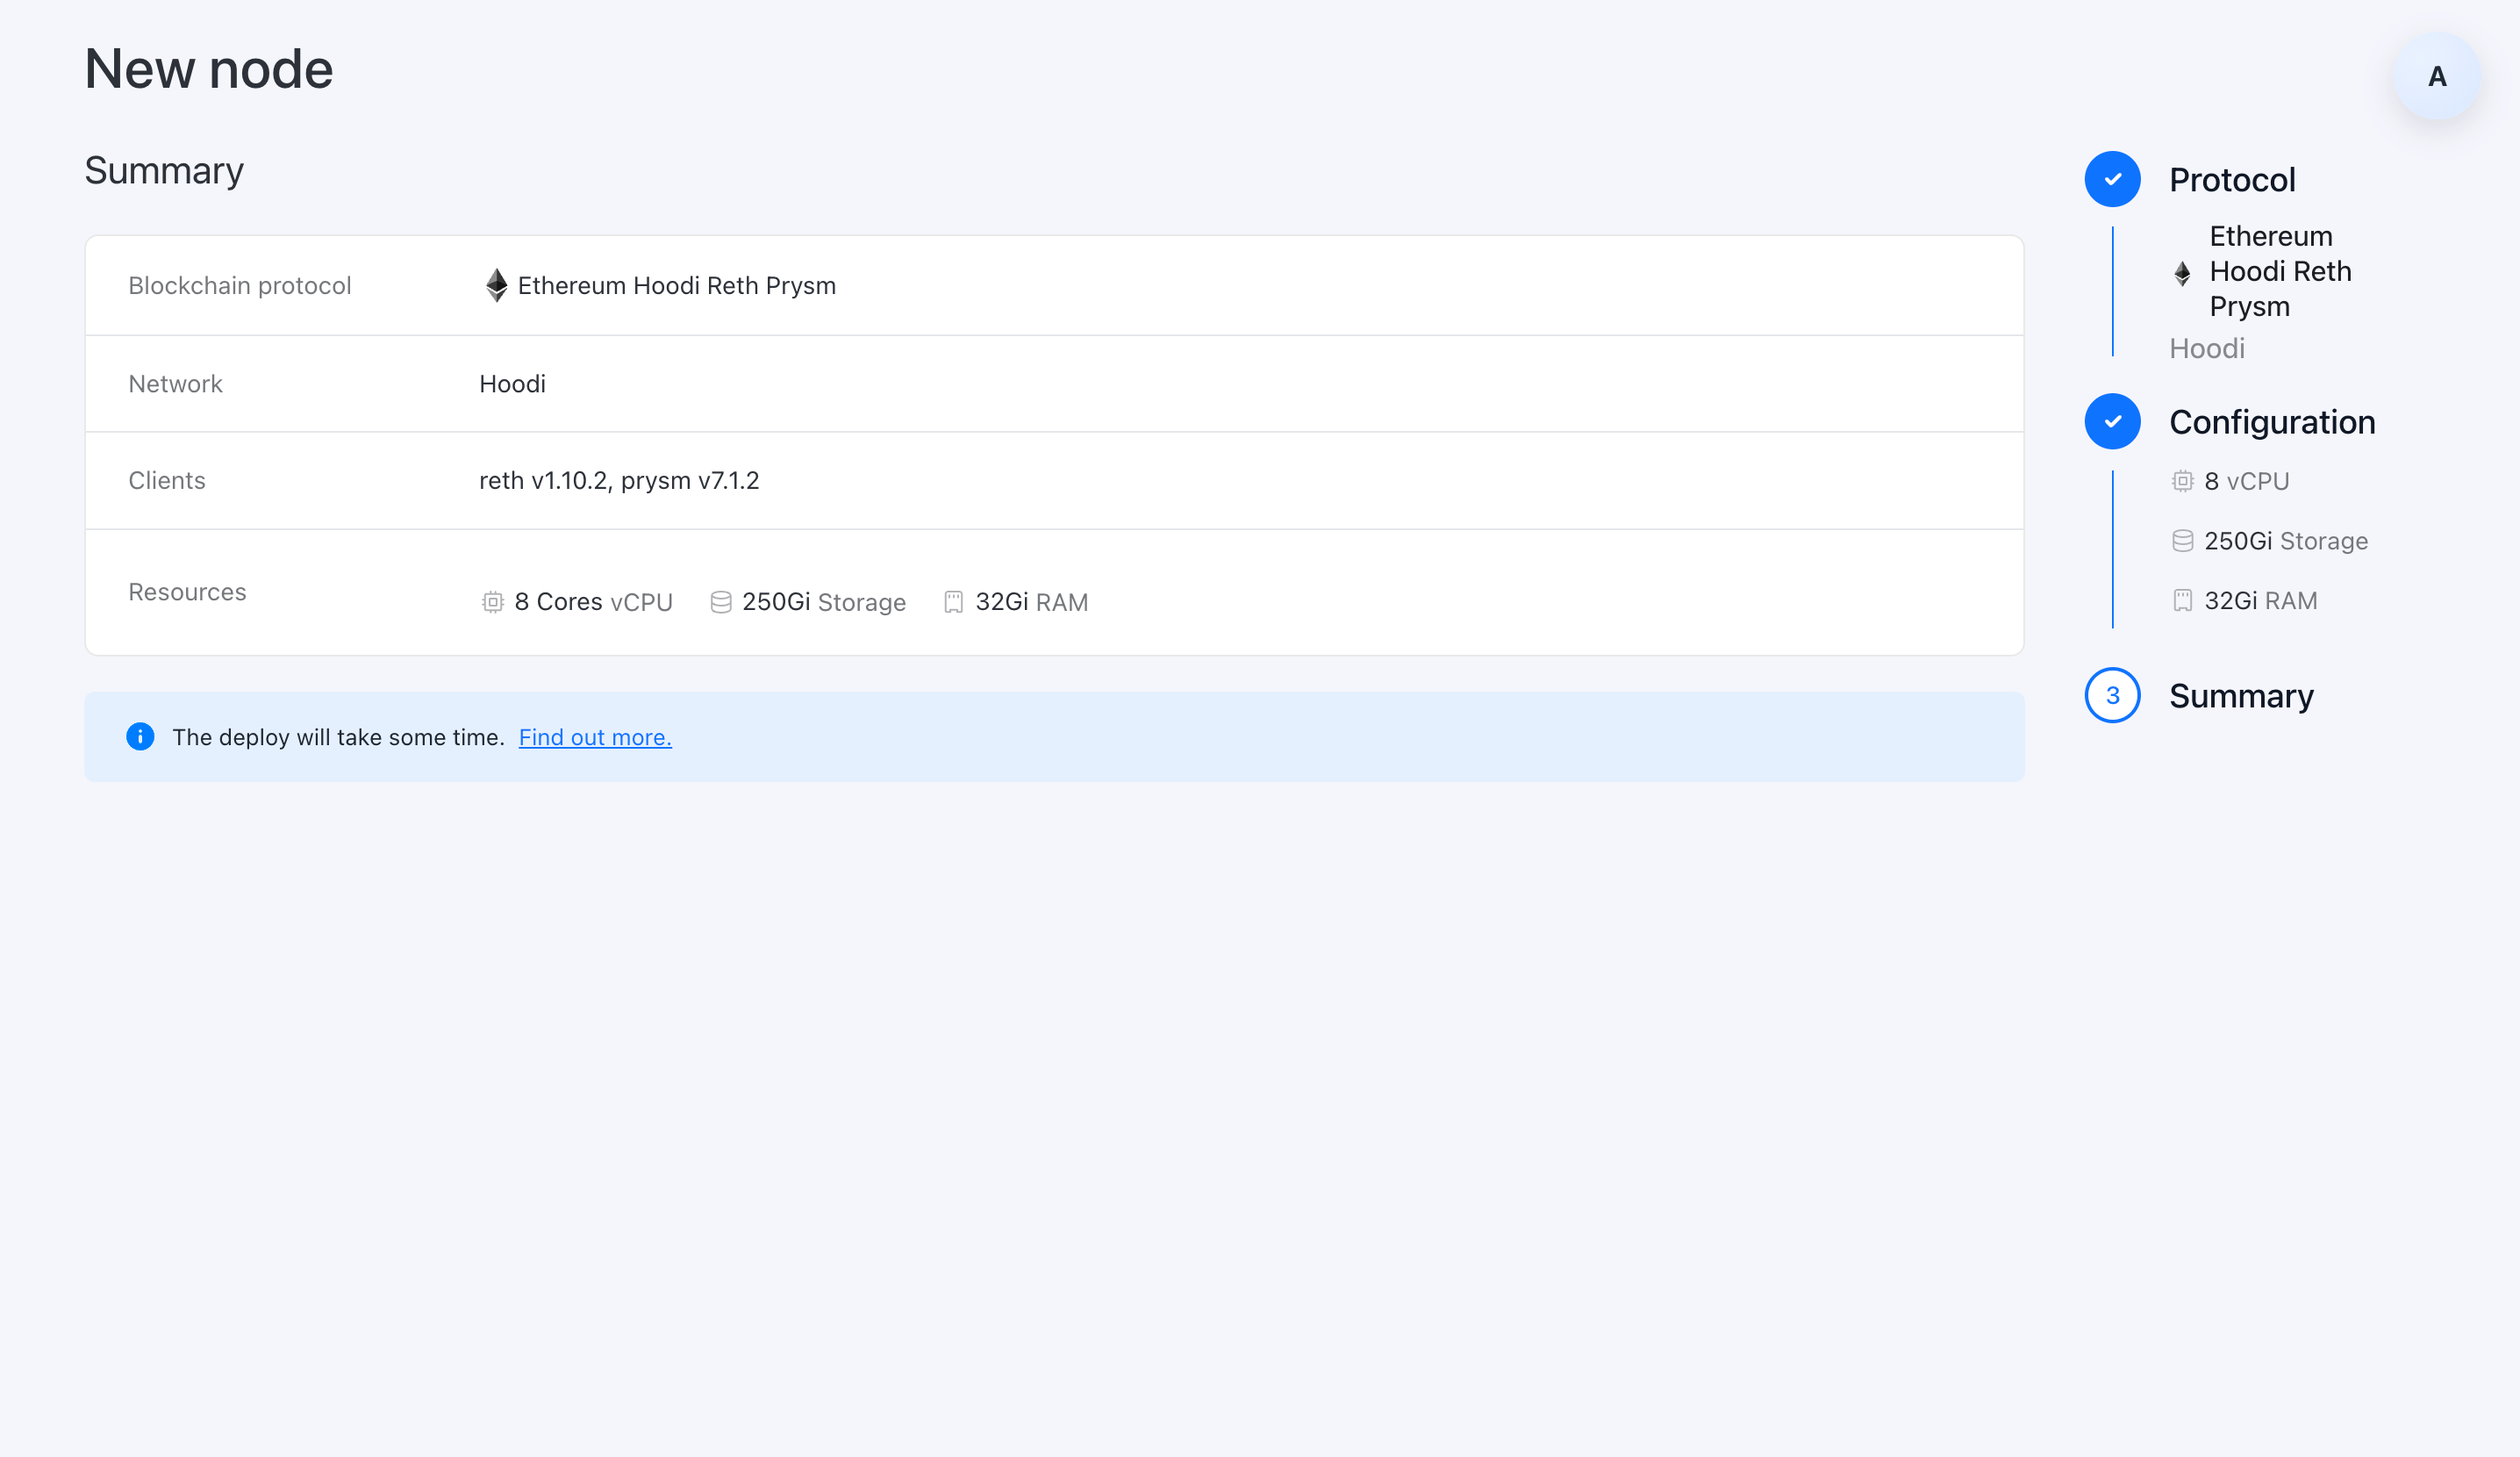
Step 4: Review and deploy
- Review your node configuration and resource allocation.
- Click Create node to start the deployment.
Once confirmed, Chainstack Self-Hosted provisions resources and begins configuring the node automatically.
Deployment phases
After deployment starts, the node progresses through several phases:
| Phase | Description | Duration |
|---|---|---|
| Bootstrapping | Resources are allocated, client software is configured | 2-5 minutes |
| Pending | Node synchronizes with the network | 2-5 days |
| Running | Node is fully operational | Continuous |
Initial sync times
Initial synchronization time depends on hardware specifications:
| Hardware tier | Approximate sync time |
|---|---|
| Minimum spec (4 CPU, 16GB RAM, 2TB SSD) | 3-5 days |
| Recommended spec (6+ CPU, 32GB RAM, 4TB SSD) | 2-3 days |
Snapshot-based deployment to reduce initial sync time is planned for H1 2026.
After deployment
Once the node reaches Running status:
- Open the node details page in the Control Panel.
- Retrieve connection information.
- Start using the node in your applications for reads, writes, indexing, or internal tooling.
⚠️ Endpoint access
Node endpoints are available only from within the Kubernetes cluster.
To achieve consistently low latency (around 1 ms), endpoints are exposed internally and are not accessible over the public internet. To use the node, deploy your applications in the same cluster or connect through a private network.
At this stage, the node behaves like a production Ethereum full node and runs entirely within your own infrastructure.
Production readiness and beta status
Chainstack Self-Hosted is currently in beta. It is recommended for:
- Development and testing environments.
- Proof-of-concept deployments.
- Infrastructure evaluation and internal trials.
Production readiness is planned for later in 2026.
Choosing the right Ethereum RPC approach
Deploying a self-hosted Ethereum node no longer requires weeks of manual setup and operational overhead. With Chainstack Self-Hosted, you get a streamlined deployment workflow while retaining full control over infrastructure, data, and network access.
If you need Ethereum nodes that meet internal compliance, security, or data residency requirements, Chainstack Self-Hosted provides a practical path to self-managed blockchain infrastructure—without sacrificing usability.
In other cases, teams may prefer a managed approach. Getting started with Ethereum on Chainstack is fast and straightforward — deploy a reliable node in seconds through an intuitive console, no hardware or complex setup required.
With 99.99% uptime, 24/7 SLA-backed operations and low-latency global endpoints, Chainstack ensures seamless RPC access for building and scaling DeFi, analytics, and trading applications.
FAQ
Chainstack Self-Hosted brings the power of Chainstack’s blockchain infrastructure platform to your own infrastructure. Deploy, manage, and monitor blockchain nodes on your own hardware or cloud environment while maintaining complete control over your data and infrastructure.
Ethereum Mainnet node:
– 4 CPU cores, 16 GB RAM, 2 TB NVMe SSD
Control Panel + Ethereum Mainnet node:
– 6 CPU cores, 18 GB RAM, 2+ TB NVMe SSD
The beta is open to individual developers and teams running, or planning to run, self-hosted nodes in staging or production environments. We review applications and onboard users in batches to ensure deployment support and collect actionable feedback.
Fill out the beta signup form: Join the Chainstack Self-Hosted Beta
Minimum (4 CPU, 16GB, 2TB SSD) – Approximate time 3-5 days
Recommended (6+ CPU, 32GB, 4TB SSD) – Approximate time 2-3 days
Looking for more details?
If you want to learn more about self-hosted nodes, supported protocols, or quick start, refer to the Chainstack official documentation.