


TL;DR
Your market-making strategy can be perfect, but if your RPC endpoint stalls for 800ms during a swap, the price you priced against is already gone. Hummingbot v2.15.0 added Chainstack as a native RPC provider in Gateway, so the same bot can place orders on Solana DEXs and EVM DEXs through a single Platform API key — no juggling Helius for Solana and Infura for Ethereum and hoping both stay healthy. This guide walks through installing Hummingbot, wiring up a Chainstack key for Solana and the EVM lineup Gateway supports, and running your first swap.
Why RPC is the silent variable in DEX trading
Most Hummingbot guides focus on the strategy layer — spreads, inventory skew, candle indicators, executor configs. That’s the part you control. The part you don’t control is the RPC endpoint sitting between your strategy and the chain, and on a DEX it absorbs more failure modes than any other component.
When Hummingbot decides to place a limit order on a CEX, the trade is a single HTTP request to the exchange’s API. When it decides to swap on Uniswap or Raydium, the same intent fans out into a dozen RPC calls: pool state reads, quote simulation, balance checks, transaction construction, simulation, broadcast, and confirmation polling. Every one of those calls is a chance for the endpoint to time out, return stale data, or rate-limit you mid-sequence.
The failure modes get worse the closer you get to production:
- A public Solana endpoint enforces 100 requests per 10 seconds per IP, and 40 per single RPC method in the same window. A single Jupiter route lookup can burn that budget before the bot decides whether to trade.
- Public EVM endpoints frequently disable
eth_getLogsover wide ranges, which breaks any strategy that reconstructs historical fills. - Shared “free tier” private endpoints from any provider compete for capacity with hundreds of other tenants — your latency spikes correlate with their traffic, not yours.
The bot doesn’t know any of this. It sees a hung promise or a 429, retries, and by the time it succeeds, the spread it was working against has moved. You pay for that gap in slippage, missed fills, or wrong-side inventory.
What v2.15.0 actually changed
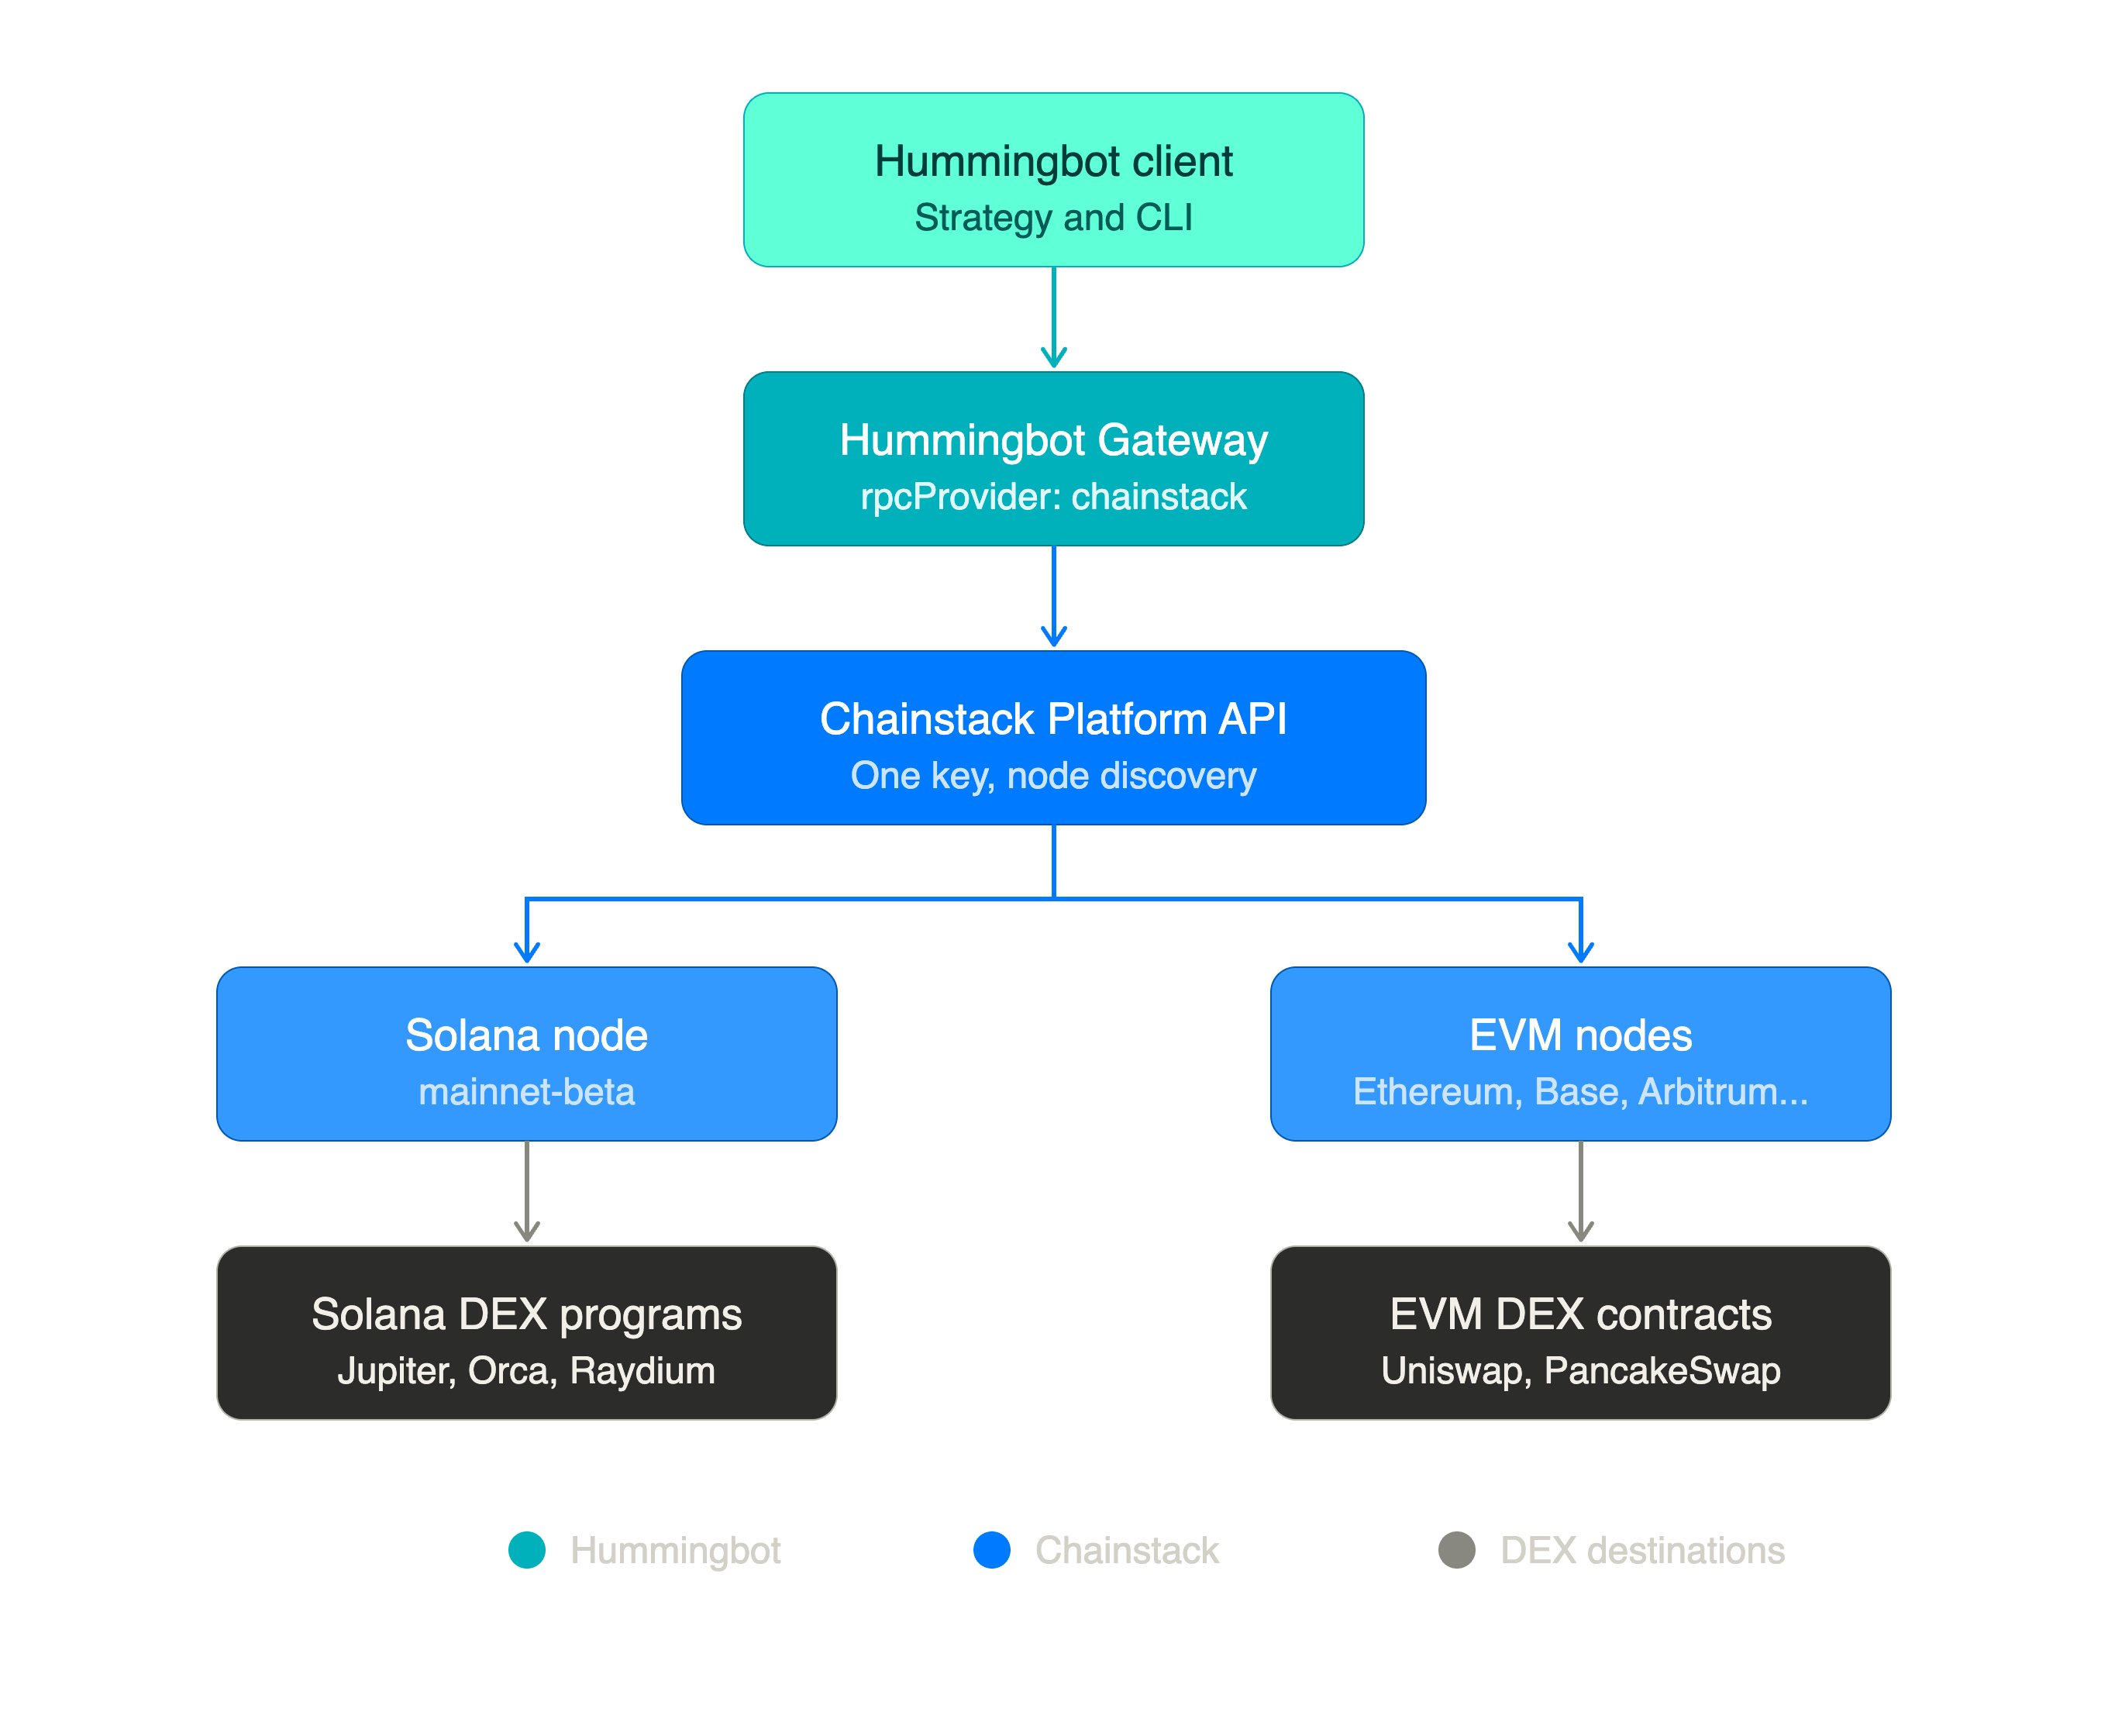
Hummingbot Gateway is the middleware that sits between the main Hummingbot client and the on-chain world — it standardizes DEX endpoints across Solana and the EVM family into one API. Until late 2025, Gateway shipped with a hardcoded notion of an RPC endpoint: one nodeURL per network, defined in conf/chains/<chain>.yml.
In v2.9.0 the team refactored that into a provider abstraction. Instead of just a URL, each chain config could point at a named provider, with the credential stored centrally. The first two providers wired into the new system were Helius (Solana) and Infura (EVM). That worked, but it left a structural awkwardness: anyone running a multi-chain bot had to maintain credentials with two different vendors, each with its own dashboard, its own billing, and its own definition of what “uptime” meant.
v2.15.0 closed that gap by adding Chainstack as a native provider that covers both sides — Solana and the EVM lineup — through a single account and a single Platform API key. Quoting the Hummingbot Foundation’s June 2026 release announcement: Gateway adds Chainstack as a cross-chain RPC provider for Solana and EVM networks for lower latency and more reliable swap execution.
There’s a subtle but important architectural difference in how Chainstack integrates. Helius and Infura are URL-templated providers: Gateway has a hardcoded URL pattern for each, and your API key gets substituted into it at runtime. Chainstack works differently — Gateway calls the Chainstack Platform API at startup and routes traffic to a node you’ve already deployed in your Chainstack project. The Hummingbot docs describe it as API-driven node discovery, and the practical effect is that as Gateway adds support for new chains, your existing Chainstack credential automatically covers them as long as you have a node deployed.
What “multi-chain” actually means here
This is worth being precise about, because every RPC provider claims it. And the precise version is more interesting than the marketing version.
Helius is a Solana specialist — excellent at Solana, with optimized transaction sending, WebSocket monitoring, and Jito tip support, but it doesn’t serve any EVM network. If your Hummingbot setup trades Raydium and Uniswap, Helius covers half of it.
Infura, conversely, is an EVM specialist. Through Gateway it currently supports Ethereum mainnet, Arbitrum, Avalanche, Base, BNB Chain, Celo, Polygon, and Sepolia — but no Solana. So the other half of the same bot needs a different vendor.
Chainstack through Gateway covers the same EVM lineup plus Solana, all behind one credential. Per the official Hummingbot RPC providers doc, the currently-routable networks are:
- EVM: ethereum mainnet, arbitrum, polygon, optimism, base, avalanche, bsc, celo, sepolia
- Solana: mainnet-beta, devnet
That’s the version of “multi-chain” that matters for a Hummingbot operator today: one provider, one credential, every chain Gateway can talk to. Beyond Gateway, Chainstack runs nodes on 70+ networks — the broader Hyperliquid, Berachain, Unichain, Linea, Katana ecosystem — and as Hummingbot Gateway adds support for those chains, the same credential covers them without re-onboarding.
Prerequisites
Before installing anything, get the accounts in order.
- A machine with at least 4 GB RAM and Docker installed. Hummingbot officially supports Linux, macOS, and Windows via Docker. Source builds work too but Docker is the path of least resistance.
- A Chainstack account — the free Developer plan is enough to walk through this tutorial, and gives you 3M request units per month with 25 RPS, which covers a single low-frequency bot. For production scale you’ll want the Growth or Pro tier, which unlock Trader Nodes for Solana and higher RPS ceilings across EVM chains.
- A wallet with a tiny amount of native gas on whichever chain you plan to trade first — SOL for Solana, ETH for Ethereum, MATIC for Polygon, and so on. Use a fresh wallet for this; never point Hummingbot at a private key holding meaningful funds while you’re still learning the configs.
Setting up Chainstack in Gateway
Step 1 — Install Hummingbot and Gateway
Hummingbot ships as two coordinated services: the Python-based client (which runs your strategy and CLI) and the TypeScript-based Gateway (which talks to chains and DEXs). For DEX trading you need both.
The cleanest install is via the official Docker deployment scripts. Clone the repo and run the bootstrap:
git clone https://github.com/hummingbot/deploy-examples.git
cd deploy-examples/hummingbot_files
./create.sh
The script asks for an instance name, a config password, and which version to pull. Pick latest or version-2.15.0 explicitly. Once it finishes, the Hummingbot client is running in a Docker container and you can attach to it with:
docker attach hummingbot
Gateway is a separate container that the client expects on a known port (15888 by default). The same deploy-examples repo has a gateway_files directory with its own create.sh. Run it the same way and accept the defaults. When both containers are up, the Hummingbot client header should show GATEWAY: 🟢 ONLINE in the upper right. Run gateway ping to confirm — you should see your chains responding through their default public RPC endpoints. That’s the baseline state we’ll improve.
Step 2 — Deploy a Chainstack node
Chainstack’s Gateway integration uses API-driven discovery, which means Gateway will look up your project’s deployed nodes at startup rather than reading hardcoded URLs from your config. So before you touch any YAML, deploy at least one node for each chain you plan to trade.
Log into the Chainstack console and create a project. Inside the project, click Add node and pick the networks you want Hummingbot to use. For a multi-chain bot a reasonable starting set is:
- Solana mainnet Global Node — geo-load-balanced across regions.
- Ethereum mainnet Global Node — for any Uniswap V3 or V4 strategy.
- Base mainnet Global Node — a lot of current Hummingbot DEX volume lives on Base.
Each node provisions in seconds. You don’t need to copy the per-node URLs anywhere — Gateway will discover them automatically once you give it the Platform API key in the next step. (You can still grab the URLs for debugging or for non-Gateway scripts; they live under the node’s Access & credentials tab.)
Step 3 — Create a Chainstack Platform API key
This is the credential Gateway actually needs. It’s different from the per-node authorization keys you see in the access tab — it’s a platform-level token that lets Gateway enumerate your project’s nodes.
Open console.chainstack.com/user/settings/api-keys, click Create key, give it a descriptive name (e.g. “Hummingbot Gateway”), and copy the generated key. Store it somewhere — you’ll need it once, in the next step.
⚠️ Treat the Platform API key like a deployment credential, not a per-application API key. It can list and read all nodes in your account. Don’t paste it into a public repo or share it across machines you don’t control.
Step 4 — Wire Chainstack into Gateway
Gateway as of v2.11+ centralizes all third-party API keys in one file: conf/apiKeys.yml. This is a change worth flagging — earlier docs (and earlier blog posts) referred to per-provider files like conf/rpc/helius.yml and conf/rpc/infura.yml, but the current pattern is one flat keys file plus a rpcProvider switch in each chain config.

The wire-up is three steps, all run from inside the Hummingbot client.
1. Add the Chainstack key to apiKeys.yml:
gateway config apiKeys update
When prompted, set the chainstack value to the Platform API key you just generated. Equivalently, edit conf/apiKeys.yml directly:
chainstack: 'YOUR_CHAINSTACK_PLATFORM_API_KEY'
2. Switch each chain’s provider to Chainstack:
gateway config ethereum update
# When prompted for rpcProvider, change from `url` to `chainstack`

gateway config solana update
# Same — change rpcProvider from `url` to `chainstack`
The url value here is Gateway’s term for “use the literal nodeURL from the chain config” — i.e., the default public endpoint. Switching to chainstack tells Gateway to ignore that URL and route through the discovery flow instead.
You can also edit the YAMLs directly. The result should look like this:
# conf/chains/solana.yml
defaultNetwork: mainnet-beta
rpcProvider: chainstack
# conf/chains/ethereum.yml
defaultNetwork: mainnet
rpcProvider: chainstack
Note what’s not in those files — no endpoint URLs, no per-network entries, no per-node auth tokens. That’s the discovery flow in practice: the only Chainstack-specific thing Gateway needs to know is “use Chainstack,” and the Platform API key in apiKeys.yml does the rest.
3. Restart Gateway and verify.
Gateway re-reads its config on restart and resolves your nodes through the Platform API. Watch the startup logs — you should see Chainstack discovery announcing the nodes it found:
Chainstack API key configured
Chainstack service initialized: node ND-123-456-789 (solana/solana-mainnet) for solana/mainnet-beta
Solana (defaultNetwork: mainnet-beta): Block #427,223,441
Chainstack service initialized: node ND-987-654-321 (ethereum/ethereum-mainnet) for ethereum/mainnet
Ethereum (defaultNetwork: mainnet): Block #25,342,330
The ND-... identifiers are your Chainstack node IDs — same ones visible in the console. If you see them in the log, discovery worked.
Confirm a chain is live with a status call directly to Gateway’s REST API:
curl "http://localhost:15888/chains/solana/status?network=mainnet-beta"
From inside the Hummingbot client, gateway ping shows the same thing in a friendlier format:
solana (mainnet-beta):
- RPC URL: https://<your-chainstack-solana-node>
- Current Block: 427223441
- Native Currency: SOL
- Status: ✓ Connected
If you don’t see Chainstack discovery in the logs, the usual suspects are: the API key wasn’t saved (re-run gateway config apiKeys update), the chain config still has rpcProvider: url instead of chainstack (check the YAML directly), or no node is deployed in your Chainstack project for the requested network (the discovery flow needs a running node to route to).
For the canonical step-by-step with the exact log output and curl verification commands, Chainstack publishes a dedicated walkthrough: Using Chainstack as a Hummingbot Gateway RPC provider. If anything in this section drifts out of date as Gateway evolves, that’s the source of truth.
Step 5 — Verify with a read-only swap quote
Before connecting a wallet — which means handing Hummingbot a private key — verify that quotes actually route through your Chainstack node. A quote is a read-only call: it asks the DEX what you’d get if you swapped, simulates the route against current chain state, and returns a price. No signature, no gas, no risk.
Hit Gateway’s REST API directly with curl. For Solana via Jupiter:
curl "http://localhost:15888/connectors/jupiter/router/quote-swap?network=mainnet-beta&baseToken=SOL"eToken=USDC&amount=1&side=SELL"
For Ethereum mainnet via Uniswap (this one needs a wallet address for routing logic, but no signing):
curl "http://localhost:15888/connectors/uniswap/router/quote-swap?network=mainnet&baseToken=WETH"eToken=USDC&amount=1&side=SELL&walletAddress=YOUR_WALLET_ADDRESS"
A successful response returns the output amount, the route, and the price impact. If you get one back, the full path works: Hummingbot client → Gateway → Chainstack-discovered node → Solana or Ethereum → DEX program/contract → and back. That’s the integration verified end-to-end without committing any capital.
Step 6 — Connect a wallet and run a real swap
Now you can connect a wallet and execute an actual trade.
gateway connect solana
gateway connect ethereum
Hummingbot will prompt for the wallet’s private key and store it encrypted with your config password. (Use a fresh, low-balance wallet, as noted in the prerequisites.)
Check balances to confirm the wallet sees its funds through the new endpoint:
gateway balance
Now run a real swap. Gateway’s swap command takes the form gateway swap <connector>/<type> [base-quote] [side] [amount]:
gateway swap jupiter/router SOL-USDC BUY 0.01
Or on Ethereum:
gateway swap uniswap ETH-USDC BUY 0.01
Gateway fetches the route from the DEX, simulates the transaction against your Chainstack-backed endpoint, and executes it. The same command shape works for raydium, orca, meteora, pancakeswap, and the rest of the connector lineup — Gateway abstracts the DEX, Chainstack abstracts the chain.
This is where the multi-chain story stops being theoretical. The exact same Hummingbot instance, with the same Platform API key, can route a swap on Solana and a swap on Base in the same trading session. There’s no provider switch, no second dashboard to check when something stalls.
Step 7 — Wire it into a strategy
A one-off gateway swap is just a connectivity test. The actual point of Hummingbot is the strategy framework — V2 strategies (PMM, XEMM, arbitrage, executors) that decide when to swap. Once Gateway is talking to Chainstack, every V2 strategy that uses a DEX connector inherits the new endpoint automatically. There’s no per-strategy config change.
A typical multi-chain market-making setup might run:
- A Uniswap V3 PMM controller on Base, quoting around a WETH-USDC pool.
- An Orca Whirlpool LP executor on Solana, providing concentrated liquidity around a SOL-USDC tick range.
- An arbitrage controller watching the price gap between the two and shifting inventory when it widens.
All three components talk to their chain through the same Chainstack-backed Gateway. The arbitrage executor benefits most: its edge depends on detecting the price gap before anyone else does, and the latency floor on a geo-routed Global Node — with sub-100ms reads in major regions — is what makes that detection viable.
If the strategy graduates into something genuinely latency-sensitive (sandwich-aware market-making, cross-DEX arbitrage with tight thresholds, MEV-adjacent flows), the natural next step is to upgrade the Solana node to a Trader Node and the EVM nodes to Dedicated Nodes. The Hummingbot config doesn’t change — the discovery flow just picks up the upgraded node next time Gateway restarts.
When to upgrade from the Developer plan
The free tier is a real plan, not a teaser — 3M request units per month, 25 RPS, 99.9% uptime, full access to every chain in the catalog. It’s enough for one bot running a moderate-frequency strategy on one or two chains.
You’ll know it’s time to upgrade when you start seeing these patterns:
- SPL token operations failing on Solana. This one’s not subtle — the Developer plan restricts
getProgramAccountsandgetTokenAccountsByOwner, which Gateway connectors use to read SPL token balances. If your bot trades anything other than native SOL on Solana, token-balance checks and parts of the swap flow will fail with a method-not-available error until you move to a paid plan. The fix is a paid Trader Node, which serves both methods without restriction. - 429s under burst load. Your bot is fine for hours, then a sudden market move spikes its request rate (re-quoting, re-simulating, cancelling old orders) past 25 RPS. Hummingbot retries gracefully, but every retry adds latency that costs you fills. The Growth plan moves the ceiling to 250 RPS, which absorbs most spikes. The official Hummingbot RPC docs explicitly recommend “upgrading to a paid tier” as one of the two fixes for rate-limit errors — the other being increasing your bot’s
tick_size. - Slot lag on Solana reads. If
getSlotfrom your endpoint is consistently 1–2 slots behind what you see on an explorer, you’re reading stale state and pricing against a world that’s already moved. A Trader Node deployed in your bot’s region typically eliminates that gap, with Warp Transactions and Jito ShredStream available for the send path. - Multiple bots, one endpoint. Each Hummingbot instance shares the rate limit. Two bots on the Developer plan compete for the same 25 RPS budget. The Unlimited Node add-on gives you a fixed RPS tier per node with no per-method billing — predictable cost regardless of how many bots are pointed at it.
The economic logic is straightforward: if your bot’s expected daily P&L is larger than a Growth subscription, the upgrade pays for itself in slippage avoidance alone.
Operational hygiene
A few things that aren’t strictly “setup” but separate the bots that survive their first month from the ones that don’t:
- Keep one node per network in the project tied to your Hummingbot key. Gateway picks the first running node it finds that matches the chain and network. If you have a Solana mainnet Trader Node and a Solana mainnet archive node in the same project, which one Gateway picks isn’t deterministic. Either use separate projects (and separate Platform API keys) for separate workloads, or keep the project Hummingbot reads from to one node per network.
- Run Gateway and the client on the same machine, in the same Docker network. Cross-machine setups introduce variable latency between the two services that compounds with chain latency. Localhost is free; use it.
- Monitor your Chainstack endpoints, not just your bot. The Chainstack console shows per-method RPS, error rates, and p95 latency. If your bot’s fill rate degrades, check the endpoint metrics first — it’s usually a symptom, not a cause.
- Use distinct API keys per environment. Don’t point your live bot and your backtest at the same Platform API key. Backtests can hammer historical RPC methods (
eth_getLogs,getSignaturesForAddress) hard enough to push you near rate limits and starve the live bot of capacity. Generate a separate key in the Chainstack console and route accordingly. - Set timeouts that match the chain. Solana’s
confirmRetryIntervaldefaults to 0.5s andconfirmRetryCountto 10 — that’s 5s of polling before Hummingbot gives up on a transaction. On a Trader Node you can tighten both. On a busy public chain like Ethereum during a congestion event, you may want to loosen them.
Why this matters beyond a release note
Adding a third RPC provider to a Hummingbot release notes page is, on the surface, an incremental update. What it actually changes is the architectural assumption that a DEX bot needs a different vendor for every chain class it touches.
That assumption was a real tax on Hummingbot operators. It meant two billing relationships, two dashboards, two sets of rate-limit math, two regional latency profiles to reason about, and two support channels to escalate to when something stalled at the wrong moment. For a hobbyist running one strategy on one chain it didn’t matter. For anyone running serious multi-chain inventory, it was friction that compounded with every chain added.
Collapsing that into one provider — one with SOC 2 Type II and ISO 27001 compliance, 99.99% uptime SLAs on paid tiers, and a single console showing latency across Solana, Ethereum, Base, Polygon, Arbitrum, BNB Chain, and the long tail of L2s — turns “multi-chain trading” from an operations problem back into a strategy problem. Which is what Hummingbot was supposed to be in the first place.
The full v2.15.0 release also shipped CLMM fixes for Orca and Meteora, a new Lighter perps connector, Hyperliquid stability improvements, and Tailscale support for private bot control. But the part worth migrating for, if you’re running any DEX strategy past prototype scale, is the one that makes “what RPC am I using?” a question you stop having to ask.
FAQ
v2.15.0 added Chainstack as a built-in RPC provider in Gateway, alongside the existing Helius (Solana) and Infura (EVM) integrations from v2.9.0. Chainstack is the only Gateway provider that covers both Solana and the full EVM lineup behind a single credential.
Helius is Solana-only and Infura is EVM-only — both use URL-templated configs where you paste a per-network endpoint. Chainstack uses API-driven node discovery: you provide one Platform API key and Gateway calls the Chainstack Platform API at startup to find your deployed nodes for each chain. One credential, both chain classes, no URLs to rotate.
No. One Chainstack Platform API key covers your entire account. As long as you’ve deployed nodes for the chains you want to trade, Gateway’s discovery flow routes each one automatically. That’s the multi-chain win versus running Helius and Infura side by side — one billing relationship, one dashboard.
A node endpoint authorization key is embedded in your RPC URL and authenticates HTTP calls to one specific node. A Platform API key is an account-level credential that lets Gateway enumerate all nodes in your project via the Chainstack Platform API. Gateway needs the Platform key — you create it under Settings → API keys in the Chainstack console.
Because the Chainstack Developer plan restricts getProgramAccounts and getTokenAccountsByOwner — the two Solana RPC methods Gateway connectors use to read SPL token balances. Any swap involving an SPL token (anything other than native SOL) will fail until you upgrade. The fix is a paid Trader Node, which serves both methods. The official Chainstack tutorial flags this explicitly in its troubleshooting section.
Three signals: (1) any Solana SPL token swap fails with a method-restriction error — not optional for production Solana trading; (2) bursts past 25 RPS during market events trigger 429s; (3) getSlot consistently lags 1–2 slots behind explorers. The Growth plan raises throughput to 250 RPS; a Trader Node eliminates slot lag and method restrictions both.